
How to Bulk Edit Price in Shopify (3 Easy Ways)
To bulk edit prices in Shopify, follow three simple methods: Use the built-in editor for quick manual changes, import or export a CSV file for spreadsheet updates, or install a free app like Revnous Bulk Price Editor.
You know how tedious and boring it is to manually update individual product prices. That is why you want to learn how to bulk edit price in Shopify.
Well, you found the right guide. It gives you practical methods to end your stress today.
You will learn three easy ways to bulk edit prices in your store. Read each step closely and try your preferred method.
How to Bulk Edit Price in Shopify for Free
You can follow two methods to bulk edit price in Shopify:
Use Shopify’s Built-in Tool
Bulk Edit Price in Shopify with CSV Import
Bulk Edit Price in Shopify with Shopify’s Native Tool
Here are the steps to follow to bulk edit prices in Shopify using its built-in tool.
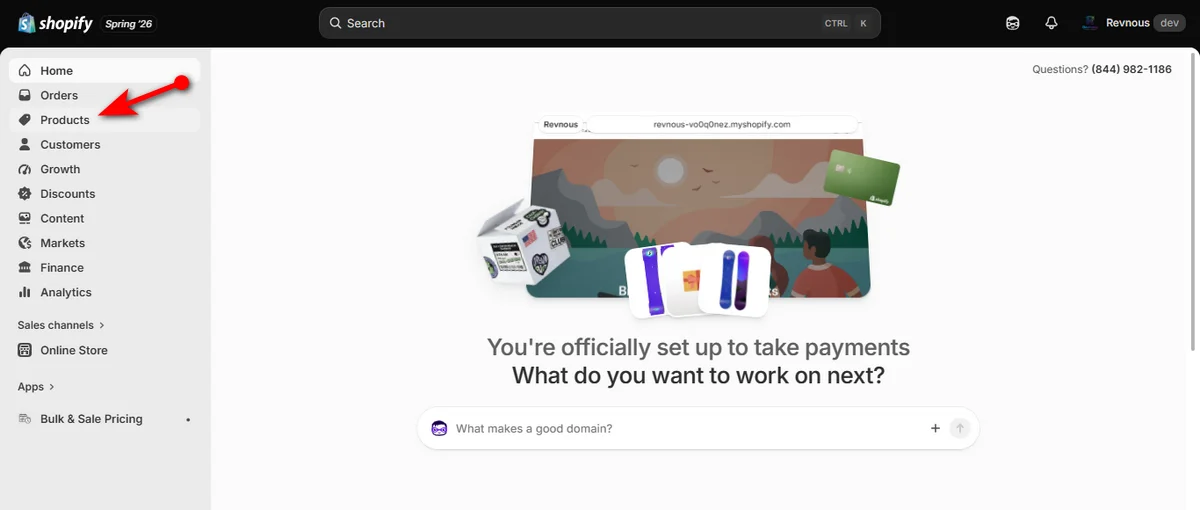
Step 1: Open the Products Menu
Go to your Shopify admin dashboard. Click ‘Products’ from the left navigation panel.
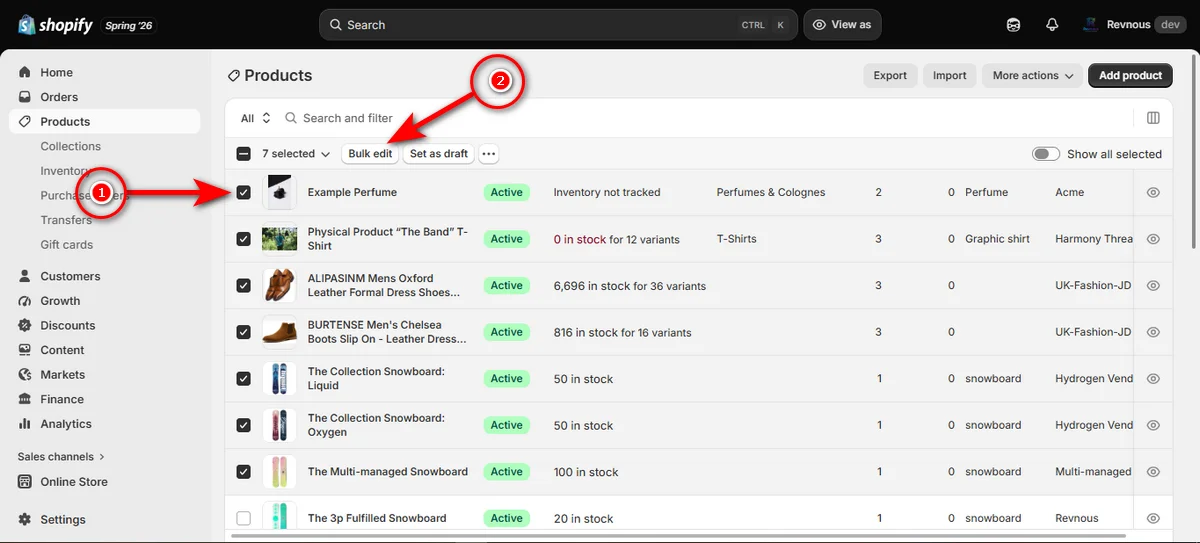
Step 2: Select Items and Click Bulk Edit
Check the box next to every product you want to modify. Click all checkboxes if you want to edit all product prices.
Then, hit the “Bulk edit” button in the pop-up action bar at the top of the list.
Step 3: Update Prices and Save
Go to the “Base price” column. Enter your new prices into the input fields for each product variant, then click ‘Save’ in the top right corner.
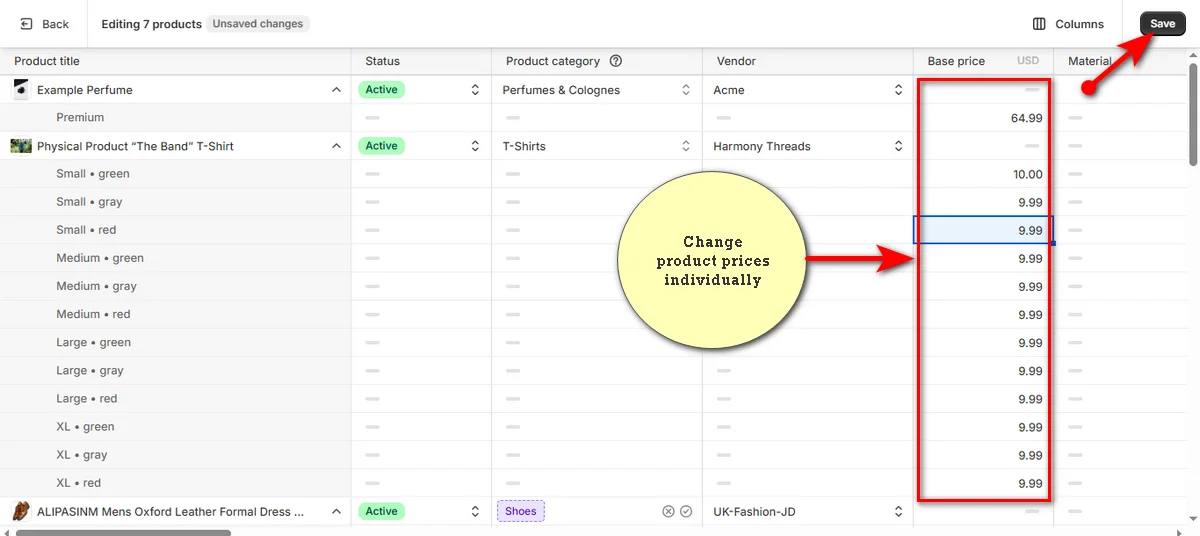
Note: Got products with the same price? Click the bottom-right corner of a price box and pull it down to fill the rest.
That’s it.
Pros and Cons of Using Shopify’s Native Tool
Advantages
Free and Native: Built directly into Shopify, so you avoid monthly app subscription costs.
Instant Application: Price adjustments apply to your store immediately after saving.
No File Management: Saves time by eliminating the need to export, edit, and re-upload CSV spreadsheets.
Disadvantages
Manual Entry: Demands individual price inputs for each variant with different pricing, which slows down large updates.
Lack of Rule Automation: Offers no automated percentage or fixed-amount discounts when you need to bulk edit collections Shopify stores put on sale.
Bulk Edit Price in Shopify with CSV Import
Follow the steps below to utilize the CSV import feature to bulk edit product prices of your Shopify store.
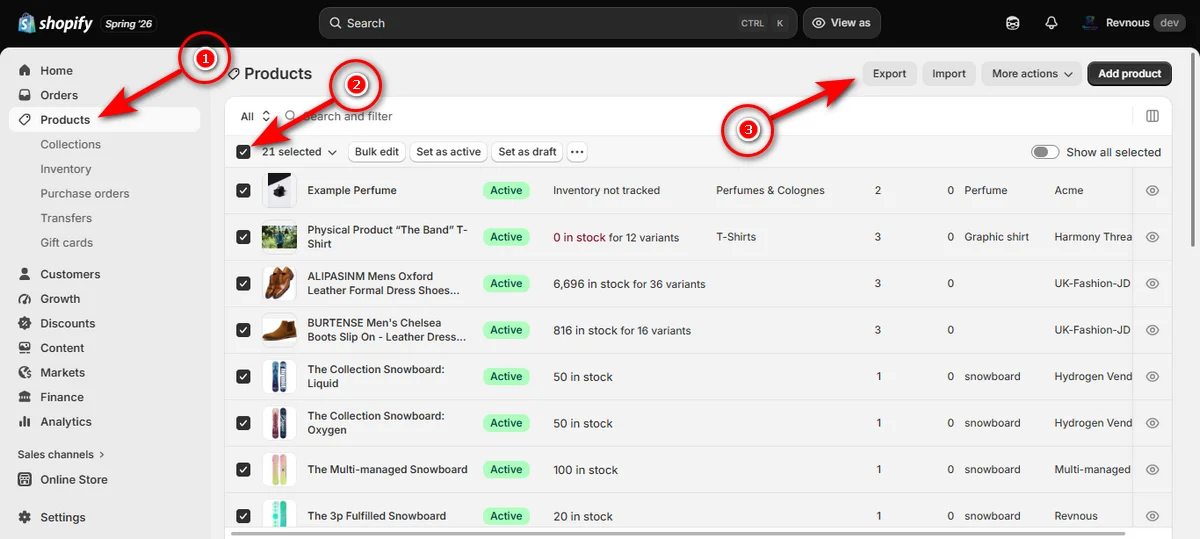
Step 1: Select Products and Click Export
Head to your Shopify admin. Click ‘Products,’ mark the checkboxes for items you need to edit, then hit ‘Export’ at the top right.
Step 2: Choose Export Settings
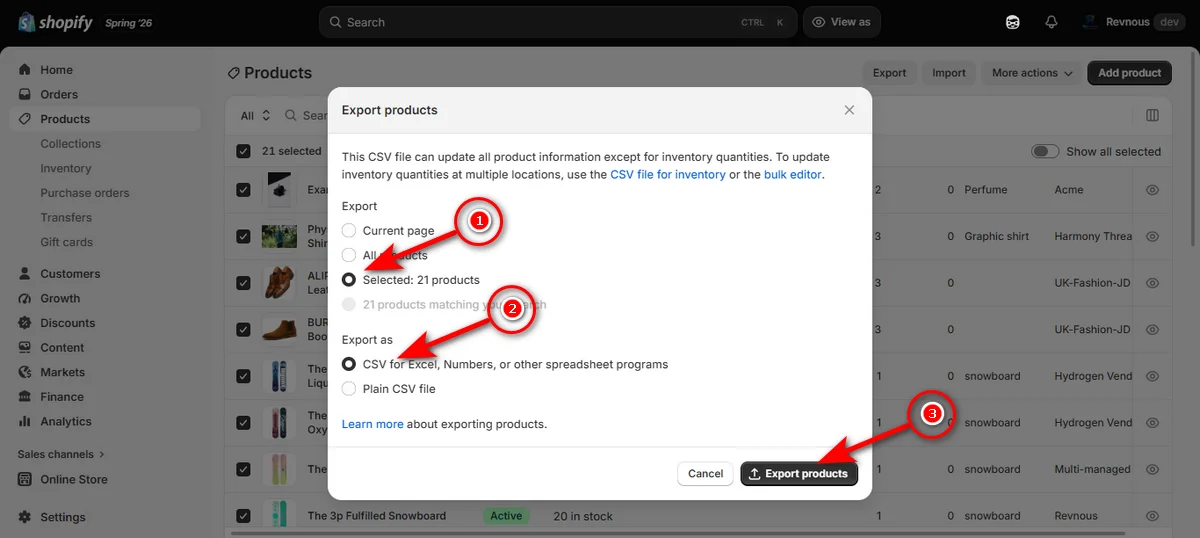
Pick “Selected: X products” to export only your flagged items, or choose “Current page” for visible items.
Select “CSV for Excel, Numbers, or other spreadsheet programs” to prevent special characters from breaking.
Lastly, click the “Export products” button.
Step 3: Edit Prices in Your Spreadsheet
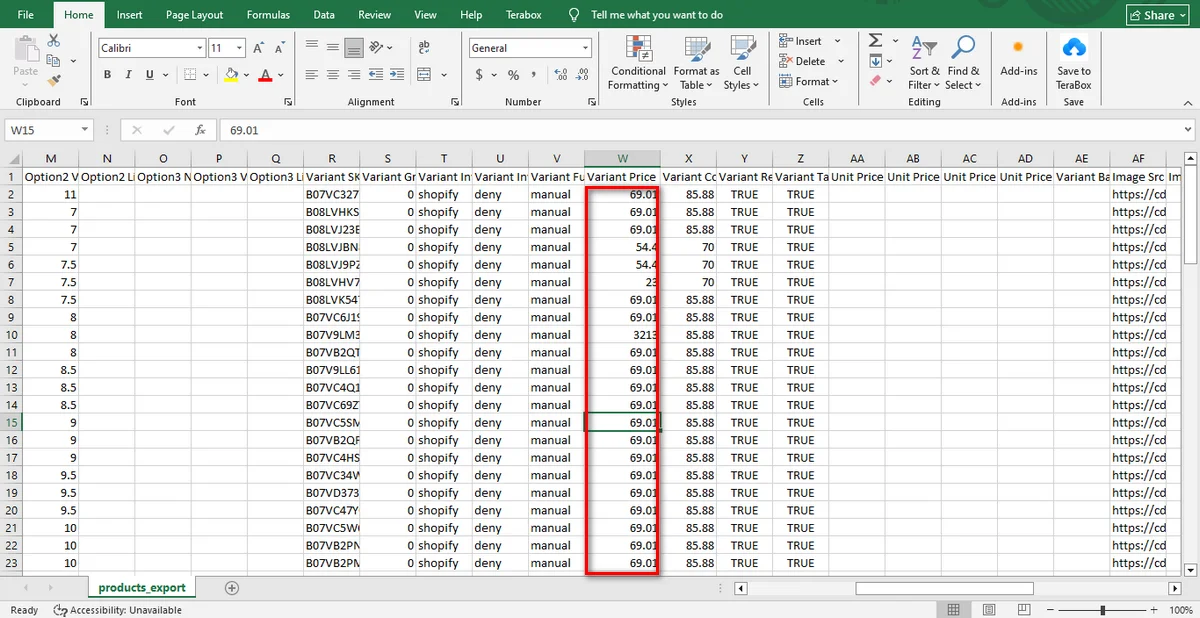
Open the downloaded CSV in Excel or Google Sheets.
Locate the column titled “Variant Price.”
Apply basic math formulas or manually type your new values down this column, then save the updated file.
Step 4: Click the Import Button
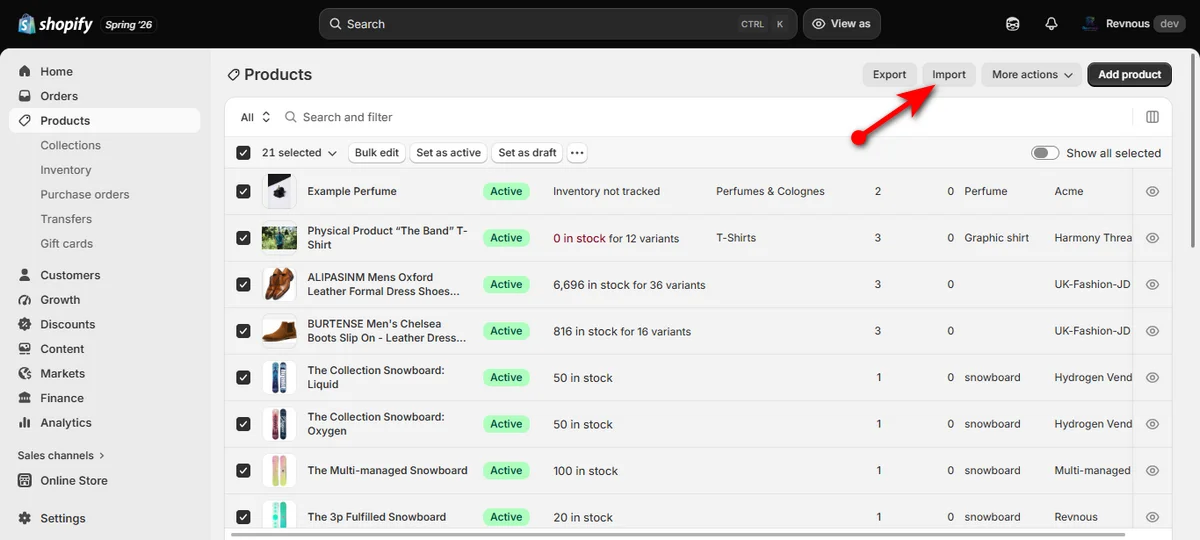
Return to the ‘Products’ screen in Shopify.
Click the ‘Import’ button located next to the ‘Export’ button.
Step 5: Upload Your CSV File
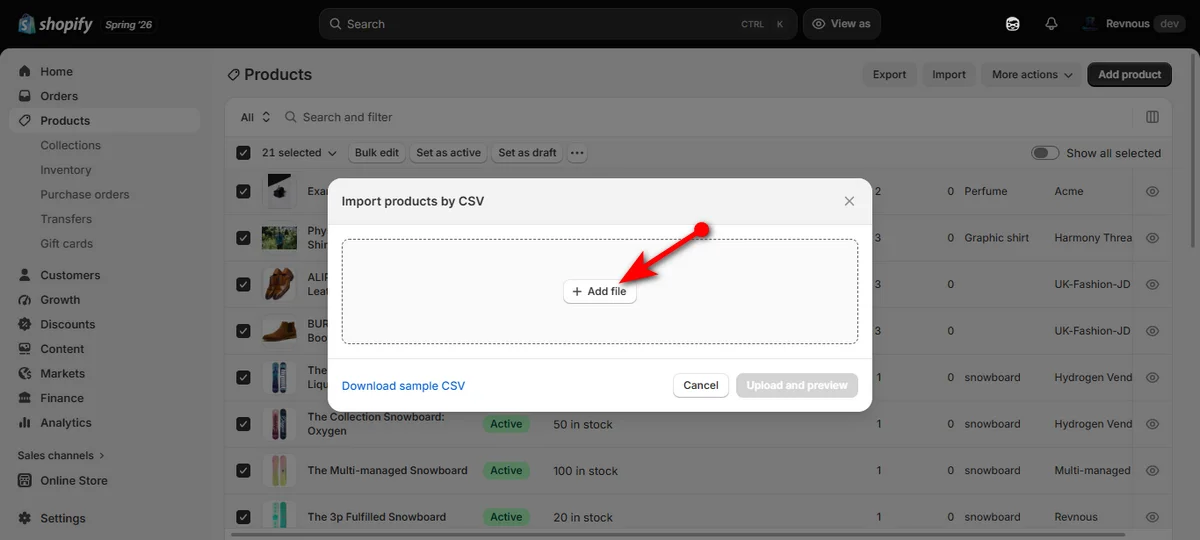
Click “+ Add file” in the modal popup.
Pick your saved CSV file from your computer to attach it.
Step 6: Configure Upload Options
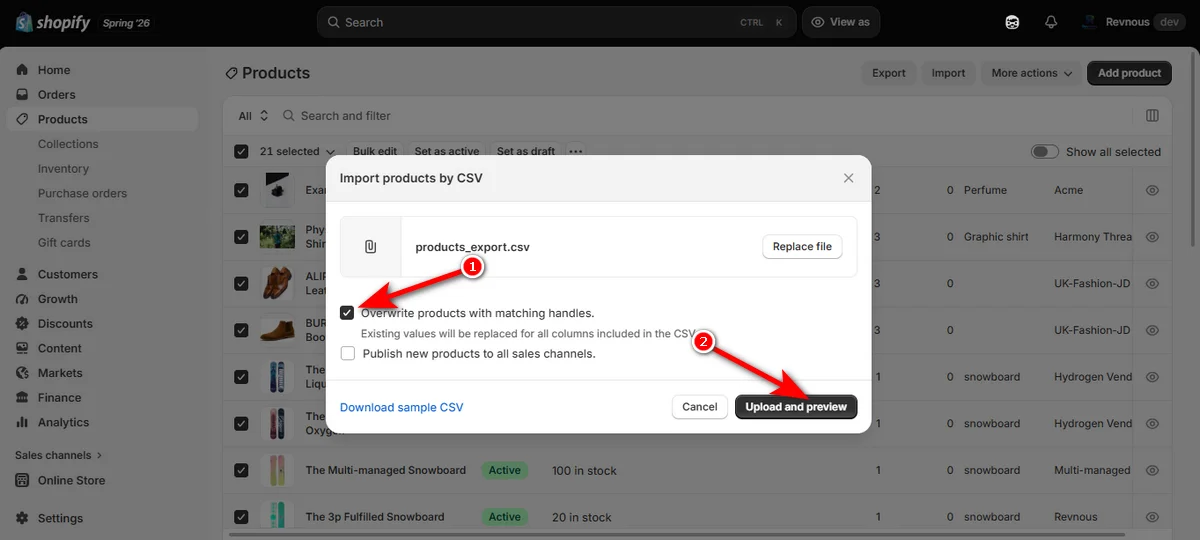
Check “Overwrite products with matching handles” so Shopify updates your existing inventory instead of creating duplicate items.
Check “Publish new products to all sales channels” only if you add brand-new handles and want them live everywhere immediately.
Click “Upload and preview.”
Step 7: Review Preview and Complete Import
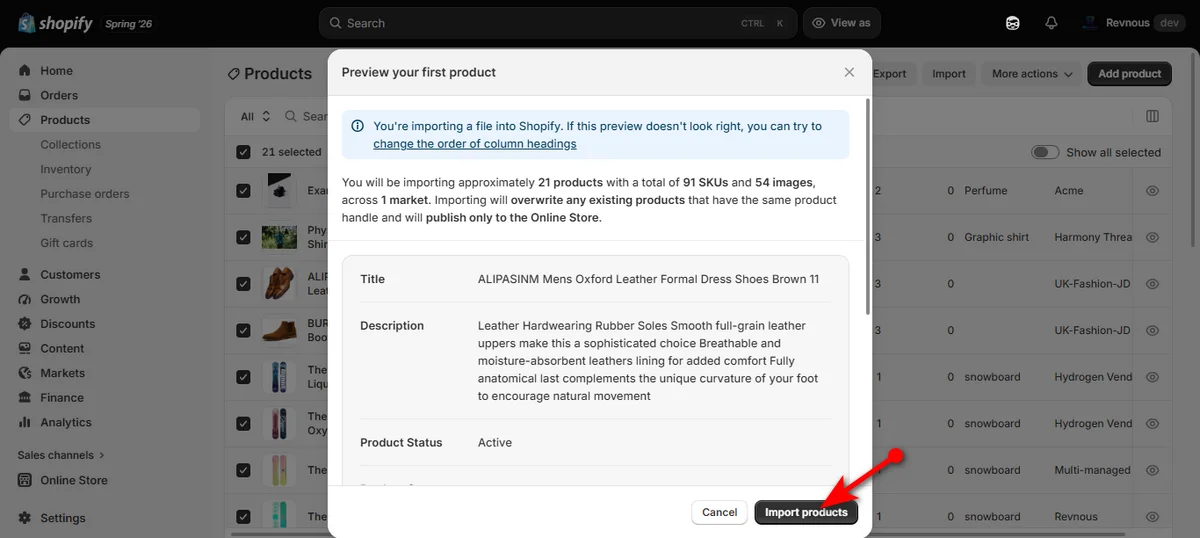
Read the preview summary carefully to verify SKU counts, market settings, and product titles look right.
Click “Import products” to push your price changes live.
Pros and Cons of Using CSV Import
Advantages
Handles Large Catalogs: Edits thousands of product prices across huge stores.
Math Spreadsheet Formulas: Allows fast percentage increases, markup calculations, and automated math tricks in Excel or spreadsheets.
Offline Backup: Keeps a downloadable record of your pricing data before you execute a Shopify update prices CSV process.
Disadvantages
Formatting Risk: Small spreadsheet errors or corrupted handle columns can mess up live product listings.
Slower Execution: Takes more steps due to downloading, opening, editing, saving, and re-uploading files.
No Direct Undo: Requires re-editing and re-uploading your CSV to reverse mistakes.
How to Bulk Edit Price in Shopify with Revnous Bulk Price Editor App
Revnous Bulk Price Editor is one of the best bulk price editing apps in Shopify. It automates price changes and discount sales.
Store owners use it to launch scheduled promotions, edit thousands of items, and auto-revert prices when sales end.
Here are the steps to use this app.
Step 1: Find the App in Shopify App Store
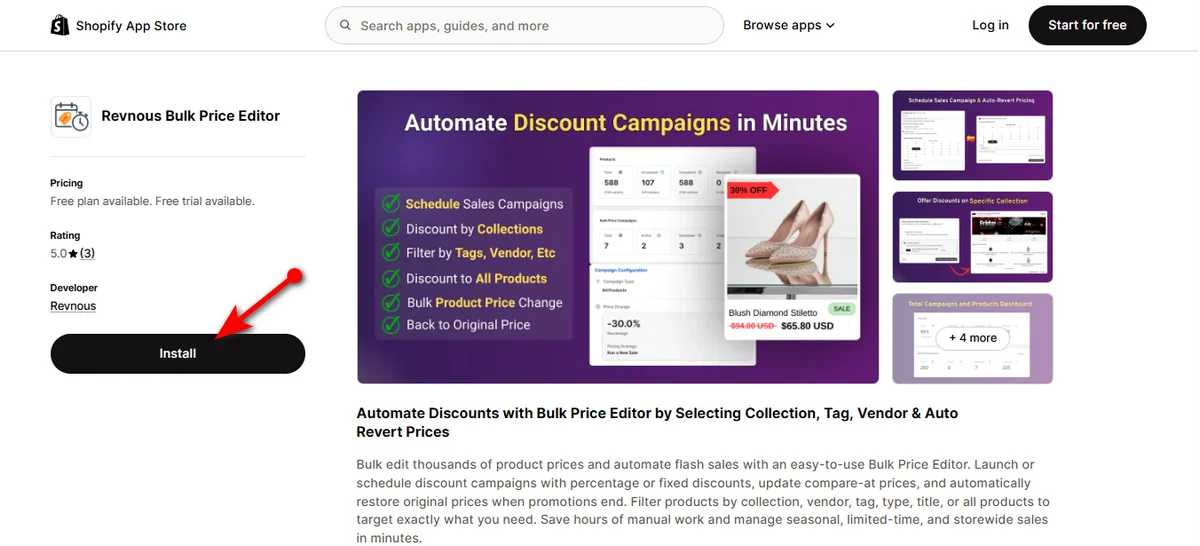
Search for “Revnous Bulk Price Editor” in the Shopify App Store.
Find the app and click ‘Install’ button.
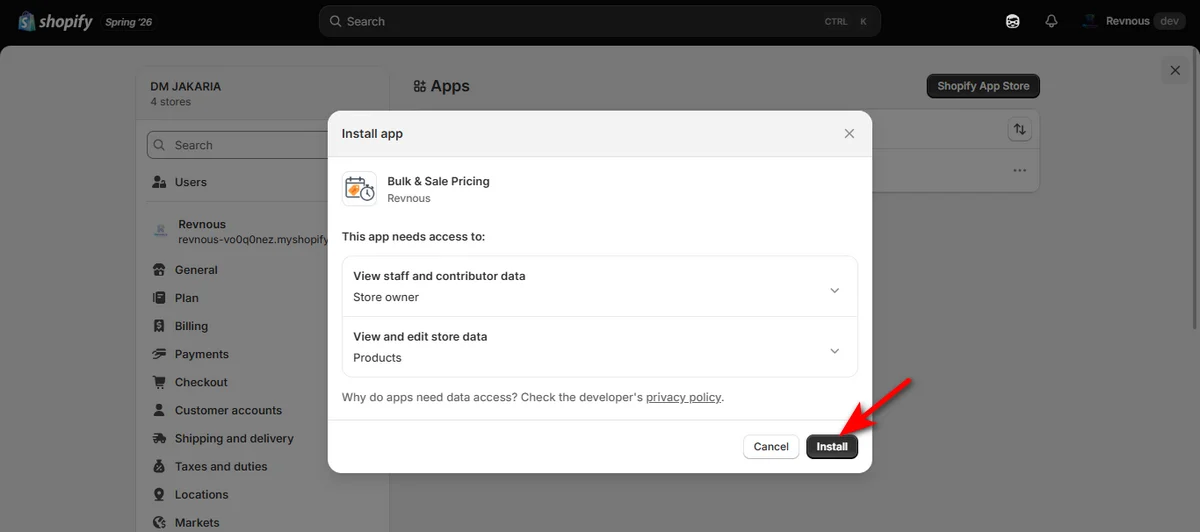
Step 2: Confirm App Installation
Review permissions inside your admin popup.
Then, press the ‘Install’ button to finish installation.
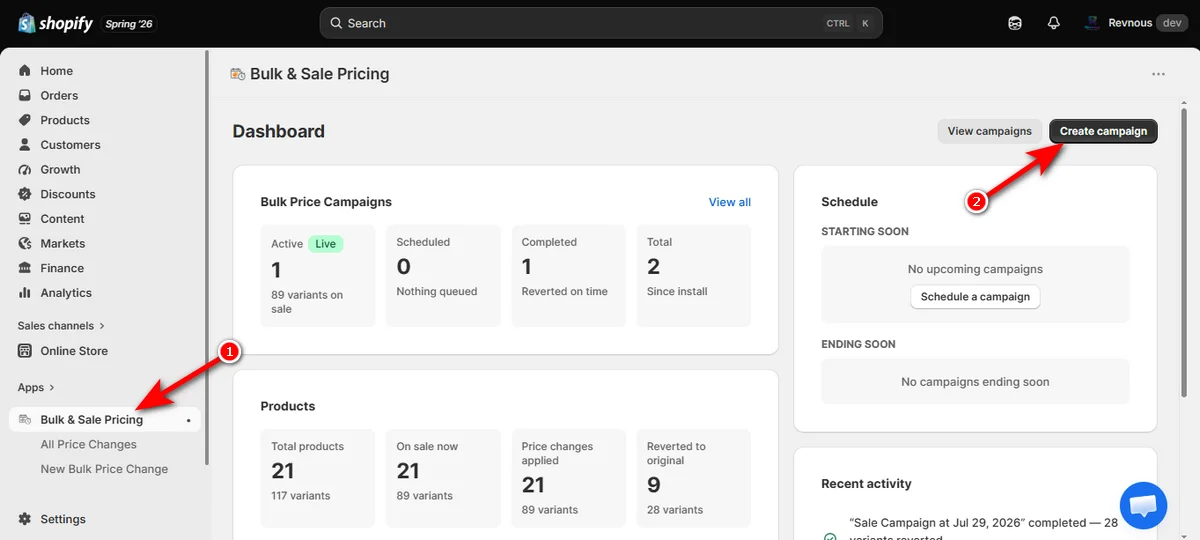
Step 3: Access Dashboard and Start Campaign
Click “Bulk & Sale Pricing” from your sidebar. Afterward, hit “Create campaign” button on the top right section.
Step 4: Choose Products to Include
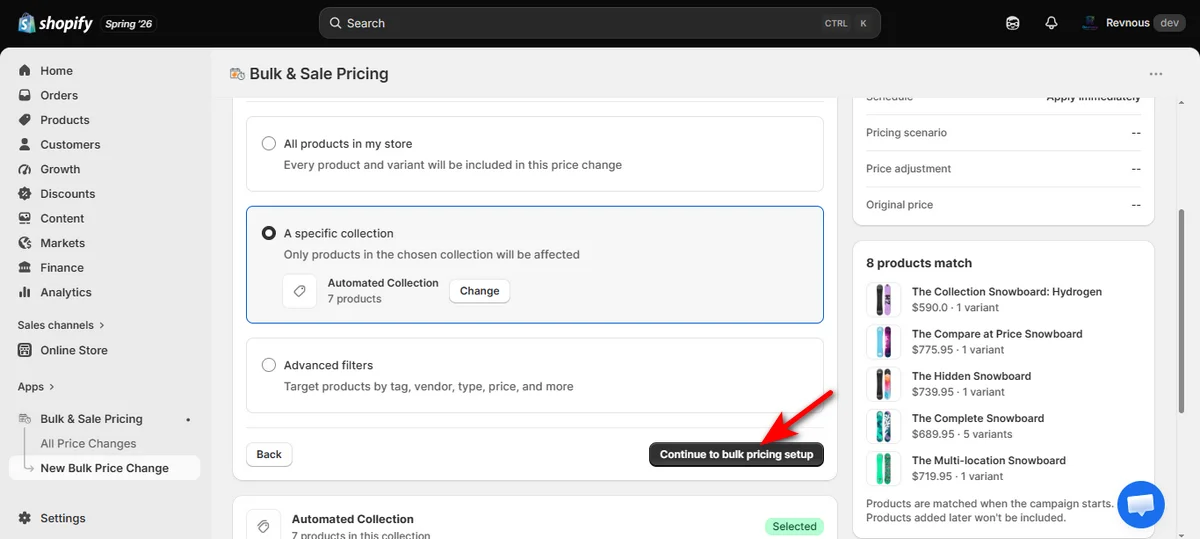
Select target items for this price update. You can pick all products in my store, a specific collection, or Advanced filters based on your needs.
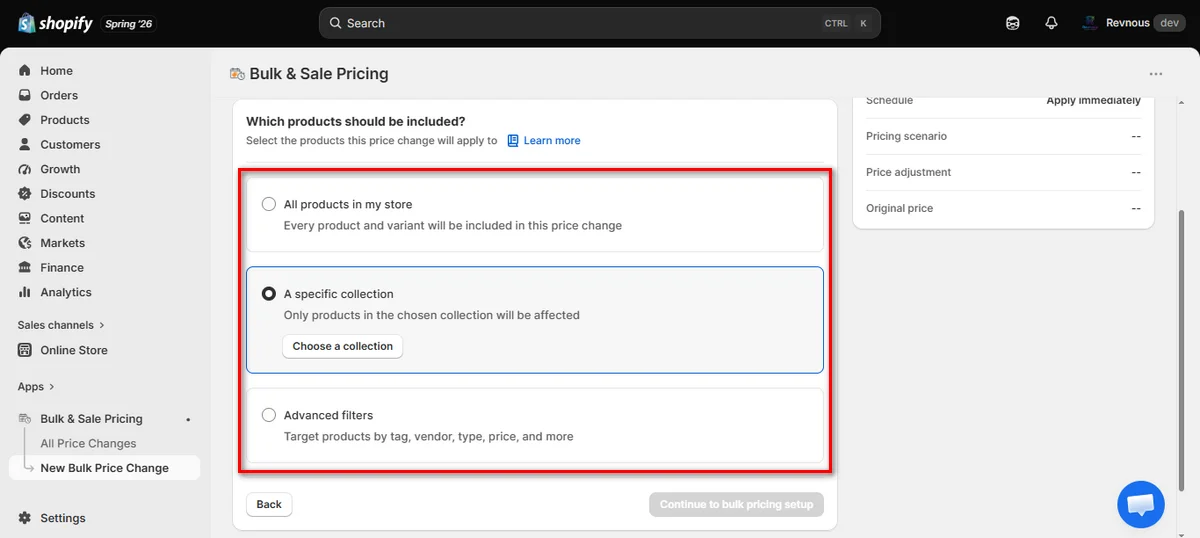
If you want to select a particular product collection, hit “A specific collection” to apply discounts across targeted product groups and to bulk edit collections Shopify store owners target for seasonal sales.
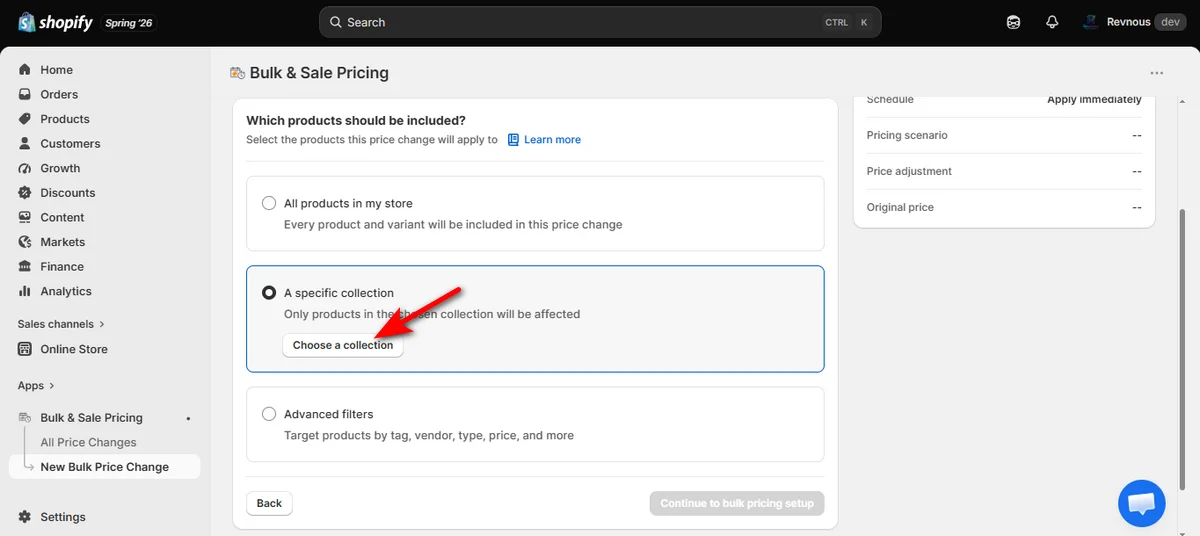
Then, click Choose a collection.
Mark the checkbox next to your chosen collection name and tap the ‘Select’ button.
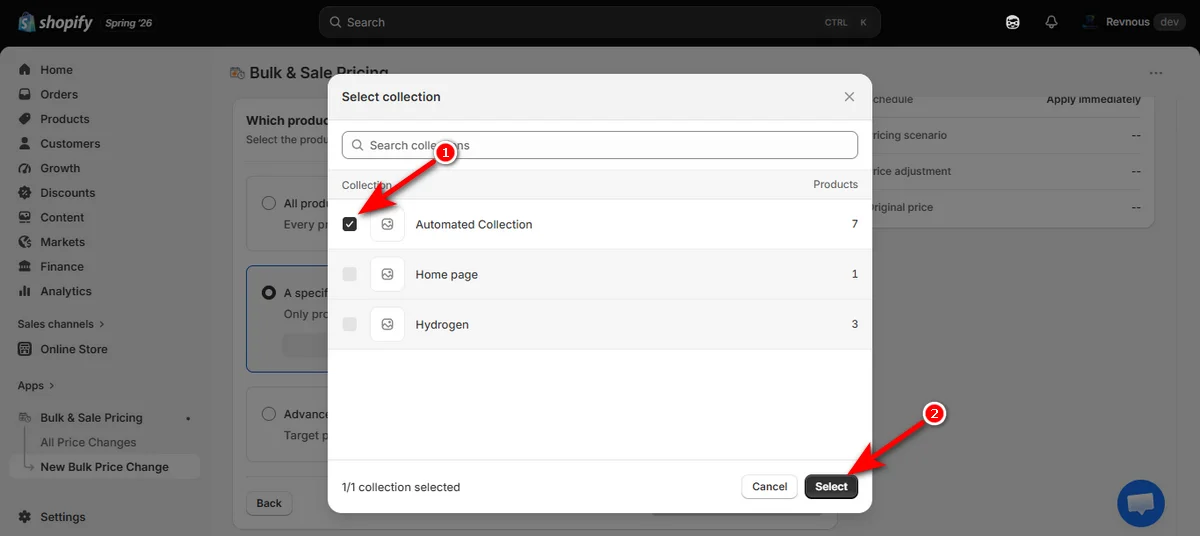
That’s how you select a product collection. On the other hand, follow the steps below to update product pricing using advanced filters.
-
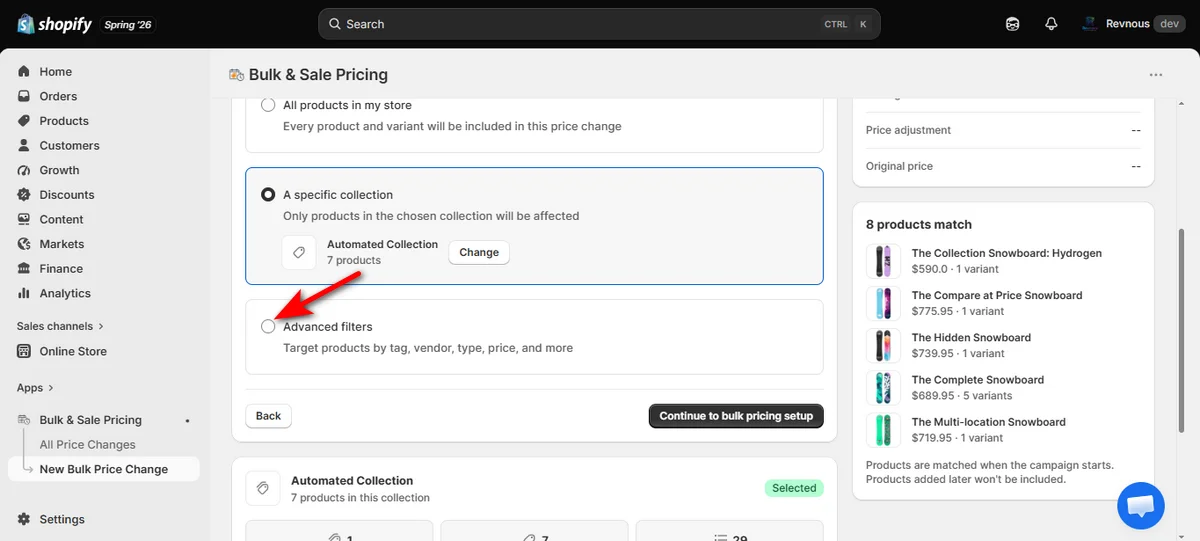
Pick “Advanced filters” from the product selection window. It’s ideal when you need fine control over specific items across collections.
-
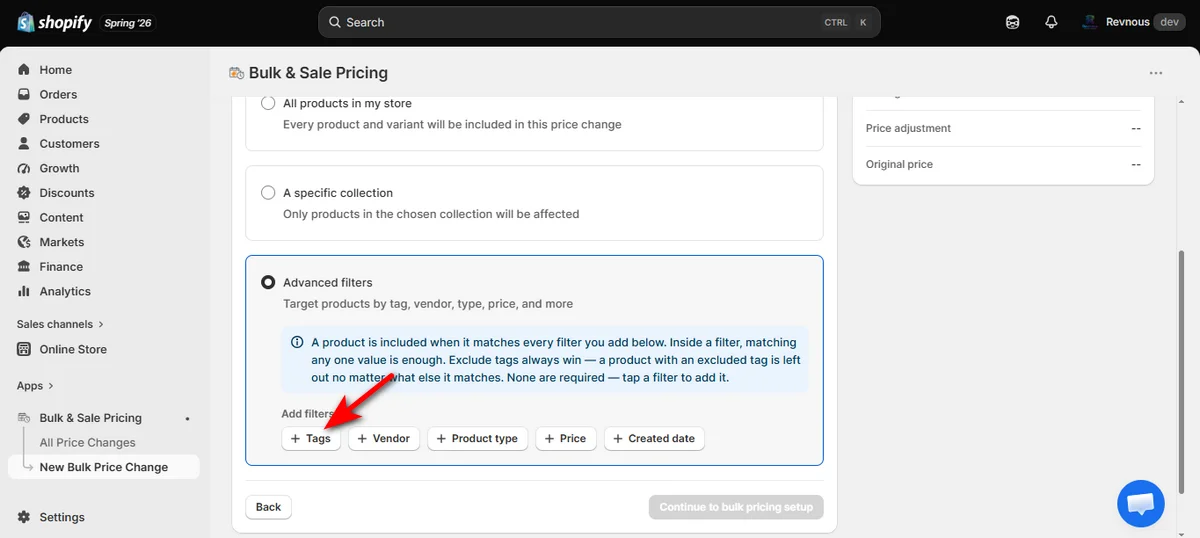
You will now see several advanced filters based on your Shopify store. You can click either one or multiple filter buttons like “+ Tags,” “+ Vendor,” and “+ Product type” to specify target criteria.
-
Then, type tags like ‘clothing,’ “winter collection,” etc., based on your store into the input box.
Now, check the tag box to confirm your choice.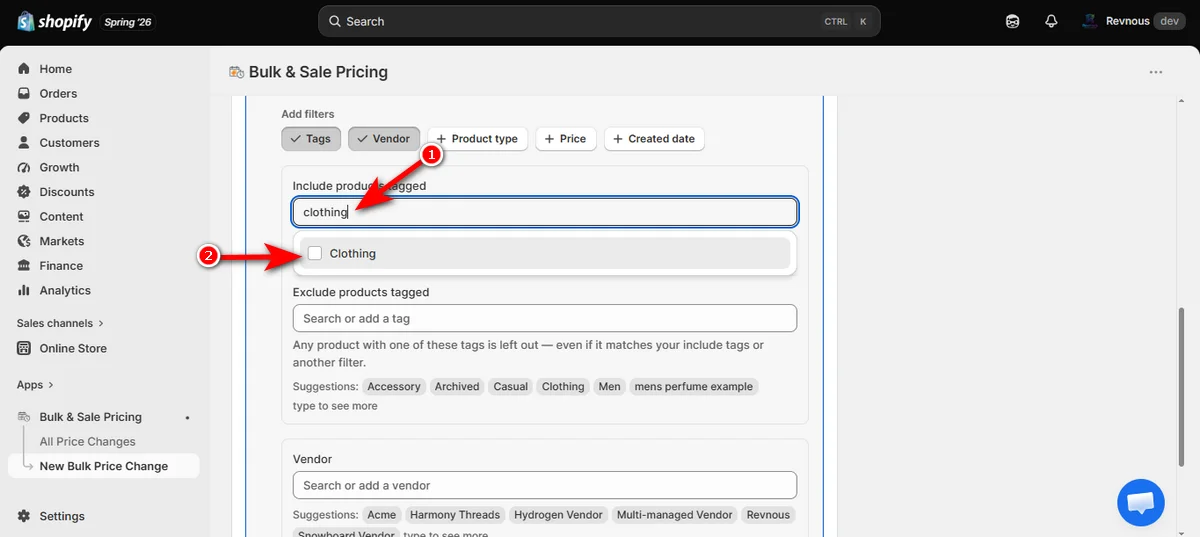
That’s how you choose products by filters to update their pricing. Once you select your preferred product, verify your matched product counts on the right panel.
Lastly, click the “Continue to bulk pricing setup” button.
Step 5: Choose Pricing Scenario
Next, select the pricing strategy that matches your goal:
Run a new sale: Use it when you launch a discount on Shopify for the first time. The old price will be crossed out, and the new lower price will be shown up next to it ($100 $80).
Adjust an existing sale: try it to change the discount on items already on sale. This option keeps the crossed-out price the same, but the final price drops or goes up (100→ $80 becomes 100→ $70).
Just update prices: Use it to change regular prices directly. No crossed-out numbers or sale badges show up in your store ($80 becomes $70).
End a sale: Use it to turn off a sale completely. Crossed-out prices disappear, and items return to one clean regular price (100→ $80 becomes $85).
Step 6: Set Calculation Method and Amount
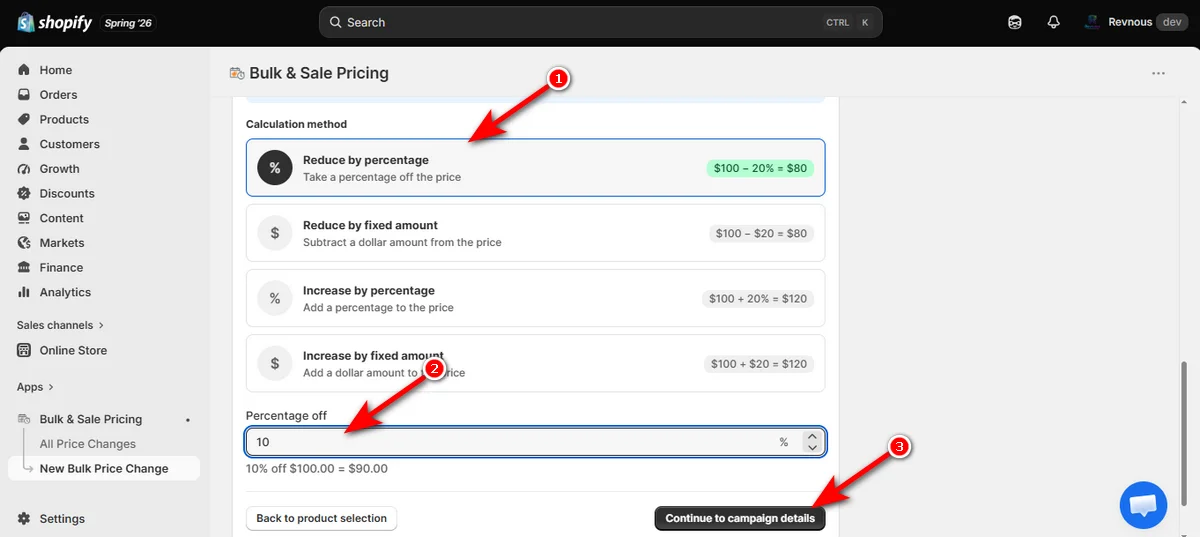
Now, scroll down and pick a calculation method to determine how you want to change product prices.
Reduce by percentage: Take a percent off the price (like 20% off).
Reduce by fixed amount: Take a specific amount off the price (like $5 off).
Increase by percentage: Add a percent to the price (like raising prices by 10%).
Increase by fixed amount: Add a particular amount to the price (like adding $2).
After selecting a calculation method, type your number into the respective field. Now, hit the “Continue to campaign details” button.
Step 7: Name Plan and Publish
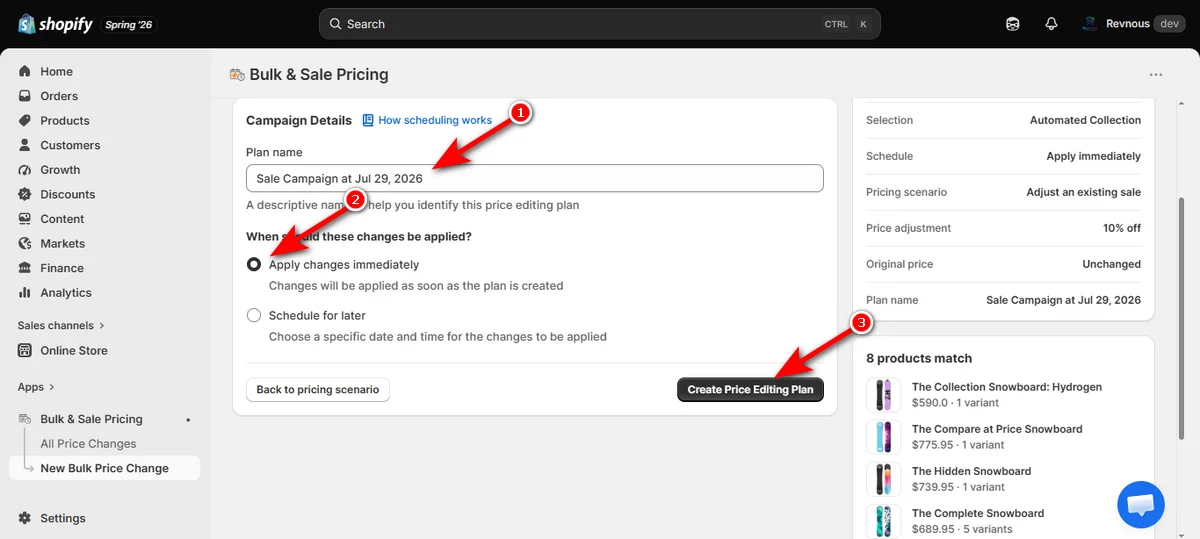
At this point, type a descriptive “Plan name” and choose “Apply changes immediately” or “Schedule for later” option depending on your requirements.
Lastly, hit the “Create Price Editing Plan” button.
Step 8: Control Active Campaign
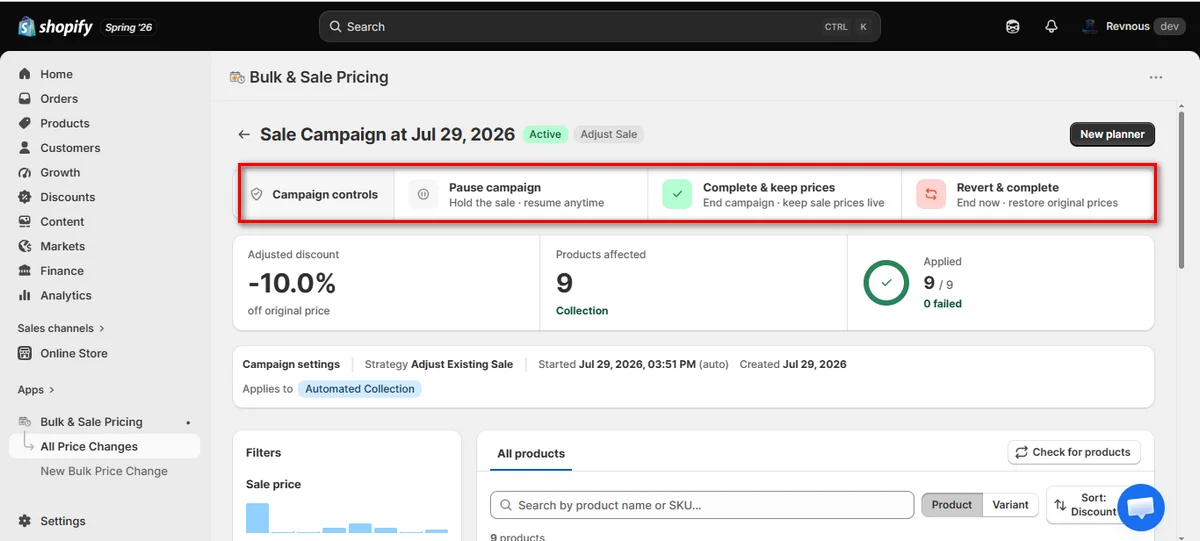
Wait a while until your campaign gets published. Then, monitor active sales from the dashboard.
Use “Pause campaign,” “Complete & keep prices,” or “Revert & complete” options according to your preferences.
Here’s what each one does.
Pause campaign: Pauses your sale. Products temporarily go back to normal prices, and you can restart the sale anytime.
Complete & keep prices: Ends the sale campaign but keeps the current discounted prices on your store forever.
Revert & complete: Ends the sale immediately and restores all original prices in 1 click.
Pros and Cons of Using Revnous Bulk Price Editor
Advantages
Automated Revert: Restores original prices automatically when campaigns end.
Advanced Targeting: Filters products instantly by tags, collections, vendors, and types.
Zero Spreadsheet Errors: Eliminates CSV corruption risks and missing handle errors.
Disadvantages
App Dependency: Requires active app installation for scheduled automated tasks.
Plan Limits: Advanced features require upgraded paid tiers.
Why Should You Use Revnous Bulk Price Editor?
Shopify’s built-in bulk editor works well for simple price updates, but it has limits when stores start running larger campaigns. Manual workflows can become slow, especially during flash sales or seasonal promotions.
An advanced Shopify bulk price editor app like Revnous Bulk Price Editor offers more automation, flexibility, and control. It helps merchants optimize sale prices for revenue growth.
Here are a few more reasons why you need to use this app.
Automated Sales and Instant Price Reverts
Manually changing prices back after you offer seasonal discounts in Shopify takes hours and risks pricing errors. Revnous Bulk Price Editor automates both ends of your campaign.
Just set a start date to push discounts live, then let the app automatically restore your original prices the exact minute your sale ends.
Flexible Targeting Beyond Shopify Limits
Shopify only lets you edit items line by line or export huge CSVs. Revnous Bulk Price Editor lets you target exact segments in seconds.
Run storewide sales, discount full collections, or use advanced filters to combine tags, vendors, product types, and price ranges.
You can also exclude specific tags so key items stay full price.
Total Control with Campaign Controls
Managing live sales becomes SUPER EASY with built-in campaign controls. You can pause a sale to hold discounts, finish a promotion early while keeping current prices live, or hit one button to revert all items to their original prices immediately.
Best Practices for Bulk Editing Shopify Product Prices
Bulk editing saves hours, but one wrong click can ruin thousands of product prices at once. Follow these quick tips to protect your store.
Always Create a Backup File First
Export your entire product list to a CSV file before you touch any prices. Treat this download as your emergency reset button. You can upload this original file to fix mistakes fast if a spreadsheet formula breaks.
Test Your Method on Two Products
Do not update your whole store catalog on the first try. Choose two or three test items and run your price change on them. Visit your live store pages to verify the new prices and sale tags look right.
Match Price and Compare-at-Price Columns
Keep your eyes on both price fields during a sale. Your Compare-at price must stay higher than your Price. Shopify drops the crossed-out price badge completely if your regular price sits above the compare-at price.
Pick the Right Editing Method
Match your goal with the best tool:
Native Bulk Editor: Good for fast manual edits on a few products.
CSV Spreadsheet Import: Good for big stores that need Excel math formulas for free.
Third-Party Apps: Good for scheduled flash sales, tag filters, and 1-click price reverts.
Summing Up
Learning how to bulk edit prices in Shopify products can save time, improve pricing accuracy, and simplify sales campaigns. Shopify’s built-in bulk editor works well for simple updates, while CSV editing helps manage large product catalogs.
For advanced pricing automation, many merchants use a Shopify bulk edit app to schedule discounts, automate flash sales, and restore prices automatically after promotions end.
Such an app is Revnous Bulk Price Editor. It makes bulk pricing easier by combining scheduled price changes, rollback protection, smart filters, and Shopify pricing automation in one system.
Frequently Asked Questions
- Can I Bulk Edit the Price of 100 Different Products at Once in Shopify?
- Yes. Use Shopify's native bulk editor by selecting all products, update prices via a CSV export/import, or use a bulk editing app.
- How to Bulk Edit More Than 50 Products in Shopify?
- Select all products in your Shopify Admin to bulk edit them directly, edit through a CSV file, or use a bulk product edit app.
- Will Bulk Editing Prices Change My Compare-at Prices?
- No. Bulk editing prices will not change your compare-at-prices. You'll need to update compare-at prices separately if needed.
- Can I Schedule Bulk Price Changes in Shopify?
- Shopify has no native feature to help you schedule bulk price changes. You can use a third-party app like Revnous Bulk Price Editor to accomplish this job.
- Can I Undo a Bulk Price Edit in Shopify?
- Shopify does not offer a one-click undo feature. To fix things up, you need to re-upload an old CSV backup, use a bulk app with a restore feature, or manually change the prices back.



Ready to Boost Your Revenue?
Join 66,000+ brands already using Revnous to drive sustainable growth