
How to Create Multiple Automatic Discounts in Shopify

Quick Answer:
Log in to your Shopify admin dashboard. Go to Discounts > Create discount and select Automatic discount. Scroll to Combinations and check the boxes for product, order, or shipping deals to combine them at checkout.
Many Shopify store owners wonder how to create multiple automatic discounts on Shopify to avoid checkout errors. They often launch deals that clash and fail to apply.
Shoppers in their stores get frustrated as cart prices do not drop automatically. You do not want your customers to have the same bad experience.
So, read this guide, which shows you how to set up automatic deals step by step. Follow along to stack discounts smoothly and boost your store revenue.
What Are Multiple Automatic Discounts in Shopify?
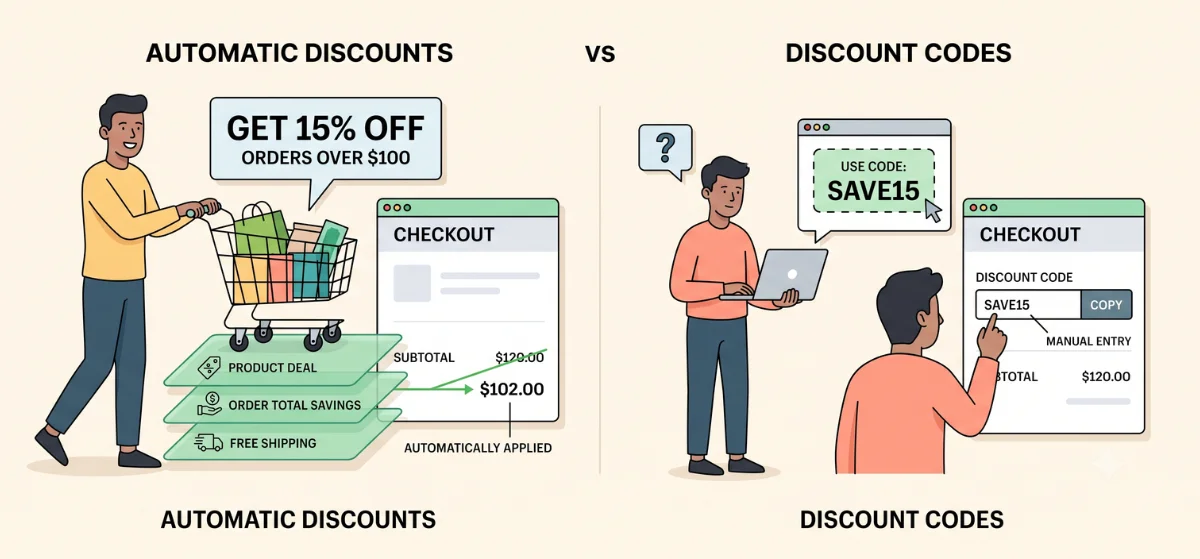
Multiple automatic discounts are deals that stack together at checkout without requiring manual promo codes, making it simple to launch a discount on Shopify for your store.
Shopify reads cart conditions in real time, so shoppers see their discount automatically applied at checkout.
You can set these automatic savings on the following:
Specific products
Product collections
Entire order totals
Shipping fees
Specific customer segments
Store owners use automatic discounts to smooth out checkout and lift overall order conversions.
Difference Between Automatic Discounts and Discount Codes
Automatic discounts kick in without any customer effort. Shopify activates the price drop the moment a shopping cart hits your required rules.
Discount codes require buyers to enter a Shopify discount code before checkout to get lower prices.
Automatic discount example: 15% off orders above $100 drops automatically at checkout.
Discount code example: Buyers type "SAVE15" into the 'Discount code' box to get savings.
Automatic deals eliminate extra steps at checkout. Buyers skip the search for external promo codes and complete purchases faster.
Types of Automatic Discounts You Can Create in Shopify
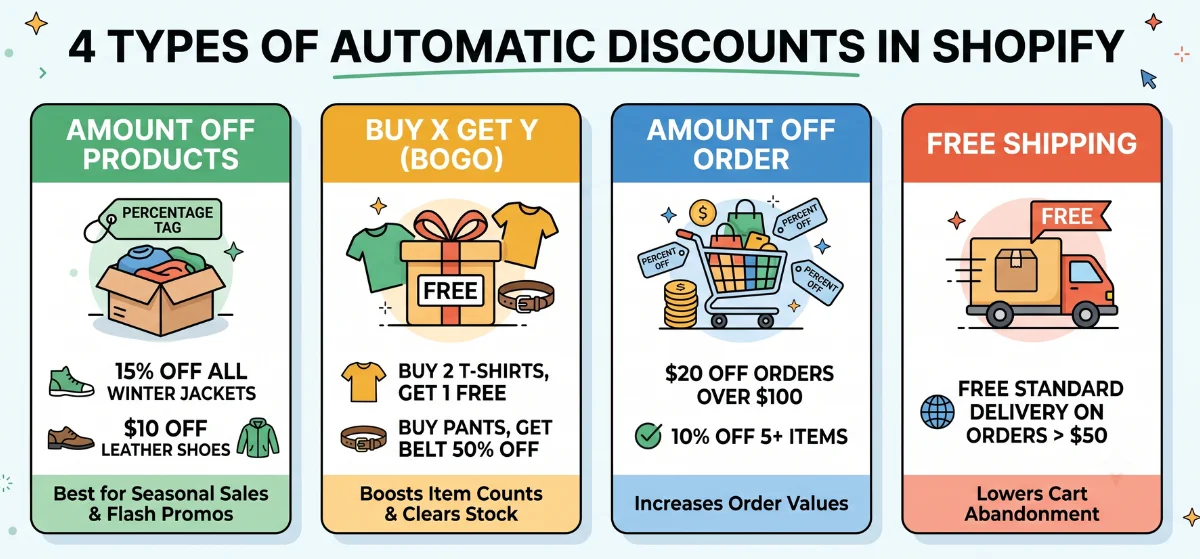
Shopify provides four core automatic discount types directly inside your admin area. Each option targets different sales goals.
1. Amount Off Products
This option cuts prices on specific items or entire collections. You can set savings as a percentage or a fixed dollar amount.
Percentage example: 15% off all winter jackets.
Fixed amount example: $10 off selected leather shoes.
This method works best when you want to run seasonal discounts in Shopify or launch flash promotions on targeted inventory.
2. Buy X Get Y (BOGO)
This setup rewards shoppers with free or discounted items when they buy qualifying products.
Example: Buy 2 t-shirts, get 1 free.
Example: Buy a pair of pants, get a belt at 50% off.
Use this strategy to clear extra stock and boost item counts per order.
3. Amount Off Order
Order-level deals reduce the total cart subtotal once a buyer meets your rules. You can apply flat cash cuts or percentage drops across the whole order.
Example: $20 off orders over $100.
Example: 10% off cart total when buying 5 or more items.
This strategy pushes shoppers to add extra items to hit your minimum spend target.
4. Free Shipping
Free delivery removes shipping costs automatically during checkout. You can offer free shipping worldwide or restrict it to selected countries.
Example: Free standard delivery on orders above $50.
Online stores use this feature to lower cart abandonment at the final checkout step.
How to Create an Automatic Product Discount in Shopify
Follow this quick guide on how to add discount on Shopify product items and get your promotion running.
Step 1: Open Discounts
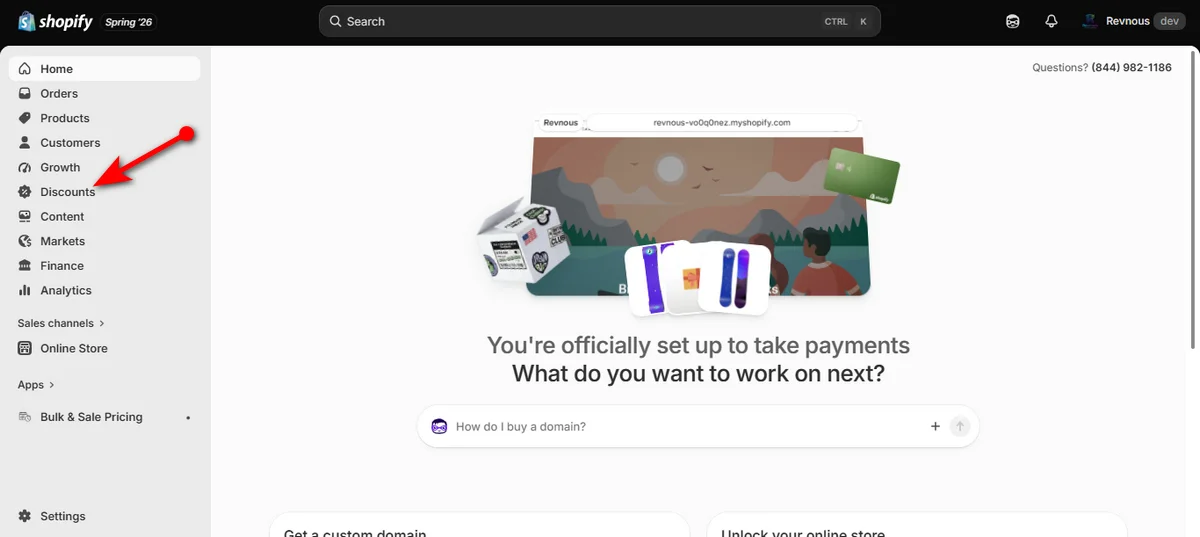
Log into your Shopify admin area and click ‘Discounts’ on the left menu panel.
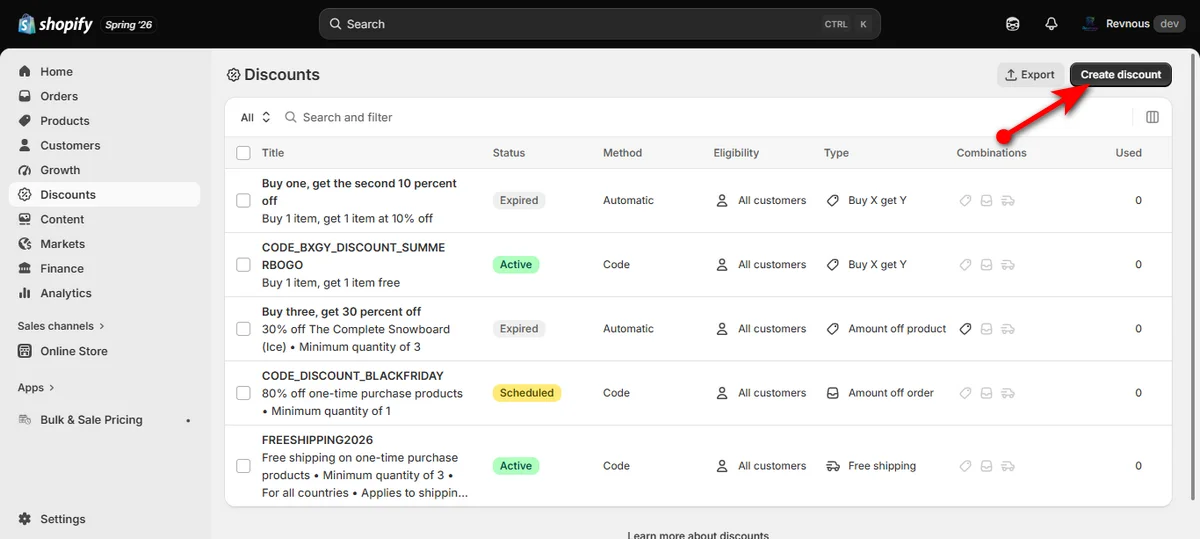
Look toward the upper right corner of the dashboard screen and hit the black “Create discount” button.
Step 2: Pick Discount Type and Select Automatic Discount
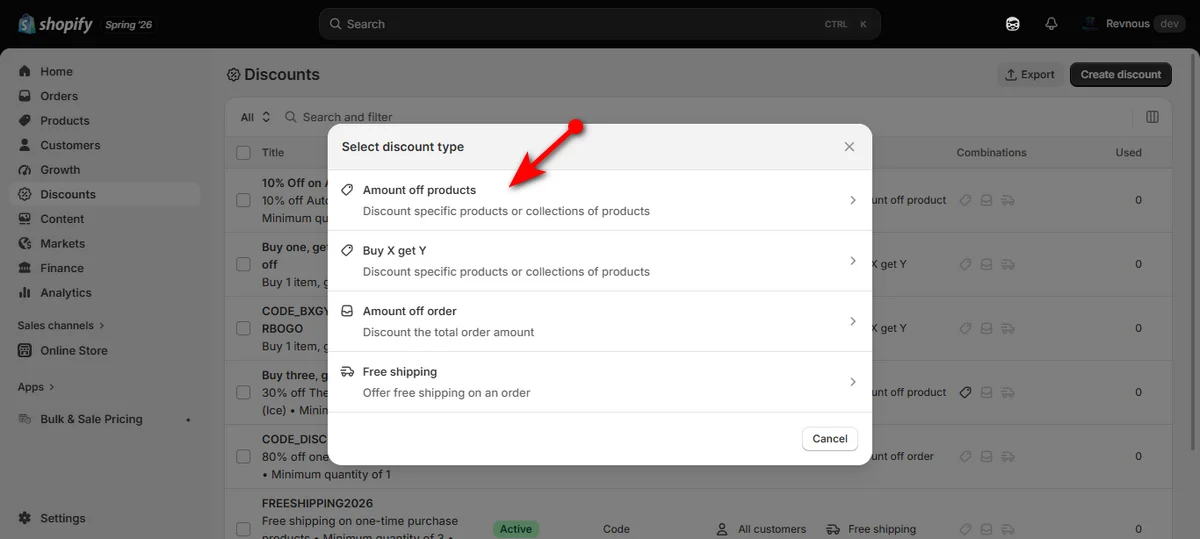
A pop-up menu will display your options. Choose “Amount off products” at the top of the list.
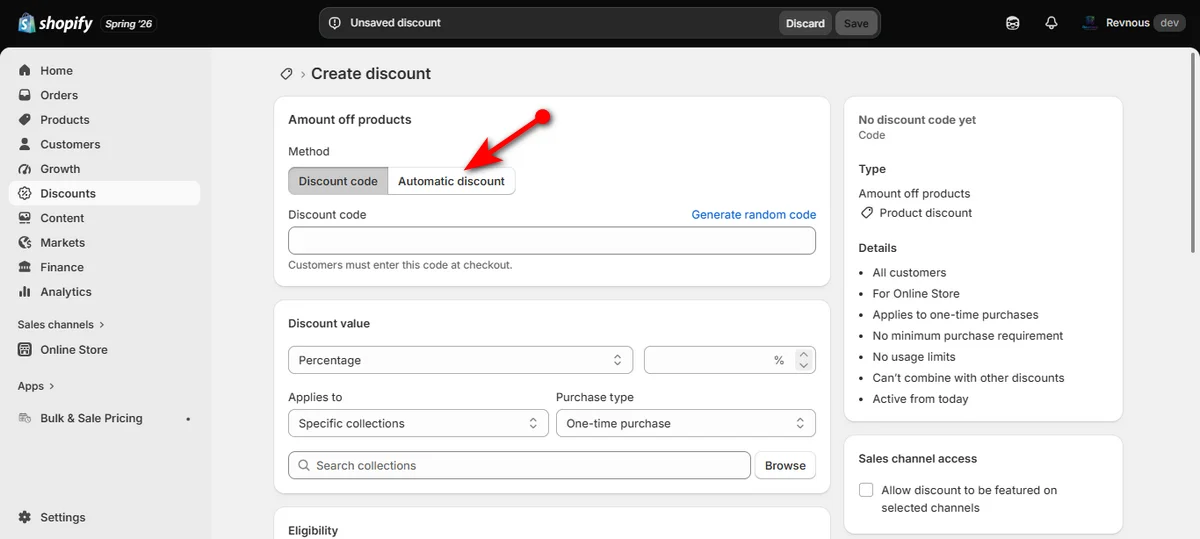
Now, hit the “Automatic discount” tab right next to “Discount code.”
Step 3: Name Your Deal and Set Value
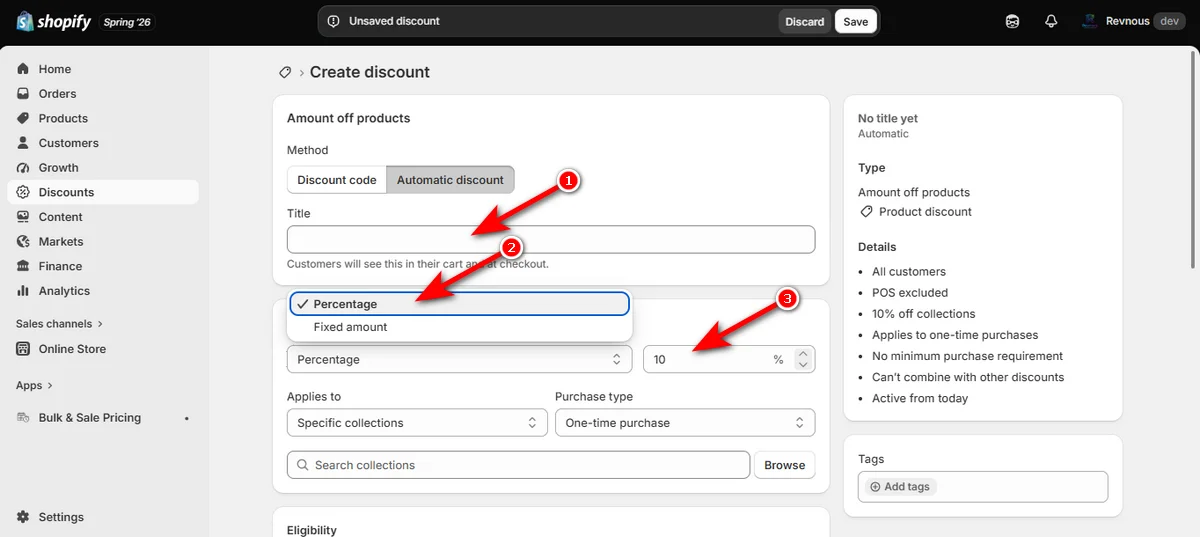
Type a clear name in the ‘Title’ box. Shoppers see this text inside their shopping carts.
At this point, select either ‘Percentage’ or "Fixed amount” from the “Discount value” dropdown menu based on your preferences.
Lastly, enter your discount value in the numeric box.
Step 4: Choose Product Scope
Find the "Applies to" dropdown menu and pick “Specific collections” or “Specific products” based on your inventory goals.
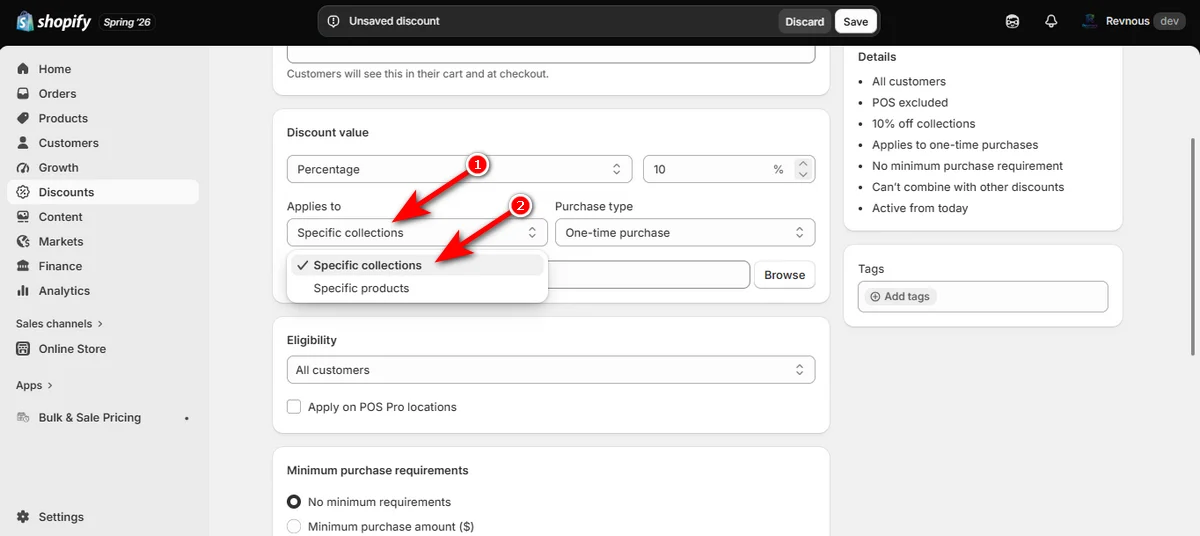
Now, click the “Purchase type” dropdown menu. Select “One-time purchase,” ‘Subscription,’ or ‘Both’ depending on what products qualify.
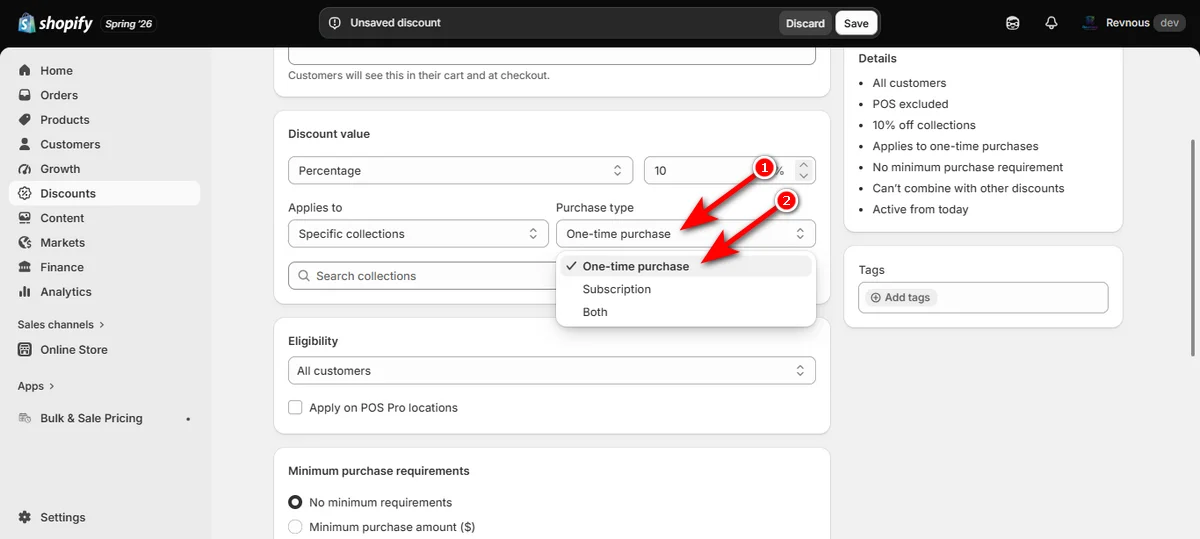
Step 5: Search Your Catalog and Add Targeted Items
Click inside the search bar or hit the ‘Browse’ button right next to it.
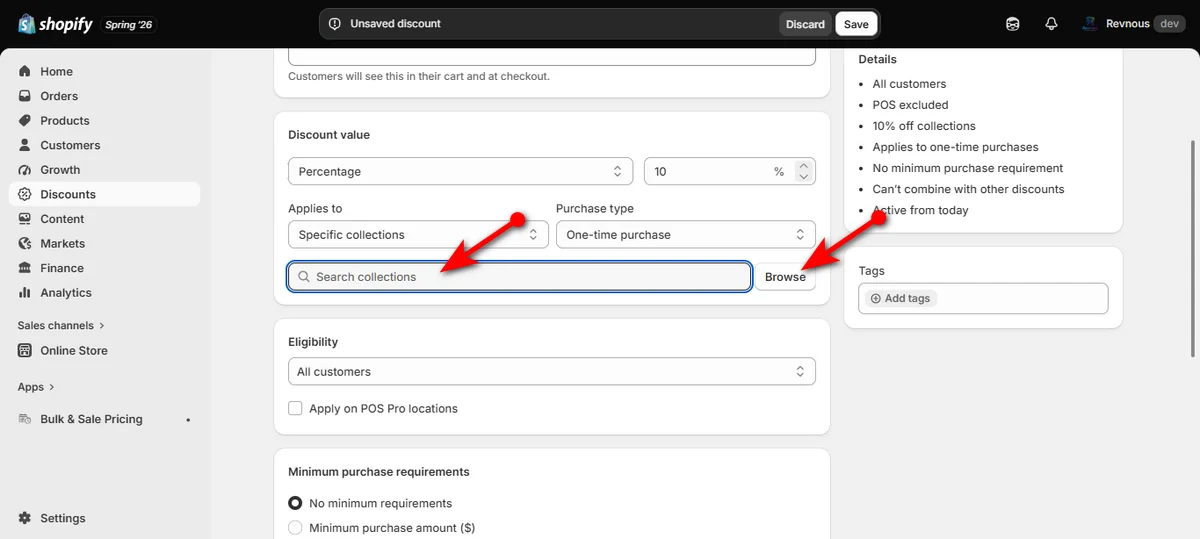
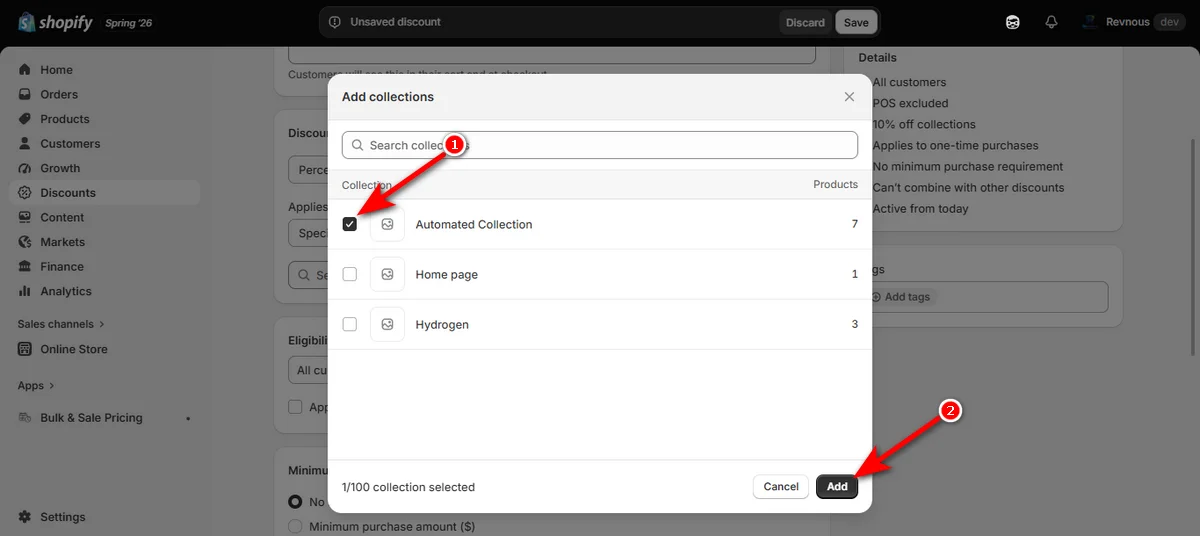
Check the box next to your desired product line or collection and click the ‘Add’ button in the pop-up modal to confirm.
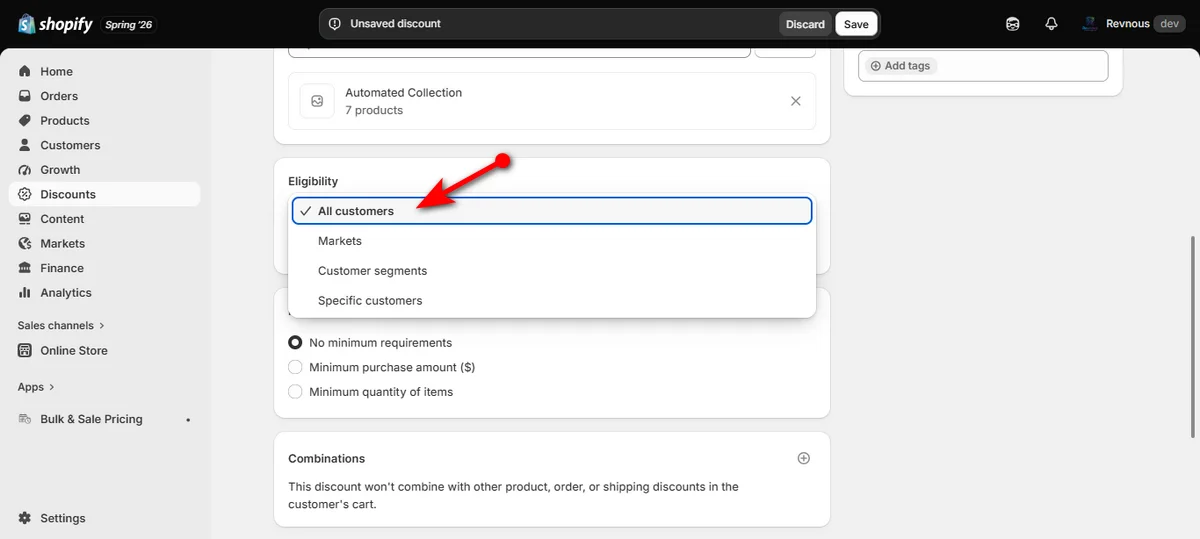
Step 6: Target Specific Customers
Scroll down to ‘Eligibility’ and click the dropdown to choose who gets the price cut (All customers, Markets, Customer segments, or Specific customers).
Step 7: Set POS Rules and Cart Limits
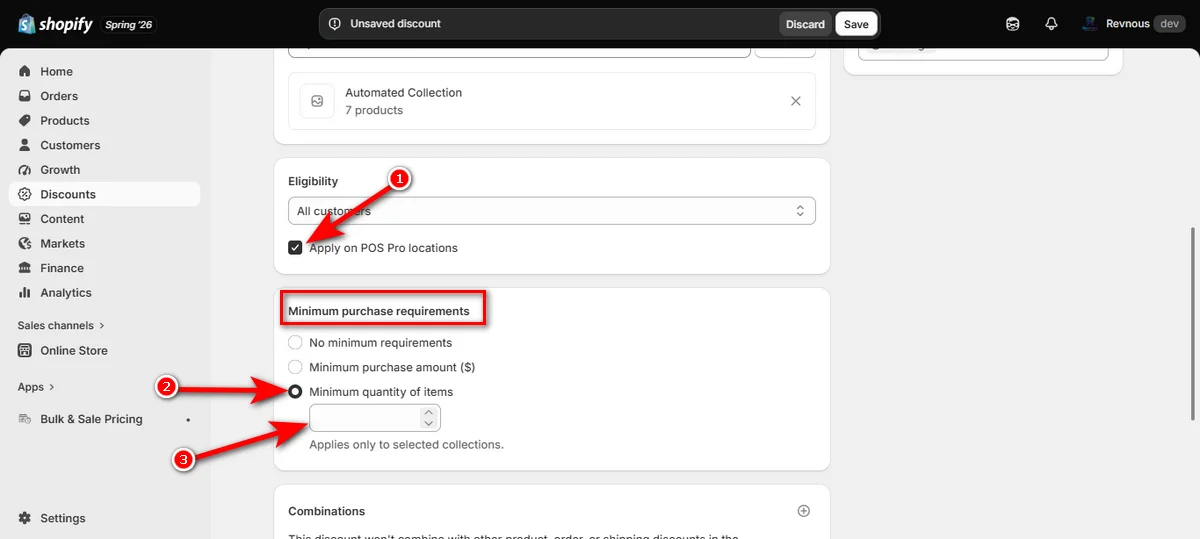
Check the “Apply on POS Pro locations” box if you sell items in person with physical register hardware.
Next, decide how buyers qualify for your price cut under “Minimum purchase requirements.” Shopify gives you three simple paths:
No minimum requirements: The price drops instantly, even for a single small item. This works best when you want zero barriers for shoppers during flash sales.
Minimum purchase amount ($): Shoppers must hit a total dollar spend before savings kick in. Pick this option if you want to push cart totals higher and boost order value.
Minimum quantity of items: Customers need to put a specific number of products into their cart. This route shines when you want to clear extra stock quickly or encourage multi-item orders.
Pick the rule that aligns best with your store goal, then type your target number into the box.
Step 8: Schedule and Save
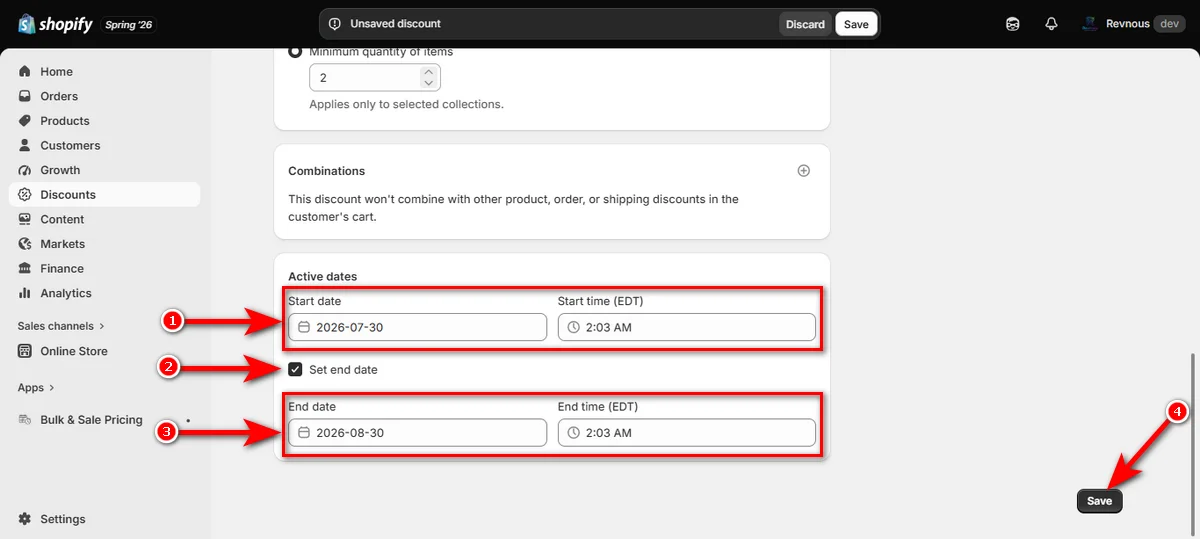
Set your launch calendar under “Active dates.” Pick your “Start date” and time.
Check “Set end date” select your automatic discount end date if you want this deal to expire automatically.
Finally, hit the ‘Save’ button in the top bar or bottom corner. Your product discount is live.
How to Create Automatic Buy X Get Y Automatic Discount in Shopify
You can clear your stock fast just by running a Buy One Get One (BOGO) deal or rewarding buyers with free gifts.
Shopify makes this simple with its native Buy X Get Y discount setup.
Here is how you can build an automatic Buy X Get Y promotion step by step.
Step 1: Select Buy X Get Y
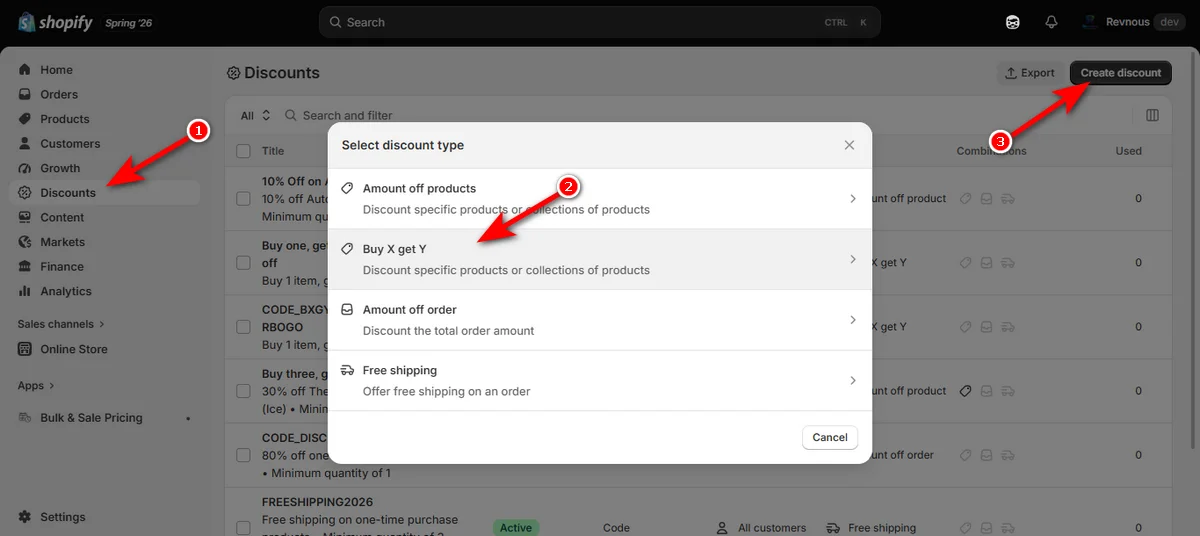
Head to ‘Discounts’ from your left menu panel and click the black “Create discount” button.
When the pop-up modal appears, choose “Buy X get Y” from the list.
Step 2: Switch to Automatic Method and Set Promo Title and Other Details
Click the “Automatic discount” tab and type a clear name in the ‘Title’ field so shoppers know what offer they received inside their shopping cart.
Now define what the customer buys (item X). Scroll down under “Customer buys” and choose how shoppers qualify for the offer:
Minimum quantity of items: Customers must buy a specific count of items before unlocking the deal. This works best if you want to push multi-item purchases.
Minimum purchase amount: Customers must spend a set dollar amount first. Pick this option when you want to lift cart values across broader price ranges.
Enter your target quantity (or dollar amount) in the input box.
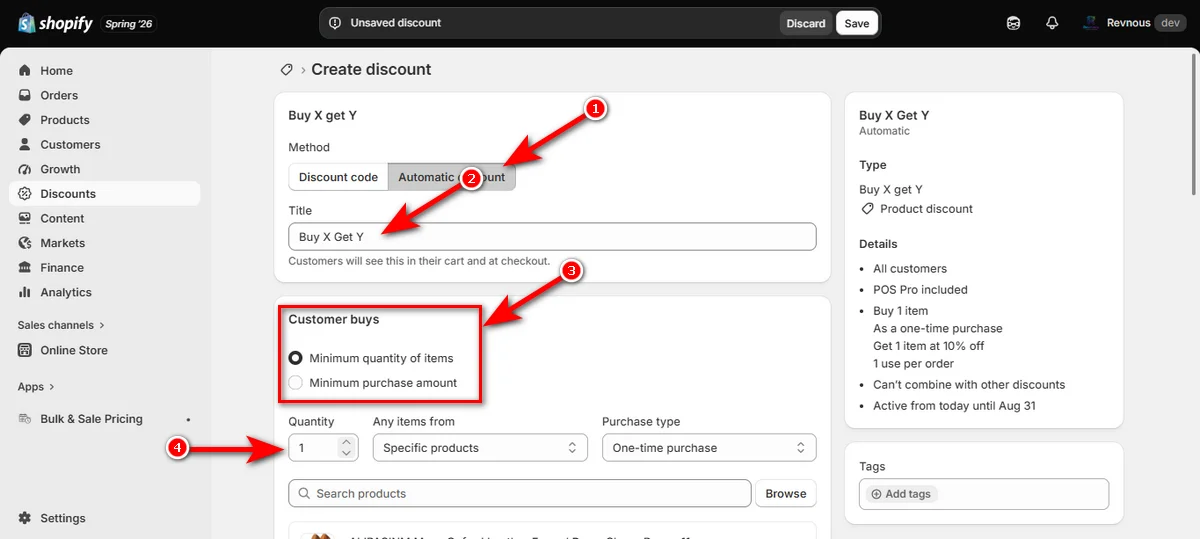
Then choose whether this applies to “Specific products” or “Specific collections,” and pick your “Purchase Type.”
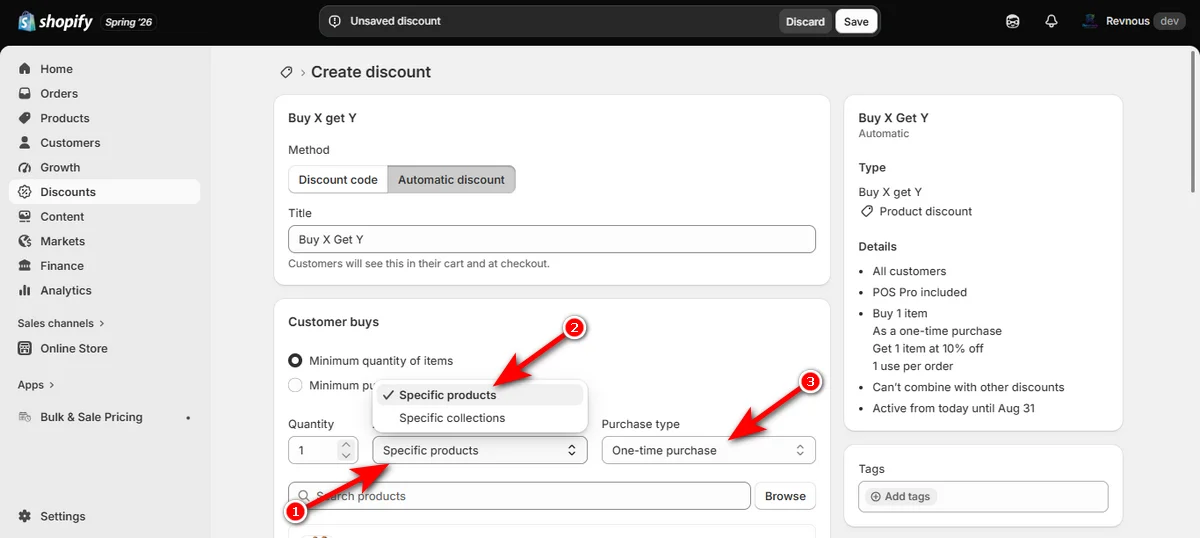
Step 3: Pick Eligible Trigger Products
Click the ‘Browse’ button (or search directly) to open your inventory window.
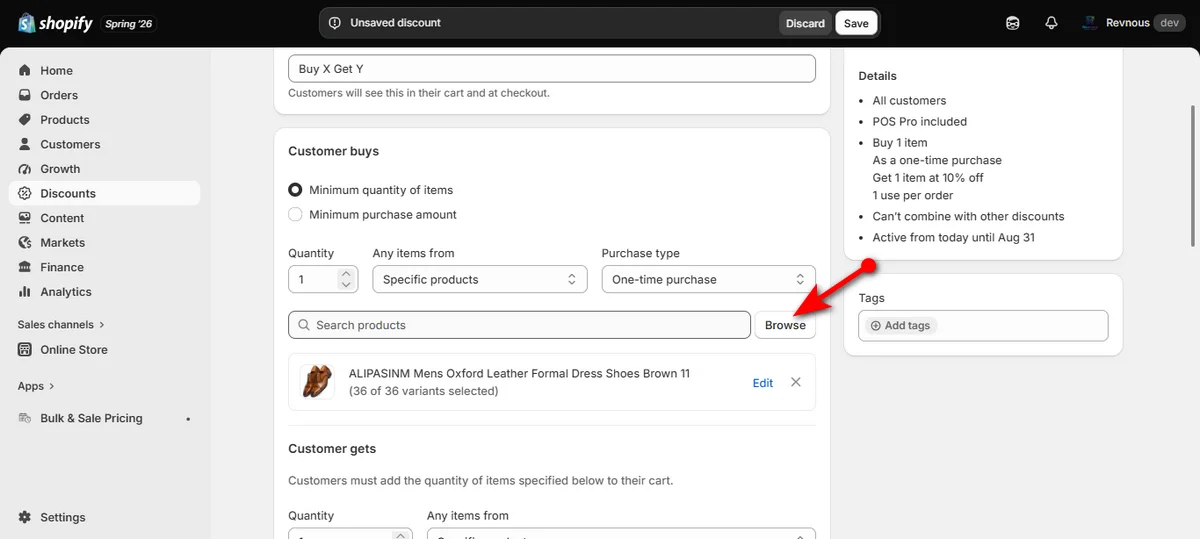
Check the boxes next to the items customers must buy to trigger the deal, then hit the ‘Done’ button.
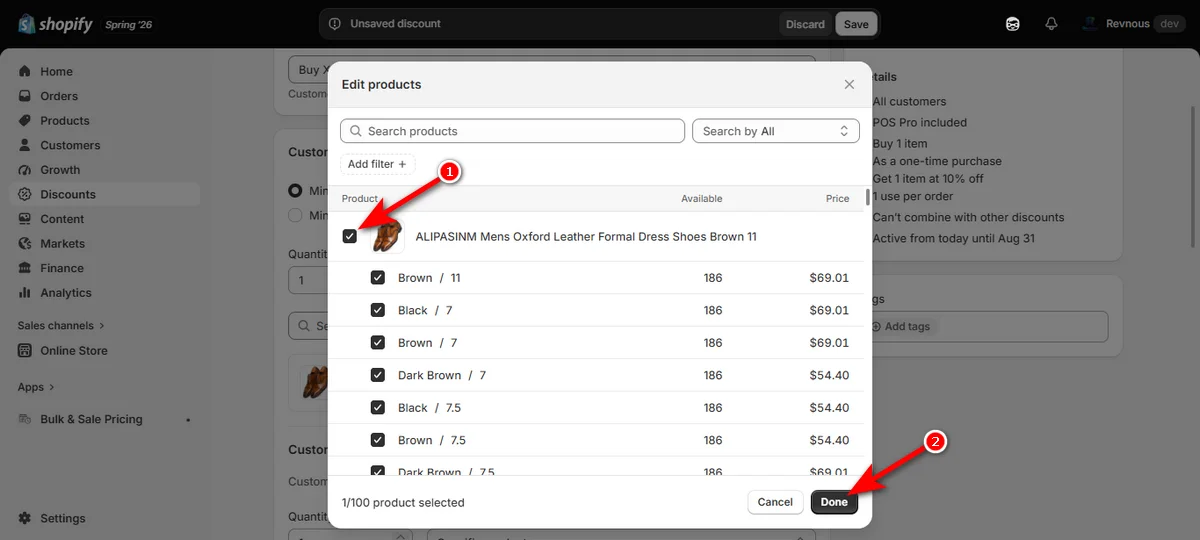
Step 4: Select What the Customer Gets (Item Y)
Scroll down to the “Customer gets” area and set the quantity and choose “Specific products” or “Specific collections” for the discounted (or free) reward item.
Click ‘Browse’ to choose the reward product from your catalog.
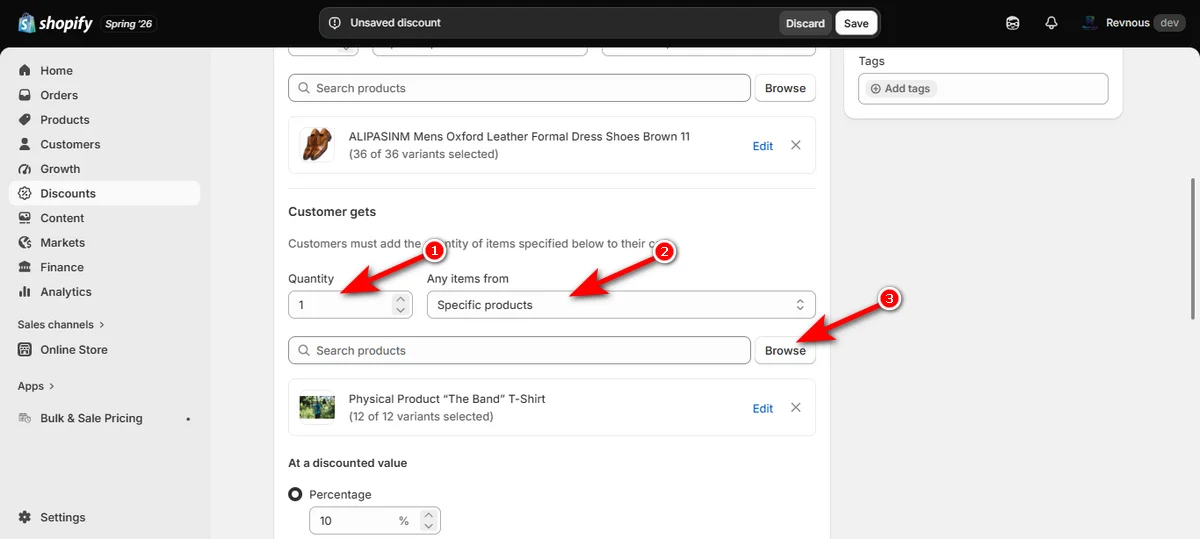
Step 5: Set the Reward Discount Value
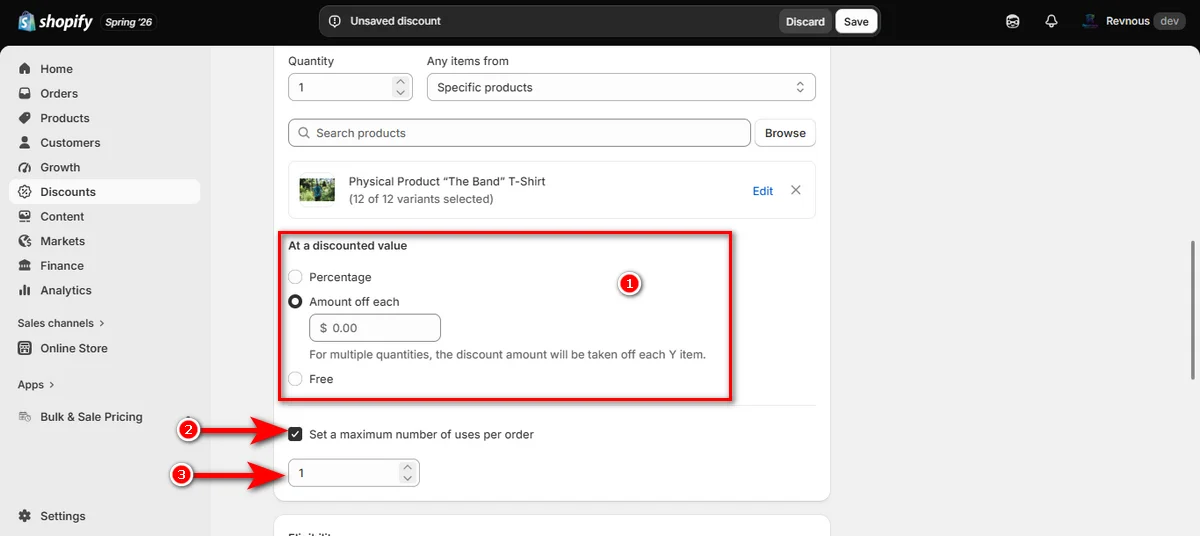
Under “At a discounted value,” choose how much buyers save on Item Y:
Percentage: Offers a percentage cut (like 50% off the second item).
Amount off each: Takes a fixed dollar amount off the reward item.
Free: Makes the reward item 100% free.
To keep your profit margins safe, check “Set a maximum number of uses per order” and type a limit (for example, 1 so a buyer only gets one free gift per order).
Step 6: Choose Customer Eligibility and POS Rules
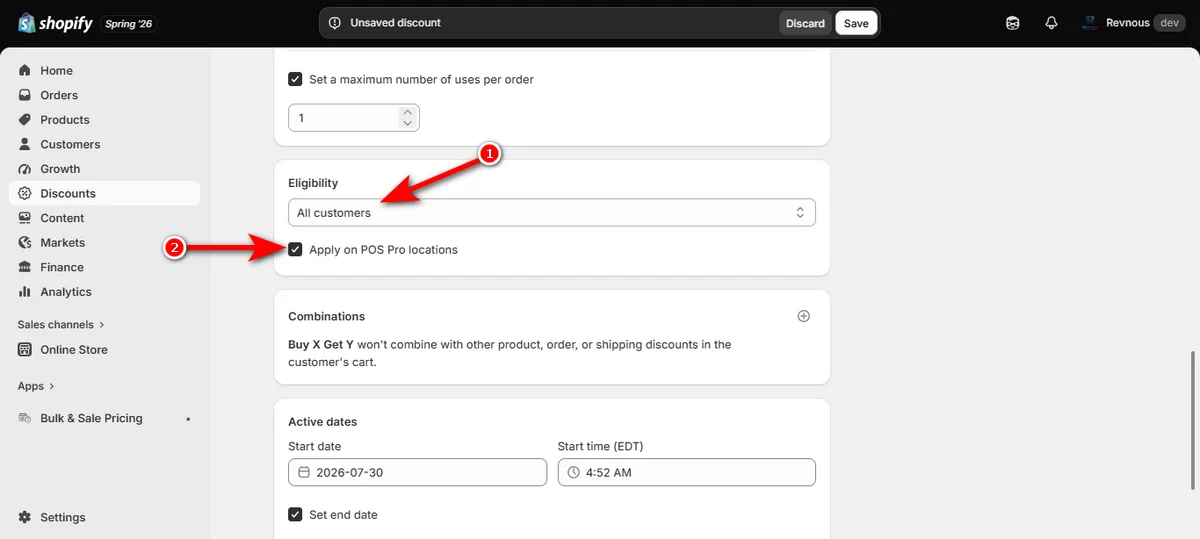
Scroll to ‘Eligibility’ and pick who gets the offer (All customers, Markets, Customer segments, or Specific customers).
Check “Apply on POS Pro locations” if you want this BOGO offer active in your physical retail stores.
Step 7: Schedule and Save
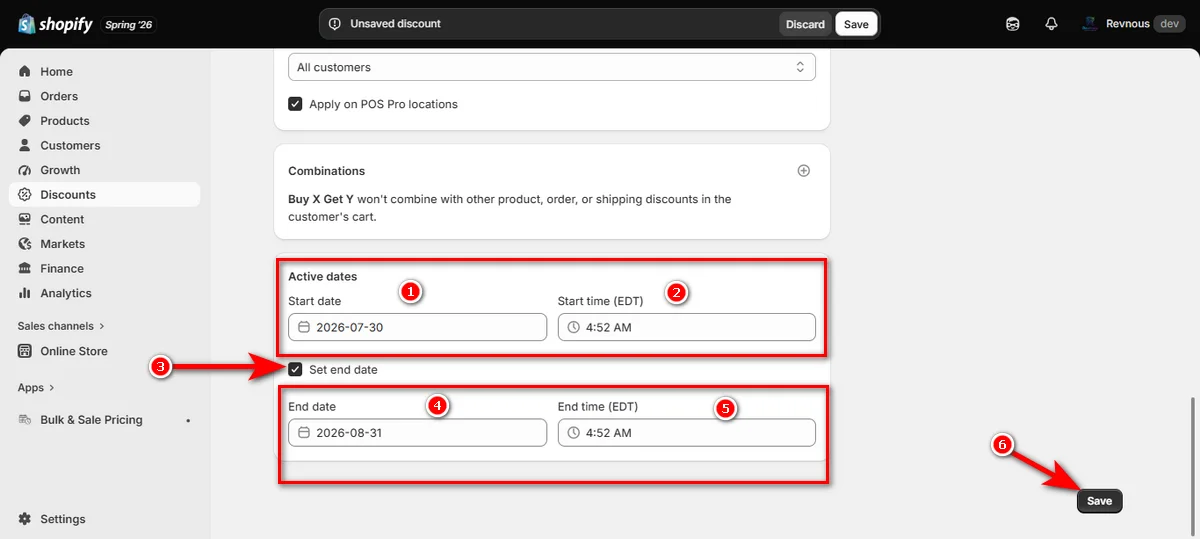
Set your campaign launch date and time under “Active dates.” Check “Set end date” if you want the offer to expire after a specific flash sale window.
Hit the ‘Save’ button in the top bar or bottom corner. Your automatic Buy X Get Y offer is ready for shoppers.
How to Create Automatic Discount on Total Order Amount in Shopify
Order-level discounts drop the price of the entire cart at once.
This strategy works well when you want to reward big spenders or push shoppers to hit specific cart thresholds.
Follow these four quick steps to set it up.
Step 1: Pick Amount Off Order
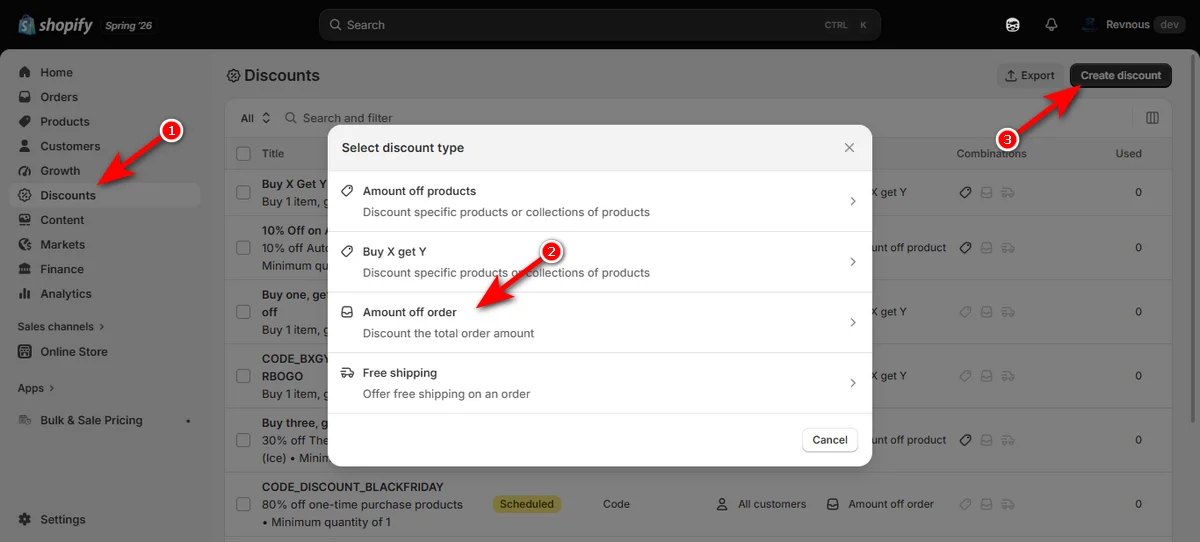
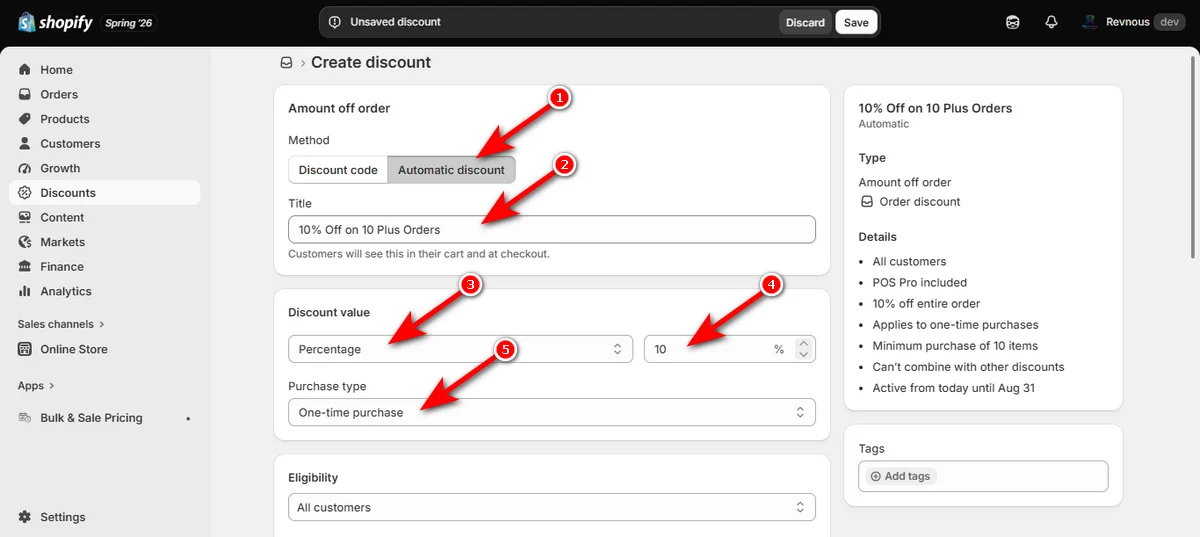
Click 'Discounts' on your admin sidebar, then hit the "Create discount" button. Select "Amount off order" from the modal list.
Step 2: Set Method, Title, and Discount Value
Switch the method tab to "Automatic discount." Write your promo name inside the 'Title' field.
Then, select 'Percentage' or "Fixed amount" from the "Discount value" dropdown menu and type your savings rate in the numeric box.
Lastly, pick your target option under "Purchase type."
Step 3: Configure Customer Eligibility and Minimum Purchase Rules
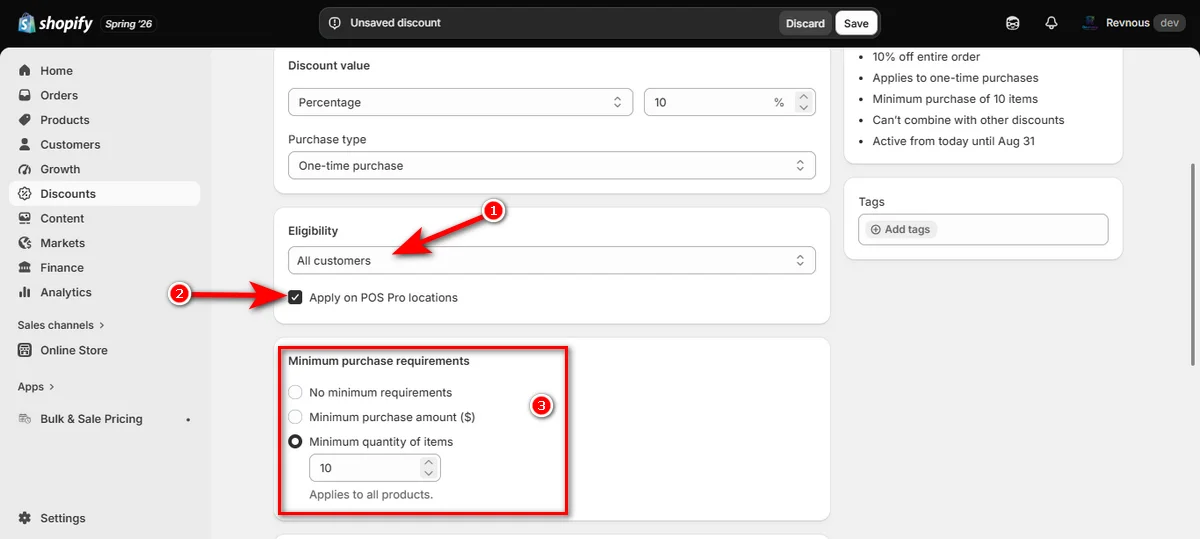
Choose who receives the deal under 'Eligibility.' Check "Apply on POS Pro locations" if you sell products inside physical stores.
Select your preferred rule under "Minimum purchase requirements" and enter the minimum dollar amount or item count.
Step 4: Schedule Campaign and Save
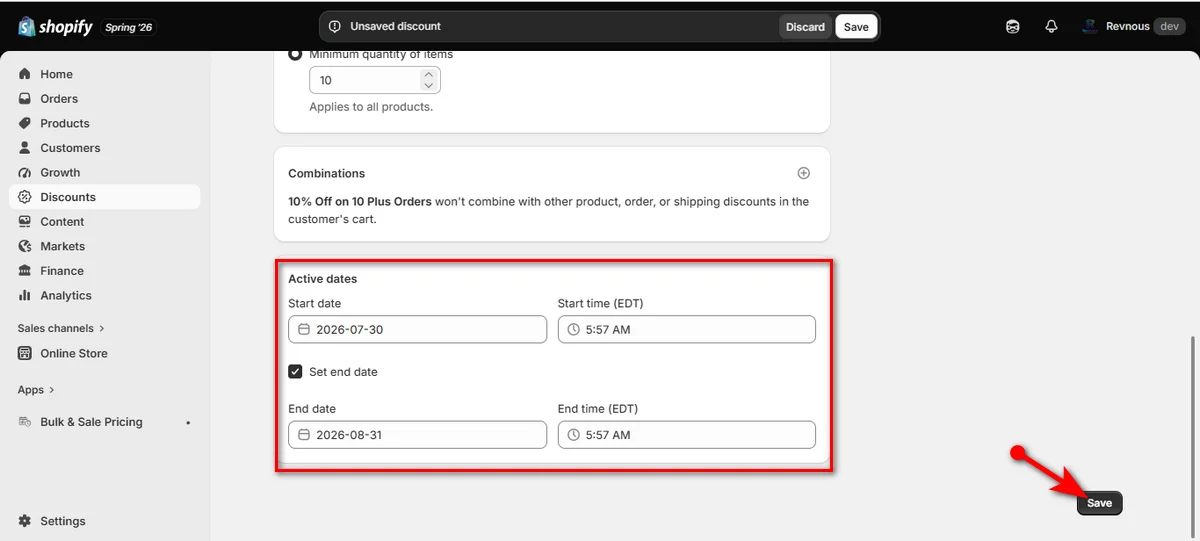
Pick your launch time under "Active dates." Check "Set end date" if you want the promo to stop on a specific day.
Hit the 'Save' button in the top bar or bottom corner to activate the order discount.
How to Create Free Shipping Automatic Discount in Shopify
Free shipping offers reduced cart abandonment during checkout. Set up automatic free delivery rules directly within your dashboard.
Step 1: Select Free Shipping
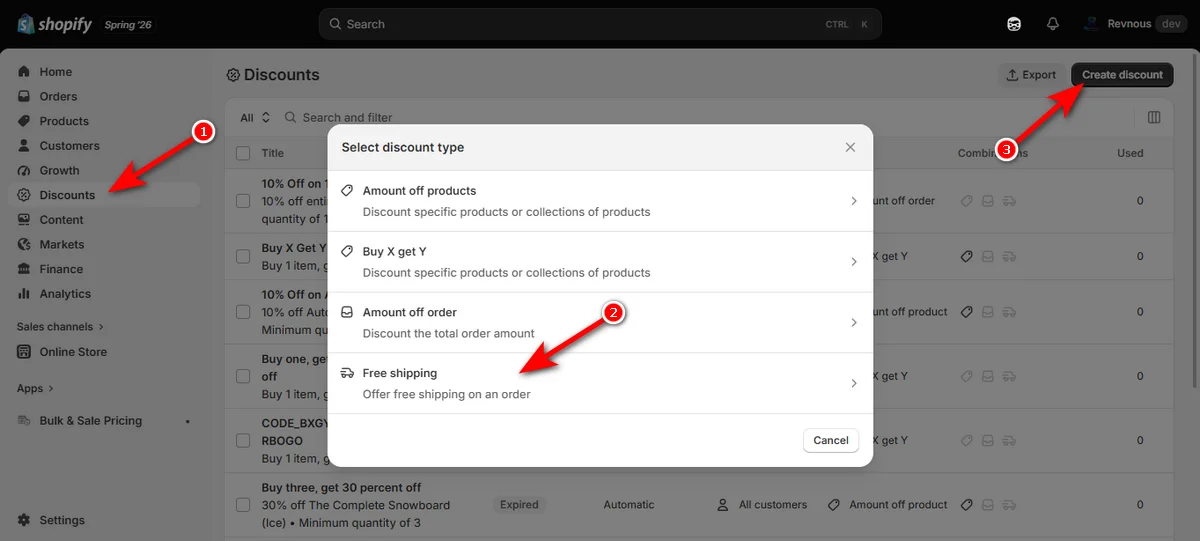
Navigate to 'Discounts' and hit the "Create discount" button. Then, click "Free shipping" from the discount type list.
Step 2: Choose Method, Title, and Country Target
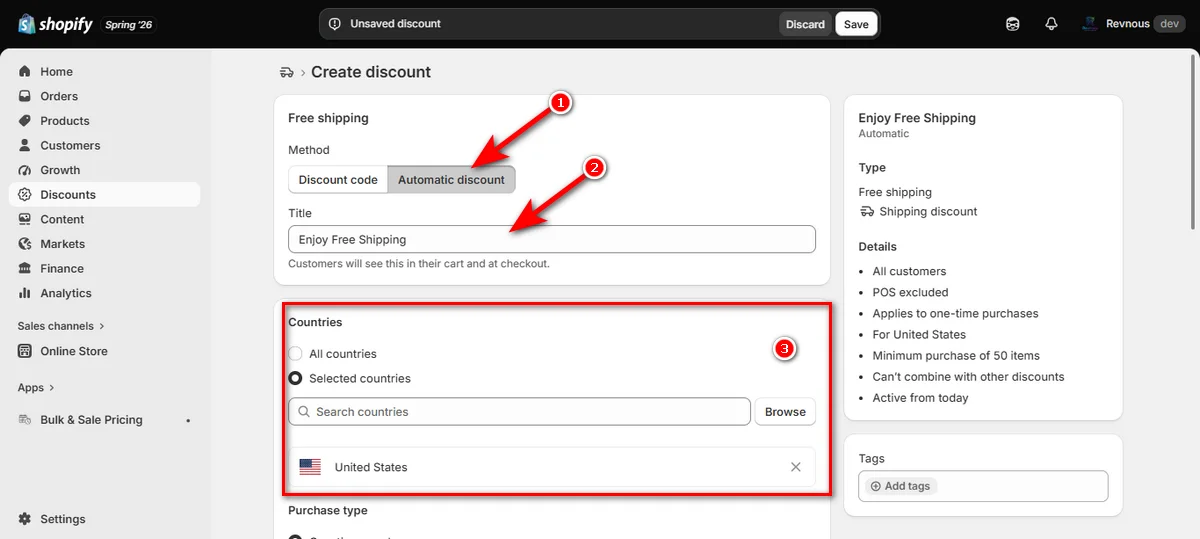
Select "Automatic discount" and give your offer a 'Title'.
Under 'Countries', pick "All countries" or select "Selected countries" to limit free delivery to specific regions.
Step 3: Set Rates, Eligibility, and Cart Limits
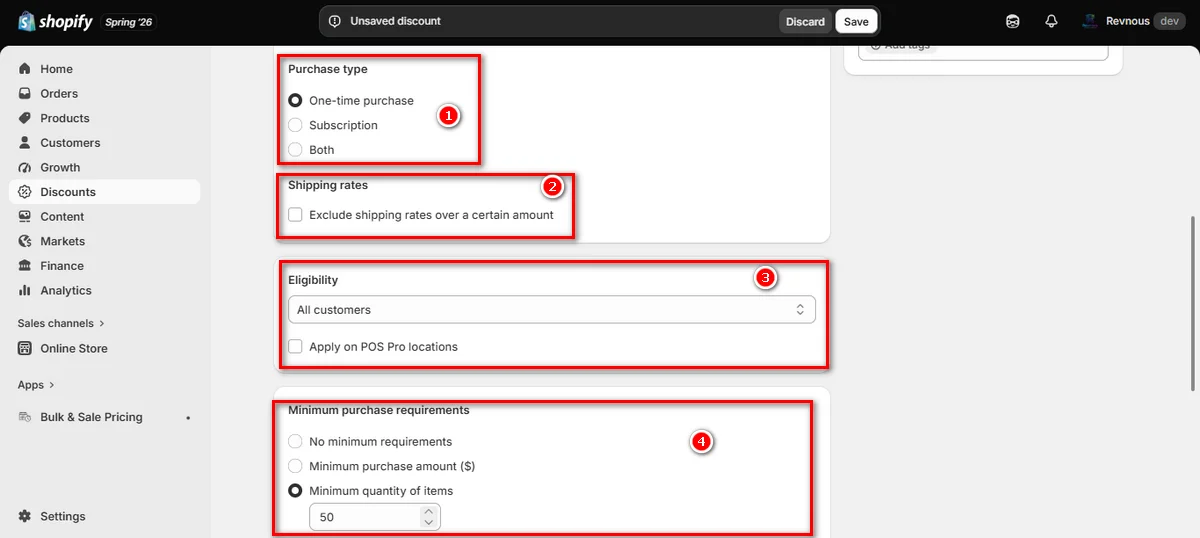
Select your "Purchase type" and target 'Eligibility'.
Under "Shipping rates", check "Exclude shipping rates over a certain amount" if you want to avoid paying high delivery costs for heavy orders or express shipping. Type your max limit in the dollar box.
Finish by picking your rule under "Minimum purchase requirements".
Step 4: Schedule and Save
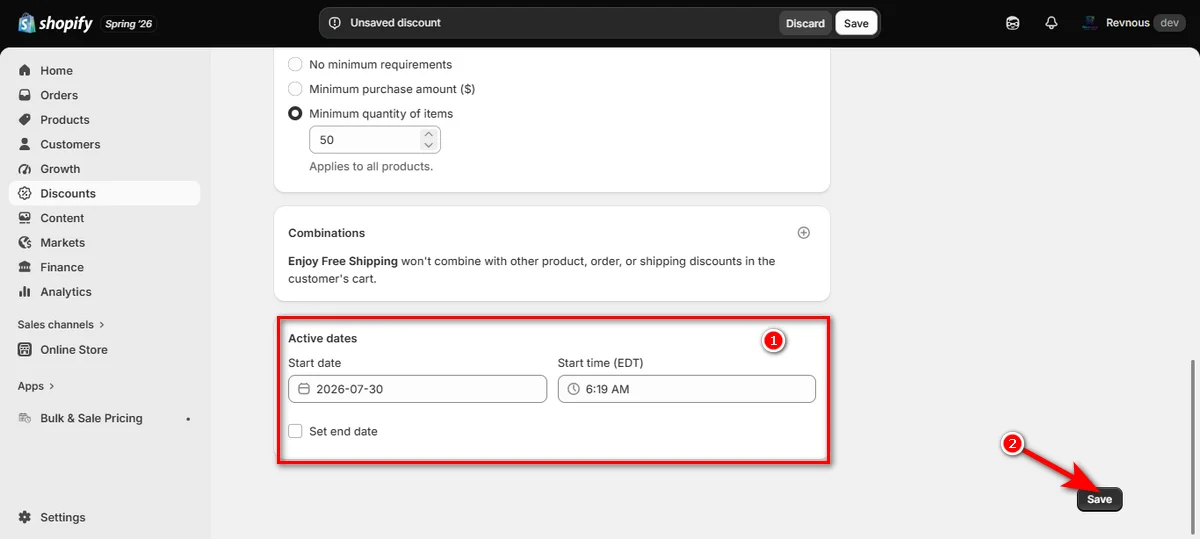
Pick your start time under "Active dates" and add an end date if needed.
Click the 'Save' button in the top bar or bottom corner to activate free shipping for qualifying carts.
How to Combine Multiple Automatic Discounts in Shopify
Follow these four steps to stack automatic discounts without checkout errors.
Step 1: Open Your Base Automatic Discount
Navigate to 'Discounts' and open your existing discount (or hit "Create discount" to make a new one).
Ensure the method tab is set to "Automatic discount".
Step 2: Scroll to the Combinations Section
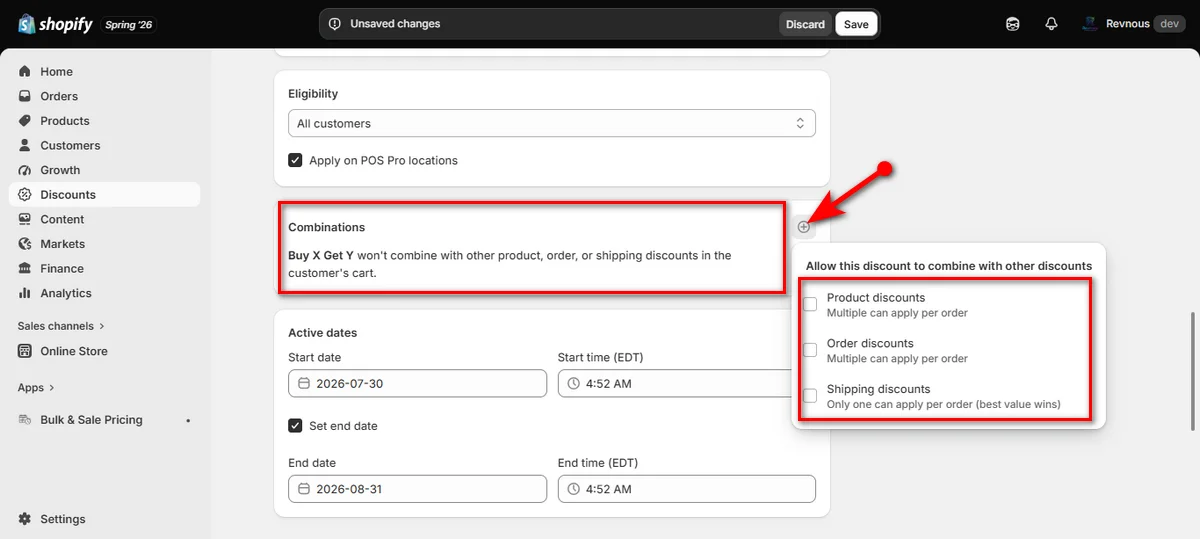
Scroll down past eligibility rules until you find the ‘Combinations’ area.
Click ‘+’ icon and you’ll notice a list of three eligible discount classes here:
Product discounts
Order discounts
Shipping discounts
Step 3: Check Allowed Stacking Classes
Check the box next to each discount type you want to stack with this deal.
For example, check "Shipping discounts" if you want your product deal to stack with a free shipping offer.
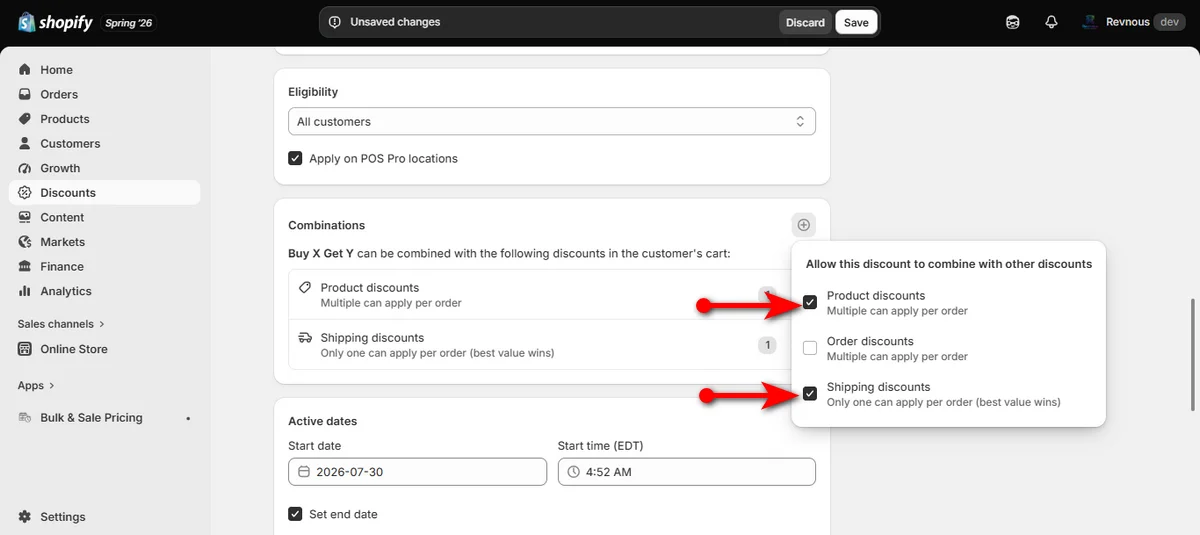
Note: Both discount types must permit each other inside their respective 'Combinations' panels.
If Discount A (Buy X Get Y) allows shipping deals, but you didn’t enable Combinations in Discount B (Free Shipping), Shopify will refuse to combine them at checkout.
Step 4: Save and Test at Checkout
Hit the 'Save' button.
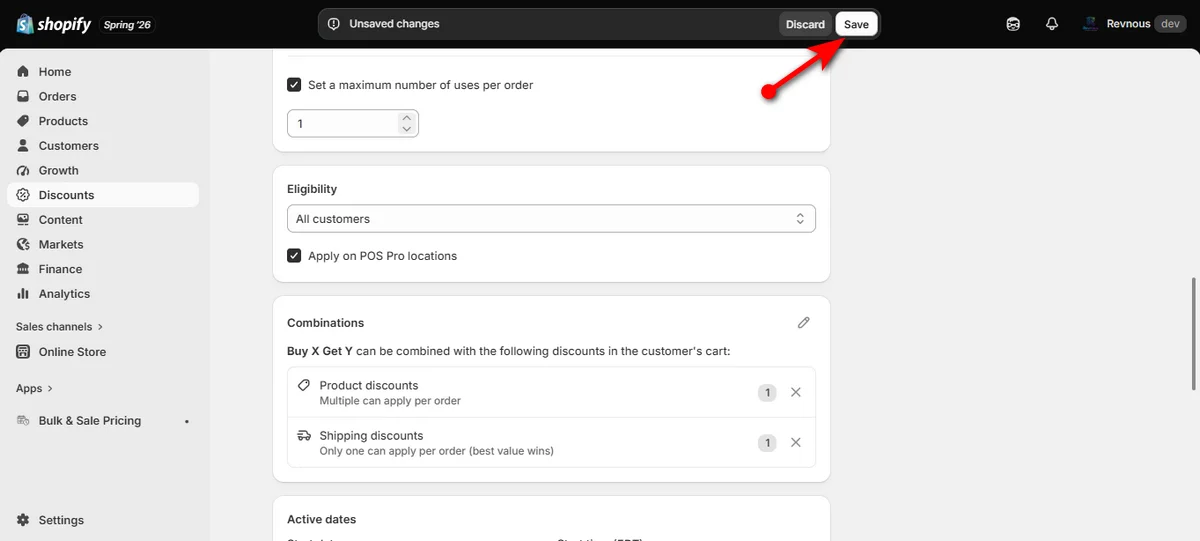
Repeat this entire process for your second automatic discount to ensure matching permissions.
Then, open an incognito browser window, add test items to your cart, and verify that both savings reflect automatically before completing checkout.
How to Create Bulk Automatic Discounts in Shopify with Shopify Apps
Shopify native rules cap active automatic deals at 25 and block multiple product discount setups on identical inventory.
A third-party pricing app like Revnous Bulk Price Editor solves this hurdle by modifying catalog price tags directly at the variant level.
Search for the Revnous Bulk Price Editor on the Shopify App Store to install it.
Afterward, follow these steps to build automatic bulk price campaigns:
Step 1: Launch New Price Campaign
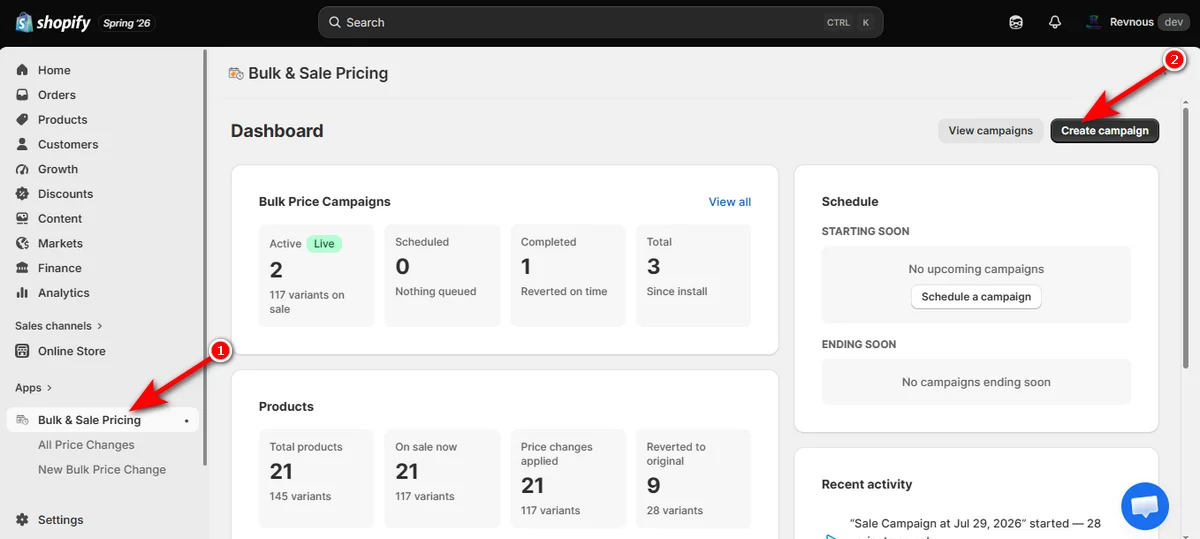
Open your Shopify admin sidebar, click “Bulk & Sale Pricing,” then click the “Create campaign” button in the top right corner.
Step 2: Select Your Preferred Products
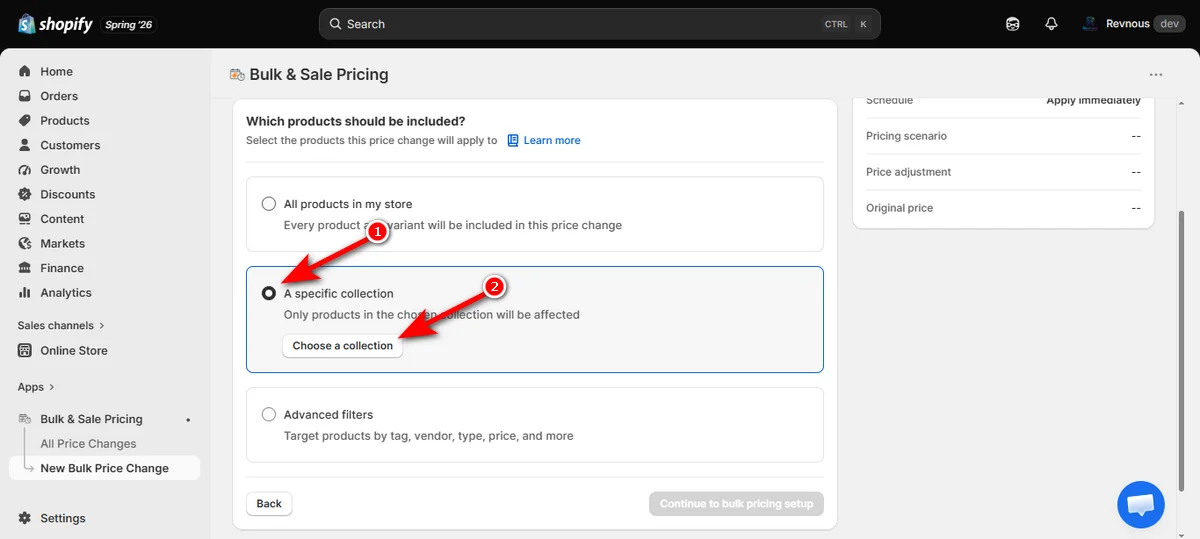
Now, you need to select products. You can choose all products, a few particular products, or select “A specific collection” under product scope options.
Then click the “Choose a collection” button to open your store inventory list.
Step 3: Choose Eligible Products
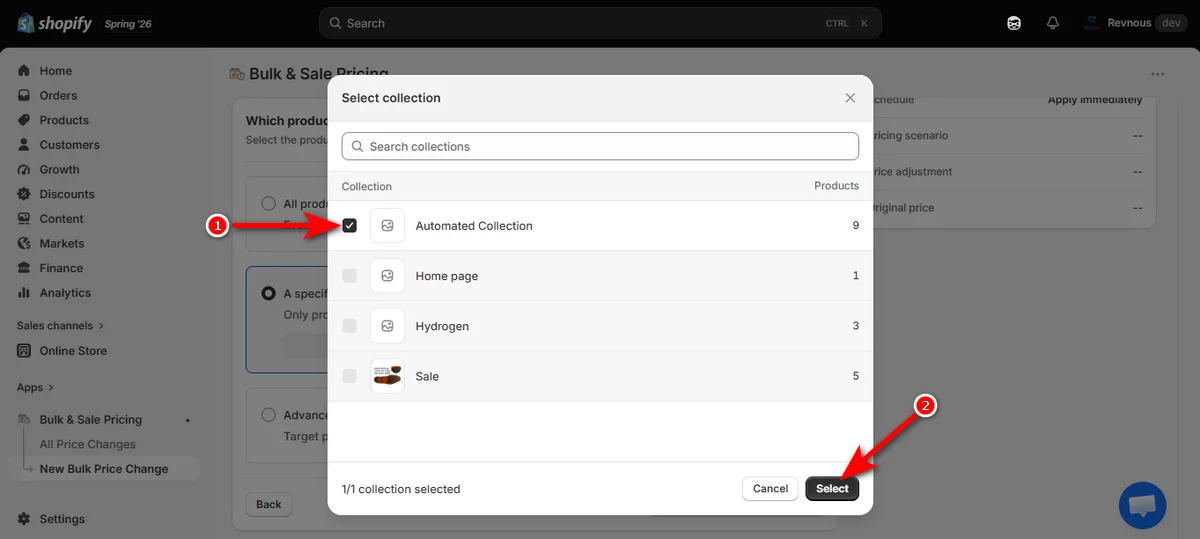
Check the box next to your desired catalog line (e.g., Automated Collection) inside the modal window, then click ‘Select’ to save your target items.
Step 4: Proceed to Discount Rules
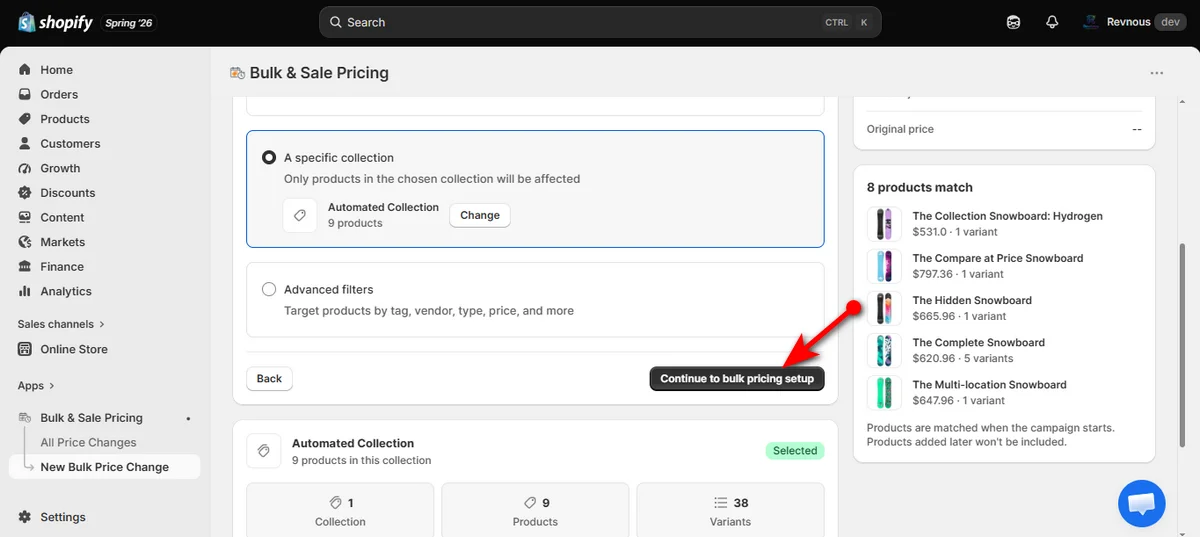
Confirm your matched product count on the summary card and hit “Continue to bulk pricing setup.”
Step 5: Pick Campaign Pricing Scenario
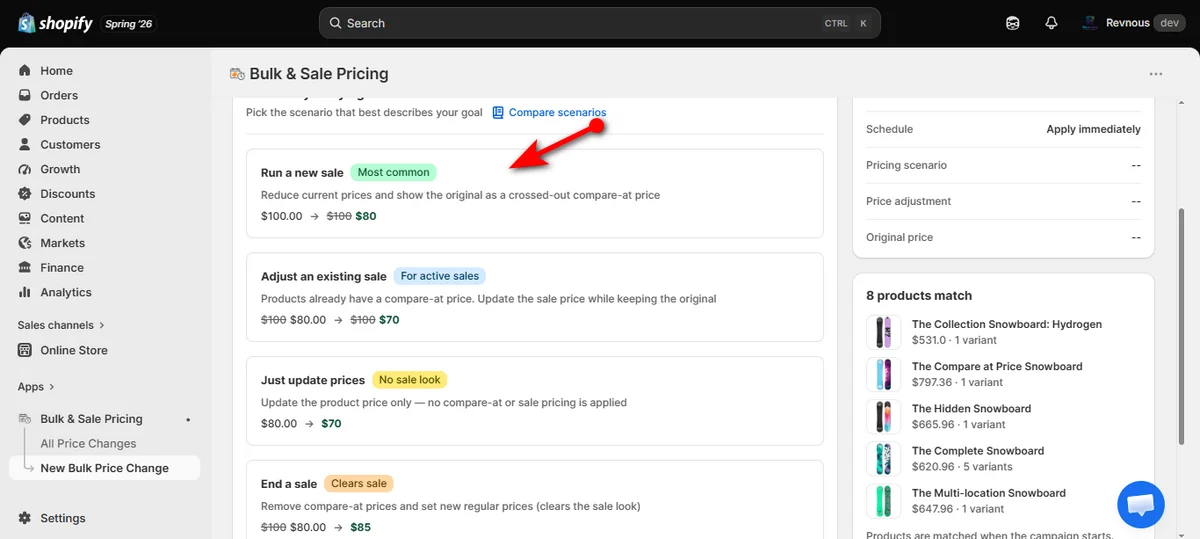
Choose the option that fits your goal:
Run a new sale: Pick this for standard sales. It cuts current prices and shows the old price crossed out.
Adjust an existing sale: Use this if items are already on sale and you want to drop prices even lower.
Just update prices: Select this for silent price changes without showing a sale or crossed-out look.
End a sale: Choose this to clear sale tags and bring item prices back to normal.
Step 6: Set Calculation Method and Value
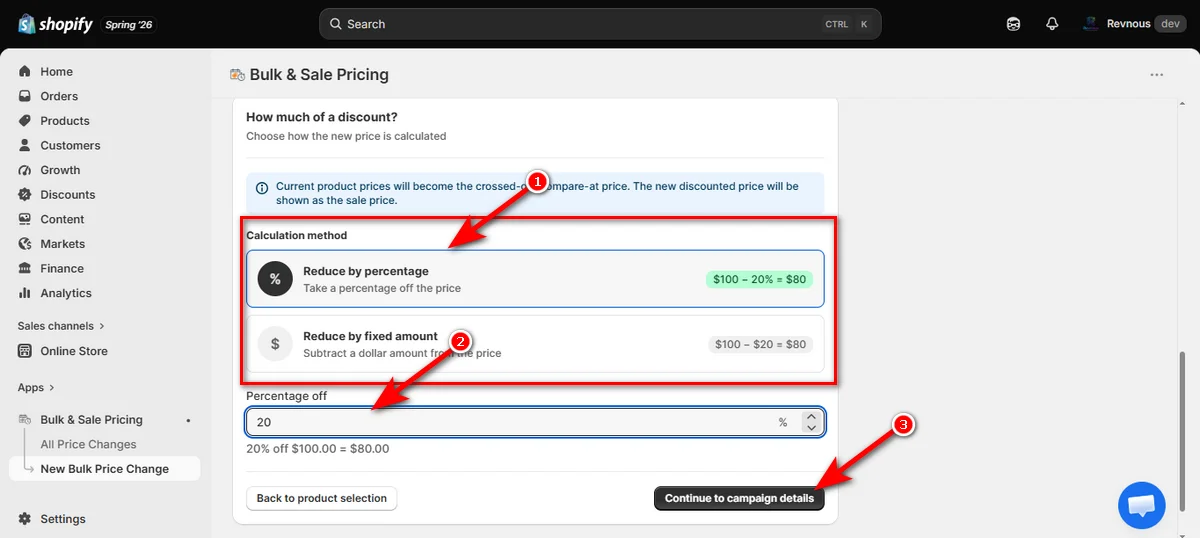
Scroll down and pick “Reduce by percentage” (or “Reduce by fixed amount”). Now, enter your target savings percentage into the numeric box (e.g., 20), and click “Continue to campaign details.”
Step 7: Name and Schedule Campaign
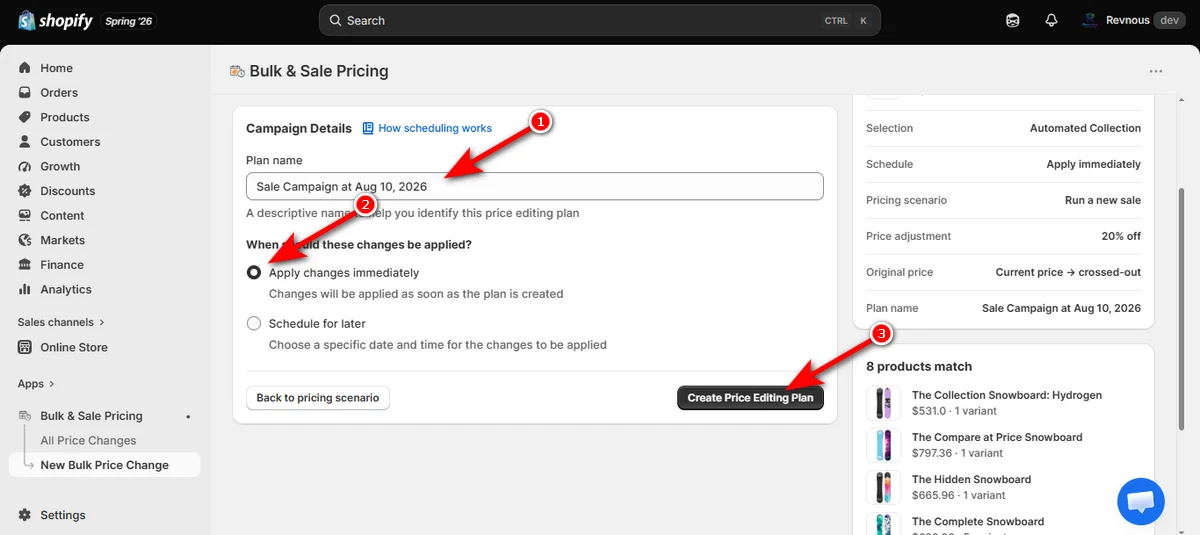
Type a descriptive title in the “Plan name” box, choose “Apply changes immediately" (or pick a future calendar schedule), and hit “Create Price Editing Plan.”
Step 8: Manage Active Campaign Controls
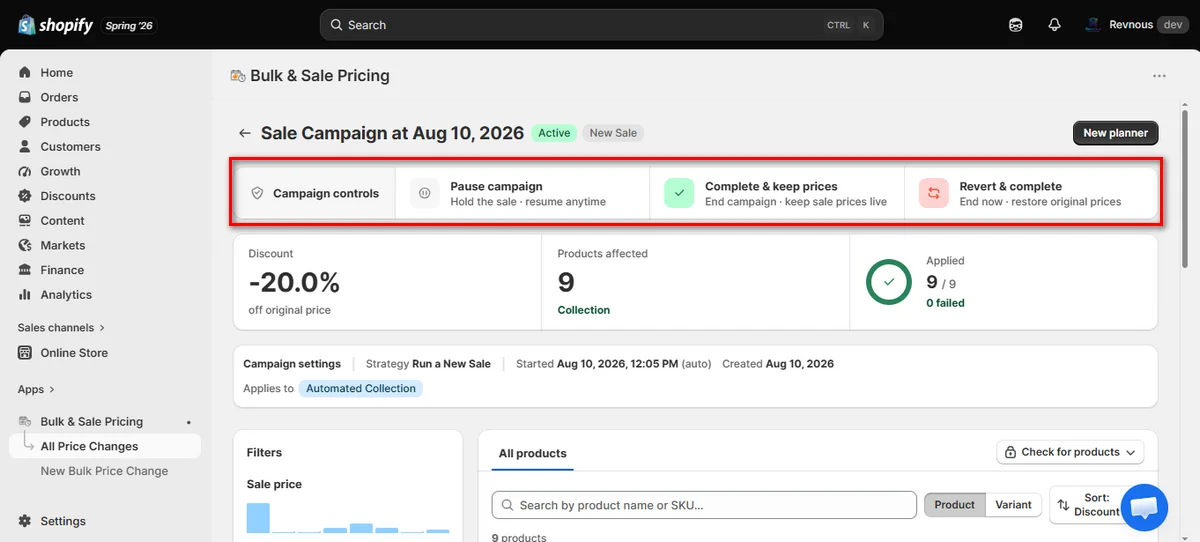
View real-time status changes inside your live dashboard. Use top control buttons to Pause campaign, Complete & keep prices, or Revert & complete to restore original rates anytime.
Try Revnous Discount Automator for Free
How Discount Combinations Work in Shopify
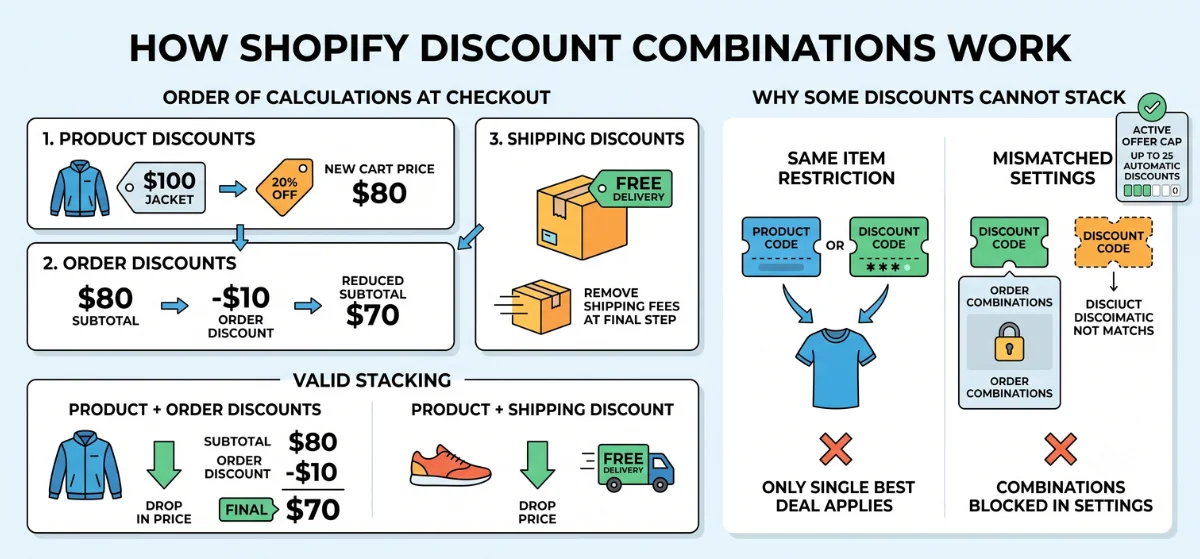
Shopify checkout uses simple step-by-step math to figure out stacked savings. Knowing these rules helps you avoid pricing mistakes.
Order of Calculations at Checkout
Shopify calculates combined deals in a strict order:
Product discounts apply first: Price cuts lower individual item costs directly in the cart.
Order discounts apply second: Flat savings apply to the new subtotal, not the original retail price.
Shipping discounts apply last: Free delivery removes shipping fees at the final step.
Product Discount + Order Discount
Product deals and order deals stack smoothly when you enable them.
Example: A customer buys a $100 jacket with a 20% product discount. The jacket price drops to $80. If you also run a $10 order discount, Shopify takes $10 off that new $80 subtotal. The final price becomes $70.
Product Discount + Shipping Discount
Shipping deals pair easily with product savings. Customers get marked-down items alongside free delivery on the same order.
Example: 15% off shoes combined with free delivery on orders over $50.
Why Some Discounts Cannot Stack
Shopify blocks specific combinations to protect your store profits:
Same item restriction: Standard Shopify plans do not allow two product discounts on the exact same item. Shopify applies only the single best deal for the buyer.
Mismatched settings: If one discount blocks order combinations inside its ‘Combinations’ panel, Shopify stops the second discount at checkout.
Active offer cap: Shopify limits stores to 25 active automatic discounts at one time.
How Shopify Combines Automatic Discounts: Common Scenarios
Shopify handles combined deals at checkout using predictable stacking rules.
Stacking Scenario |
Native Support? |
Real-World Example |
How Savings Apply at Checkout |
Product + Order |
Yes |
10% off Shirts + $15 off $100+ order |
Product discount drops item prices first. Order discount applies to the new remaining subtotal. |
Product + Free Shipping |
Yes |
20% off Jackets + Free Shipping |
Both deals trigger automatically once cart conditions match. |
Order + Free Shipping |
Yes |
$10 off total cart + Free Shipping |
Both discounts stack without friction during the final checkout step. |
Product + Product (Same item) |
No (Shopify Plus only) |
15% off Pants + BOGO on same Pants |
Shopify blocks double dipping on standard plans. The system automatically picks the single best deal for the buyer. |
Common Problems of Using Multiple Automatic Discounts in Shopify
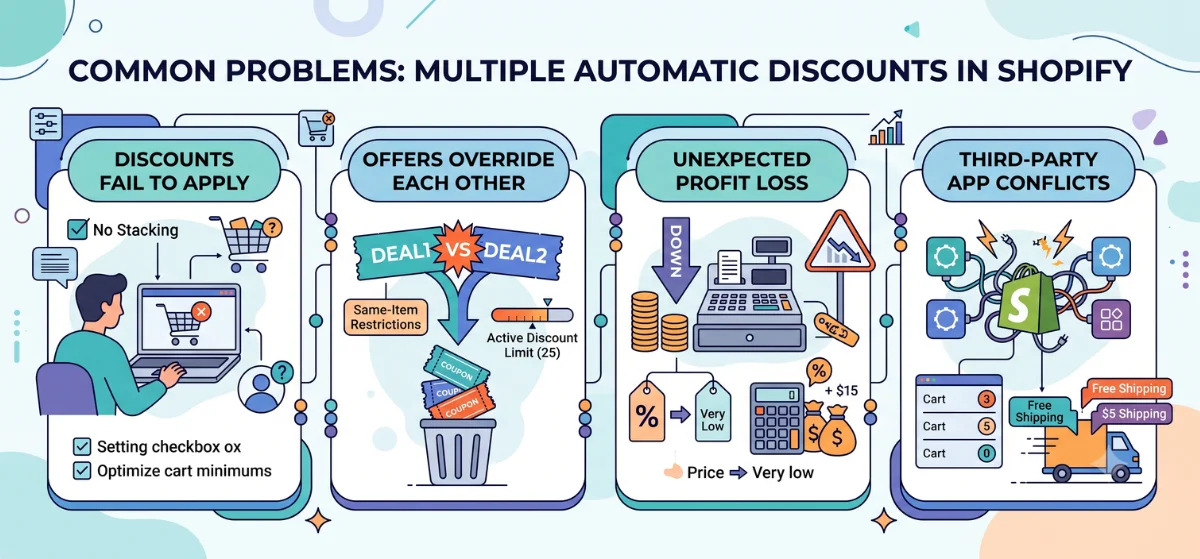
Multiple automatic deals can cause errors if rules overlap or clash at checkout.
Discounts Fail to Apply
Shoppers often miss out on deals due to simple setup mistakes.
Disabled combination settings: Shopify blocks stacking by default. You must check combination boxes on both deals, or Shopify drops one offer.
Incorrect eligibility rules: Cart totals or item counts fall short of your set limits.
Customer condition conflicts: The buyer does not match your target customer segment.
Offers Override Each Other
Some discounts replace existing deals instead of stacking together.
Same-item restrictions: Standard Shopify plans block two product discounts on the exact same item.
One-sided combination permission: One discount allows stacking, but the second discount blocks it.
Active discount limits: Shopify caps your store at 25 active automatic discounts. The system ignores extra deals.
Unexpected Profit Loss
Layered deals can wipe out your profit margins fast. A 20% product discount combined with a $15 order discount can cause you to sell items below cost. Always calculate total savings before launching stacked sales.
Third-Party App Conflicts
External sales tools and bulk discount Shopify apps often clash with native settings if rules overlap.
Duplicate price cuts: Apps and native settings apply the same deal twice.
Display errors: Shopping carts show wrong totals before checkout.
Shipping conflicts: Shopify allows only one shipping discount per order. Multiple shipping apps or rules will clash.
Best Practices for Managing Multiple Shopify Discounts
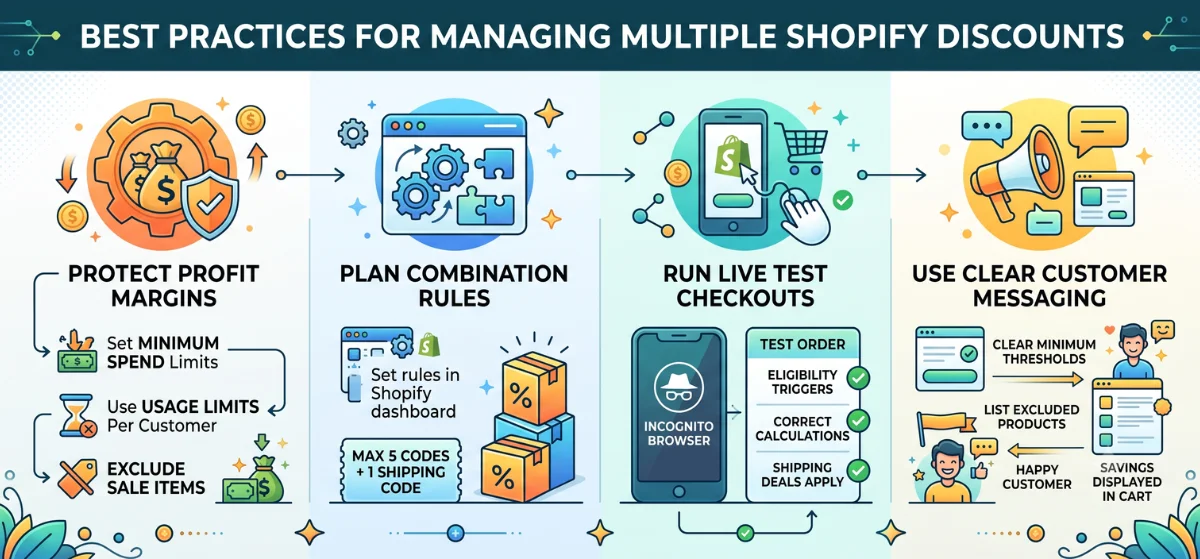
Planning and testing keep your promotions profitable and error-free.
Protect Your Profit Margins
Uncontrolled overlapping deals can wipe out your profit. Use simple guardrails to keep promotions profitable:
Set minimum spend limits: Require shoppers to hit a minimum dollar amount or item count before unlocking extra savings.
Use usage limits: Cap total uses per customer or order to prevent promo abuse.
Exclude sale items: Do not give extra discounts on sale items, especially when you use bulk edit price Shopify apps to drop storewide prices.
Plan Combination Rules
Set clear rules directly inside your dashboard. Decide which product, order, and shipping deals can run together.
Keep in mind that Shopify limits orders to a maximum of 5 product or order discount codes and 1 shipping code.
Run Live Test Checkouts
Always test your discount logic before launching a campaign. Open an incognito browser window and add test items to your cart.
Verify that eligibility rules trigger, calculations match your math, and shipping deals apply without issues.
Use Clear Customer Messaging
Tell shoppers exactly how your deals work to build trust:
Display minimum cart thresholds clearly on banner notices.
List excluded products or collections on promotional graphics.
Explain how savings apply inside cart summary drawers.
Wrapping Up
Okay, now you know how to create multiple automatic discounts on Shopify. Correctly follow all the steps shown in this content to keep your store running smoothly.
Automatic deals give shoppers great savings without extra effort. Always run a quick test purchase in a private browser window before going live.
This simple check protects your profit margins and prevents checkout errors. That’s all with this article. You may read our other blogs for more amazing tutorials.
Frequently Asked Questions
- What is the Automatic Discount Function on Shopify?
- The automatic discount function applies price cuts or free shipping directly to a customer's shopping cart during checkout. Shoppers receive savings automatically once their cart meets set eligibility rules, without entering a promo code.
- How to Add an Automatic Discount in Shopify?
- Log into your Shopify admin area and go to Discounts > Create discount. Pick your discount type, select the “Automatic discount” tab, set your eligibility rules, enable combination permissions, and hit save.
- Can You Have Multiple Automatic Discounts on Shopify?
- Yes, Shopify supports multiple automatic discounts running at the same time. You can keep up to 25 automatic discounts active concurrently across your store.
- Can I Stack Discounts?
- Yes, you can stack product, order, and shipping deals together. Both promotions must have stacking permissions enabled inside their 'Combinations' settings panel for savings to calculate at checkout.
- Can You Apply Multiple Discount Codes?
- Yes, shoppers can enter up to 5 product or order discount codes and 1 shipping discount code on a single checkout, as long as your combination rules permit code stacking.


Ready to Boost Your Revenue?
Join 66,000+ brands already using Revnous to drive sustainable growth