
How to Create a Sale Collection on Shopify

To create a sale collection on Shopify, go to Products > Collections and click “Add collection.” Name it ‘Sale,’ click “Add condition” under ‘Products,’ set “Compare at price” to “is greater than 0.00,” and save.
Shoppers leave your site fast when they can’t find your active discounts. You lose easy revenue because buyers refuse to hunt through every product page for a deal.
Learn how to create a sale collection on Shopify to solve this problem right away. A clear sale page gathers every markdown in one spot so visitors buy without delay.
This guide covers step-by-step methods to build your sales page, set up automated rules, update pricing, and add sale links to your store menu.
What is a Collection on Shopify?
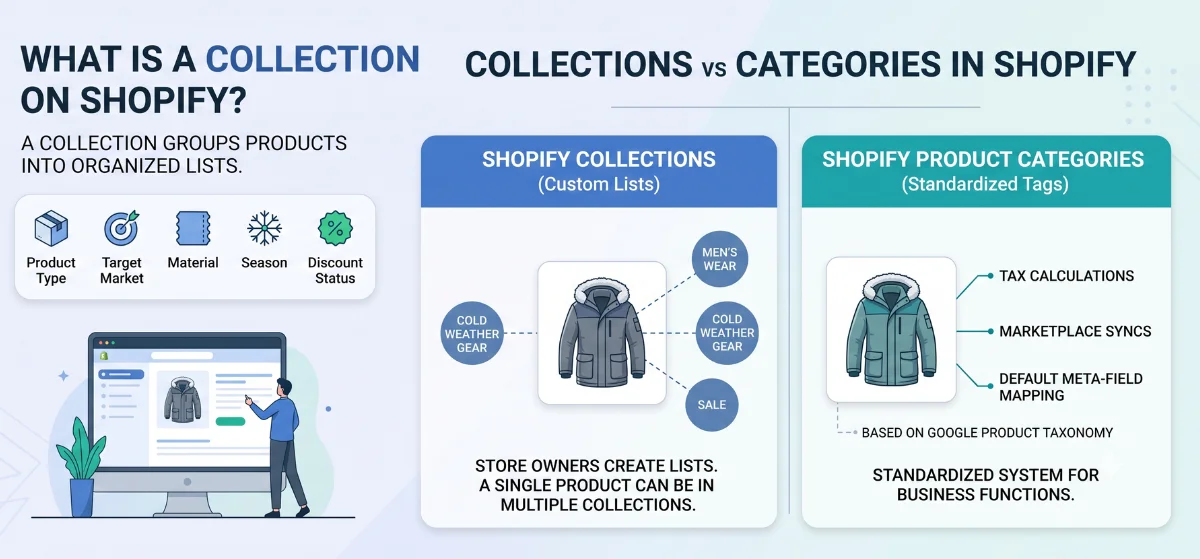
A collection in Shopify groups products into organized lists. Store owners organize items by product type, target market, material, season, or discount status.
Collections vs Categories in Shopify
Store owners must distinguish between collections and categories to avoid structural errors:
Shopify Collections: Custom product lists created by store owners. A single product can sit inside multiple collections at the same time. For example, a winter coat can appear inside Men's Wear, Cold Weather Gear, and Sale.
Shopify Product Categories: Standardized tags based on Google Product Taxonomy. Shopify uses this system for tax calculations, marketplace syncs, and default meta-field mapping.
How to Build a Sale Collection in Shopify
Here’s a step-by-step guide on how to create a sale collection on Shopify. You’ll learn both automated and manual methods.
Two Smart Rules Every Sale Page Needs
To set up an automatic sale collection, you rely on two basic settings:
Compare-at Price is Greater Than 0: In Shopify, the “Compare-at Price” is simply the original, full price of an item before it went on sale.
When you lower a product's price and put its old price in the "Compare-at Price" box, Shopify recognizes that the item is on sale.
When you set this rule, it tells Shopify to instantly add any item with a discount to your sale page.
Inventory Stock is Greater Than 0: This rule tells Shopify to hide items once they sell out.
Showing out-of-stock products on a sale page disappoints shoppers and leads to lost sales.
Step-by-Step Guide: Build Your Sale Collection
Step 1: Start a New Collection
-
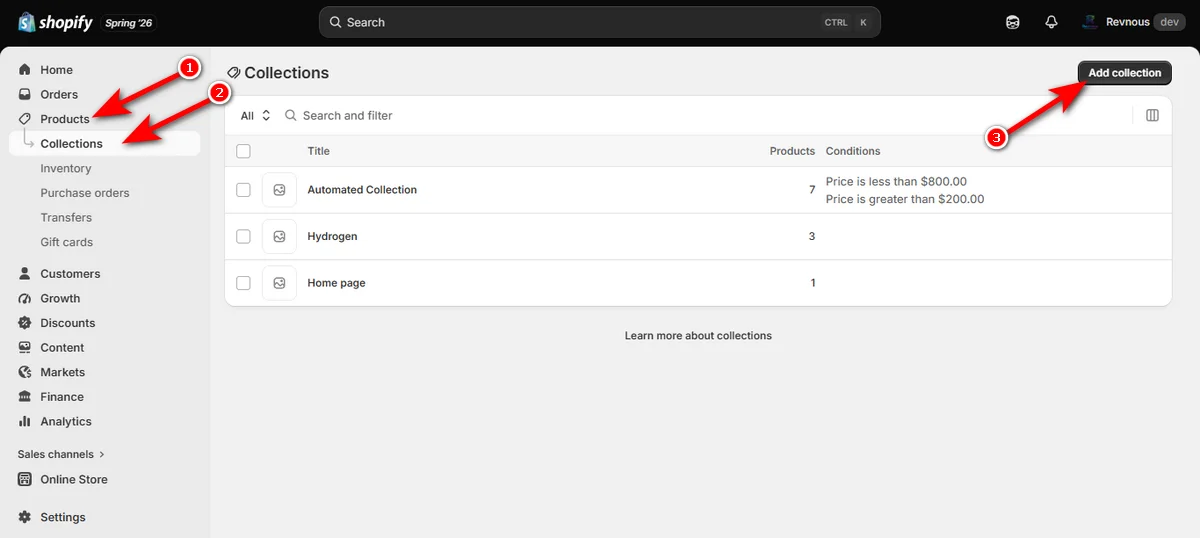
Log in to your Shopify admin screen. Click ‘Products’ on the left menu, click ‘Collections,’ then hit the black “Add collection” button at the top right.
-
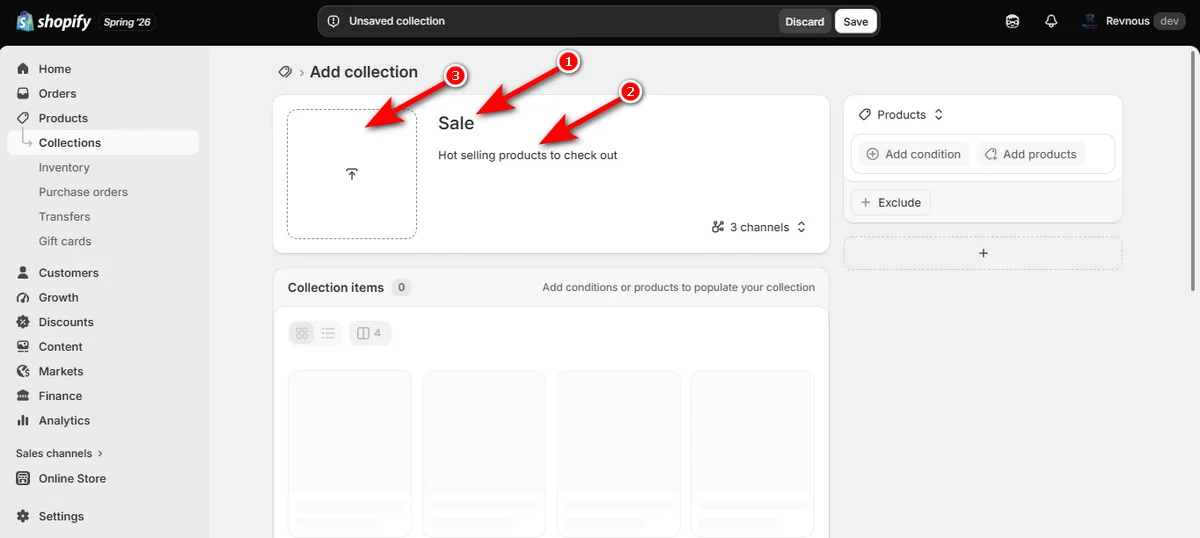
Type a title for your page, such as ‘Sale’ or ‘Clearance,’ and add a short description for your buyers.
-
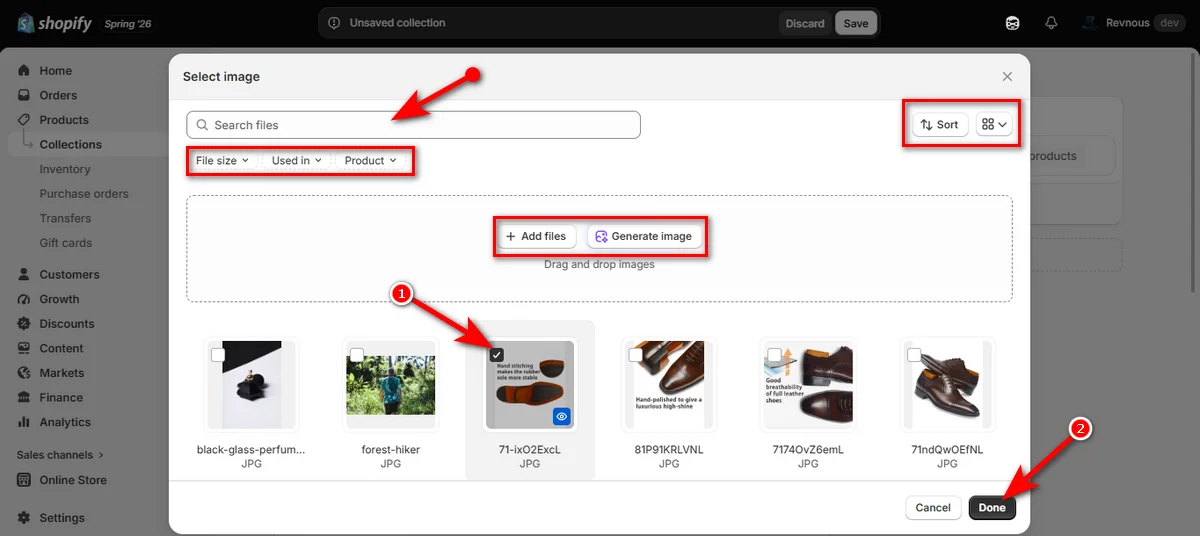
Click the square image box to upload a cover photo or banner for your sale page, then click ‘Done.’
Step 2: Add Products to Your Collection
You have two simple ways to choose which products appear on your sale page:
Method A: Pick Products by Hand (Manual)
Use this option if you want to run a small sale with only a few specific items:
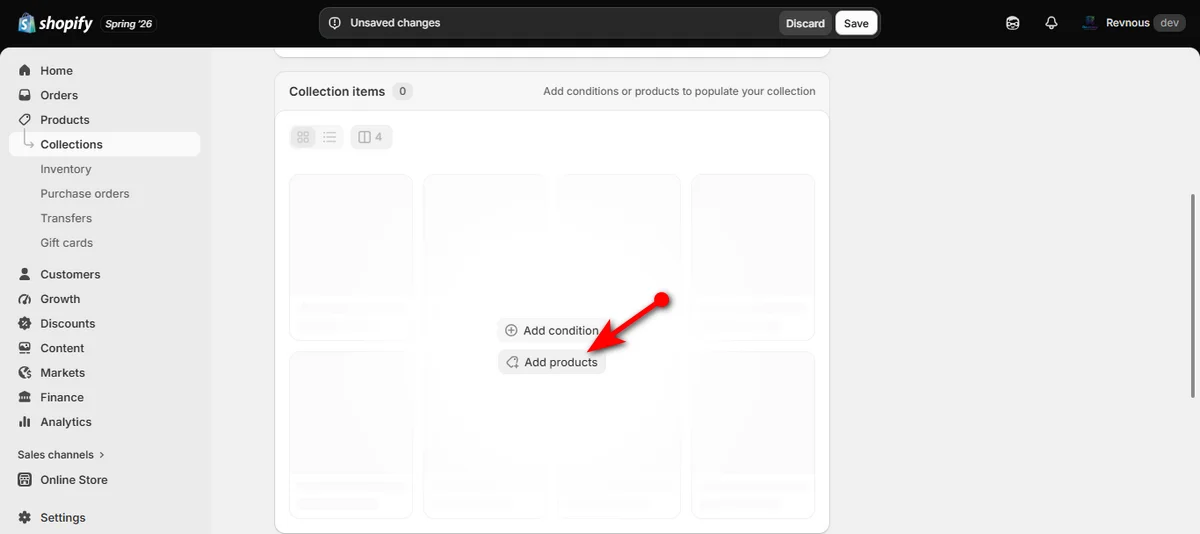
Click the “Add products” button in the middle of the page under “Collection items” or inside the ‘Products’ block on the right.
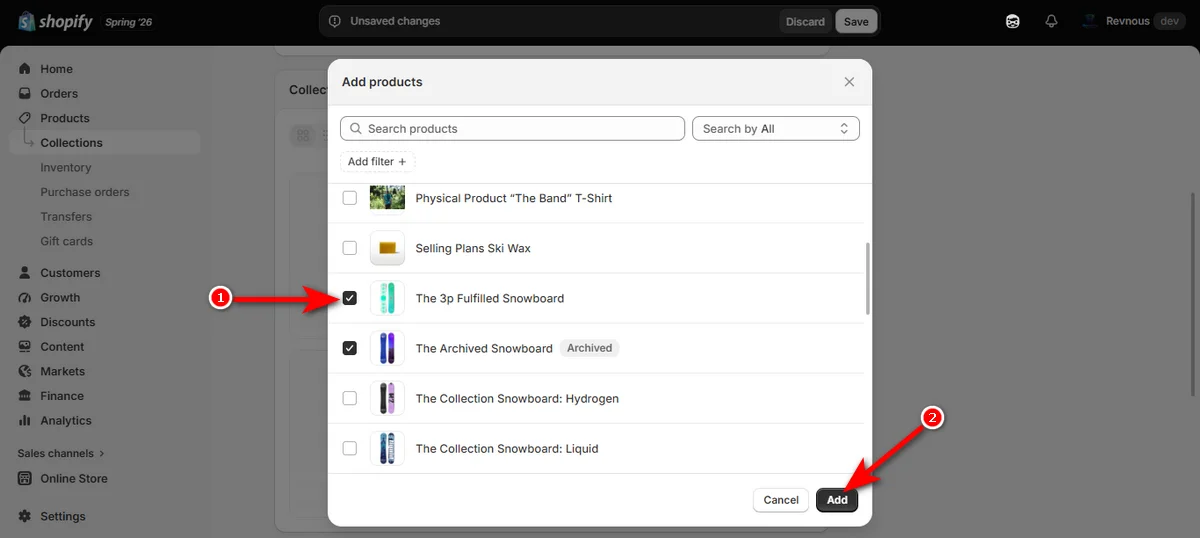
Check the boxes next to the products you want to include, then click the ‘Add’ button.
Method B: Add Products Automatically (Recommended)
Use this option if you want Shopify to automatically feature every discounted item in your store:
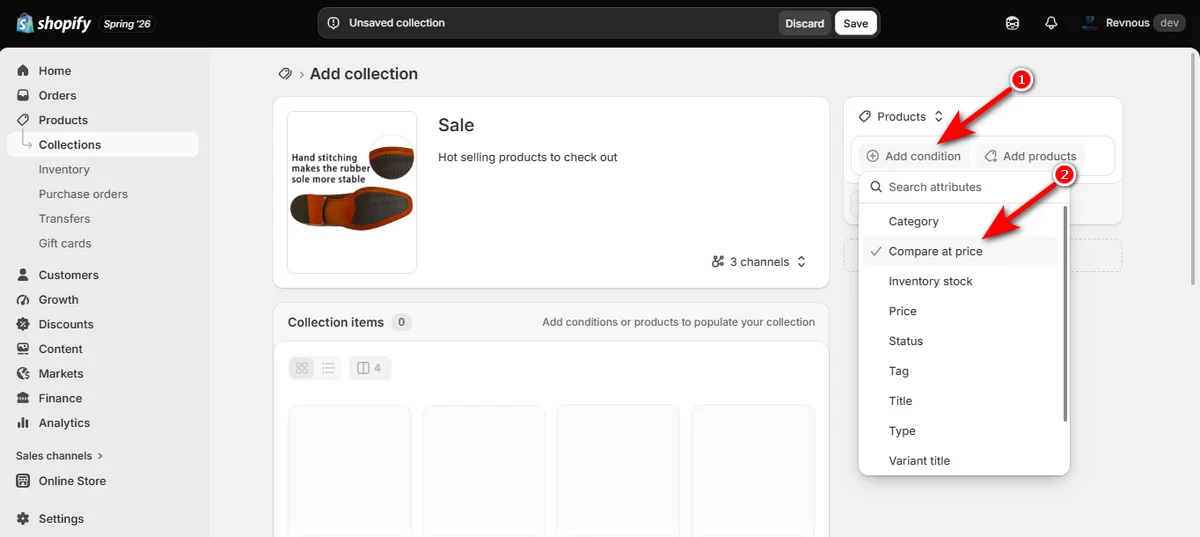
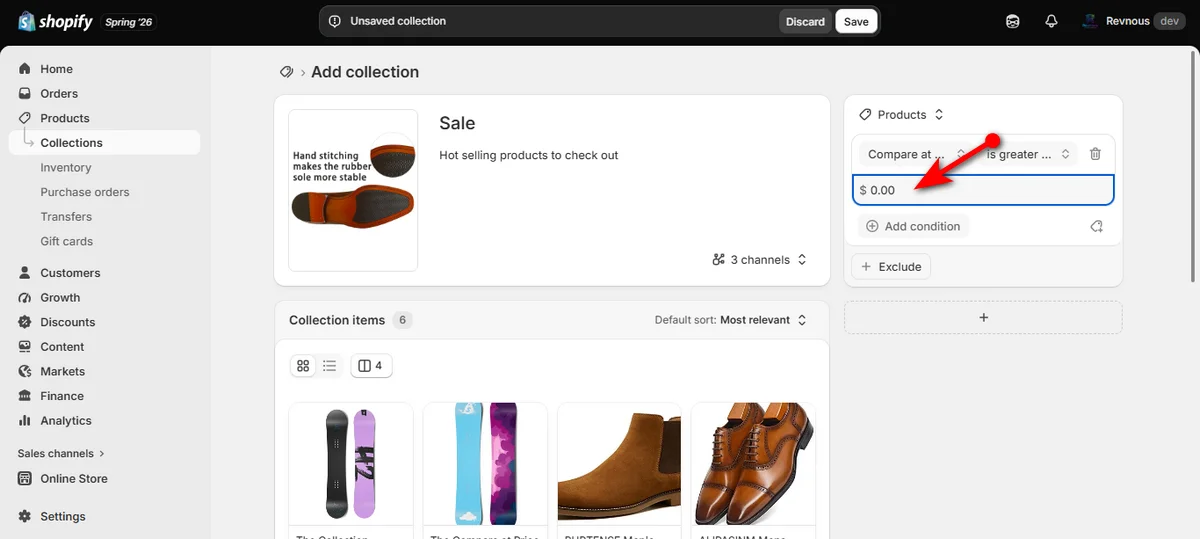
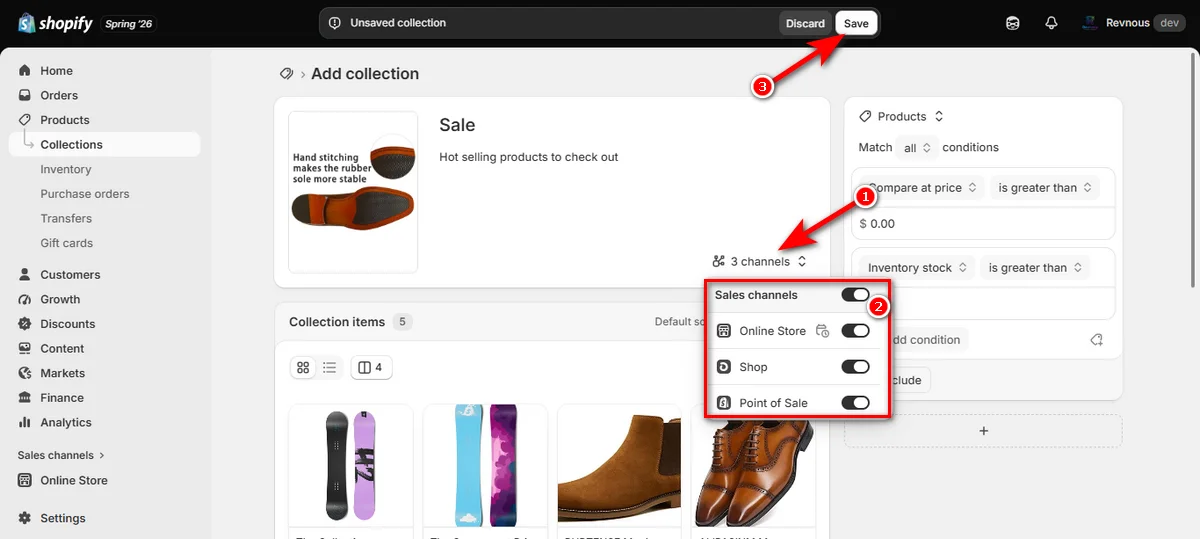
Go to the ‘Products’ block on the right side of your screen and click “Add condition.” From the attribute menu that appears, select “Compare at price.”
-
Hit the dropdown menu next to “Compare at price” (which defaults to "is equal to") and choose “is greater than.”
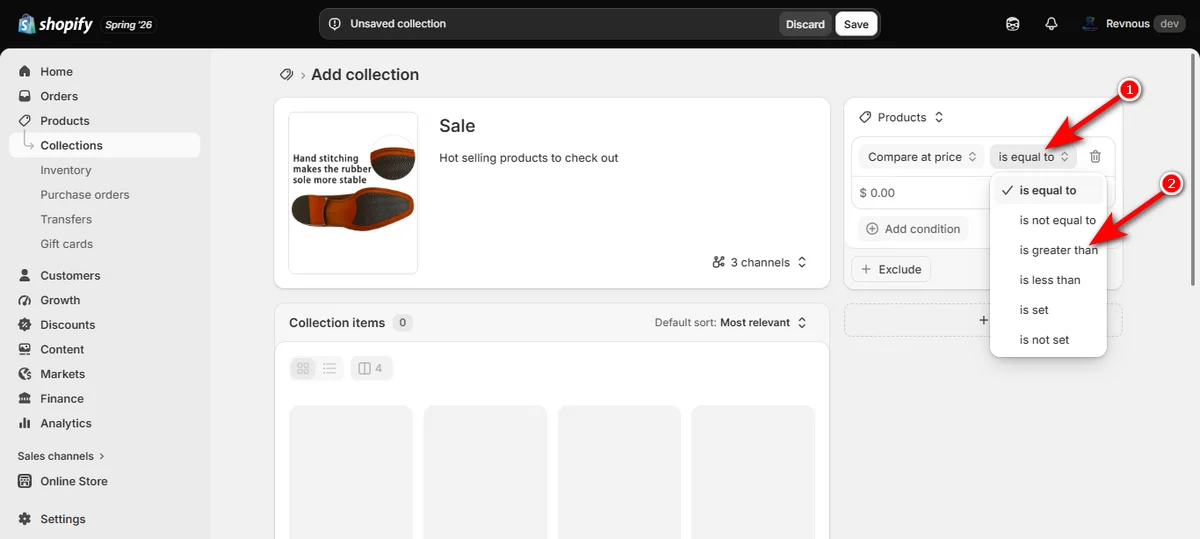
Click the price field below it and type 0.00.
-
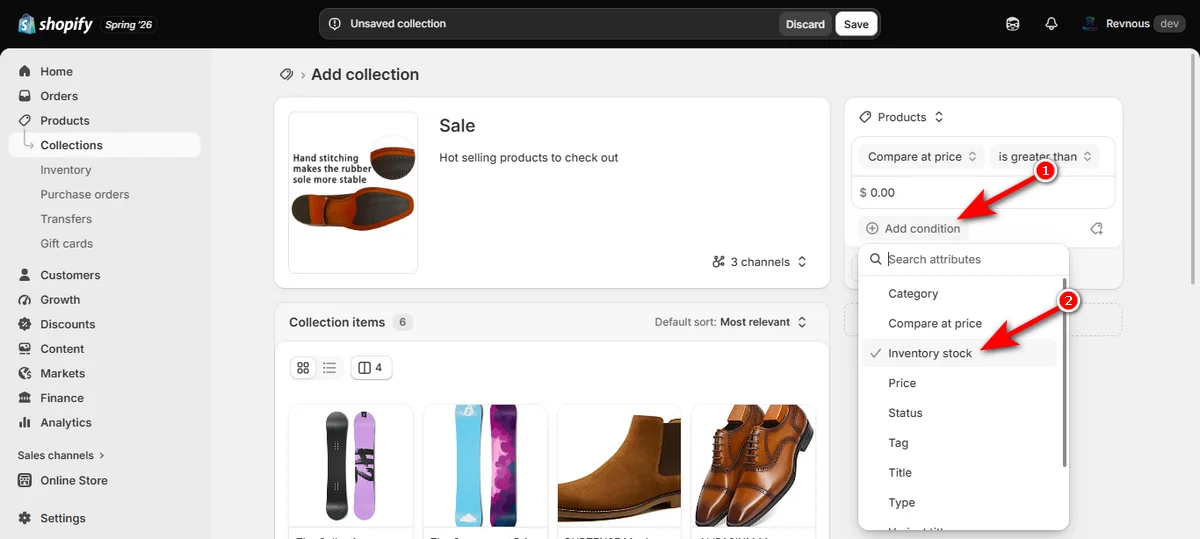
Click “Add condition” again inside the same ‘Products’ block and select “Inventory stock.”
-
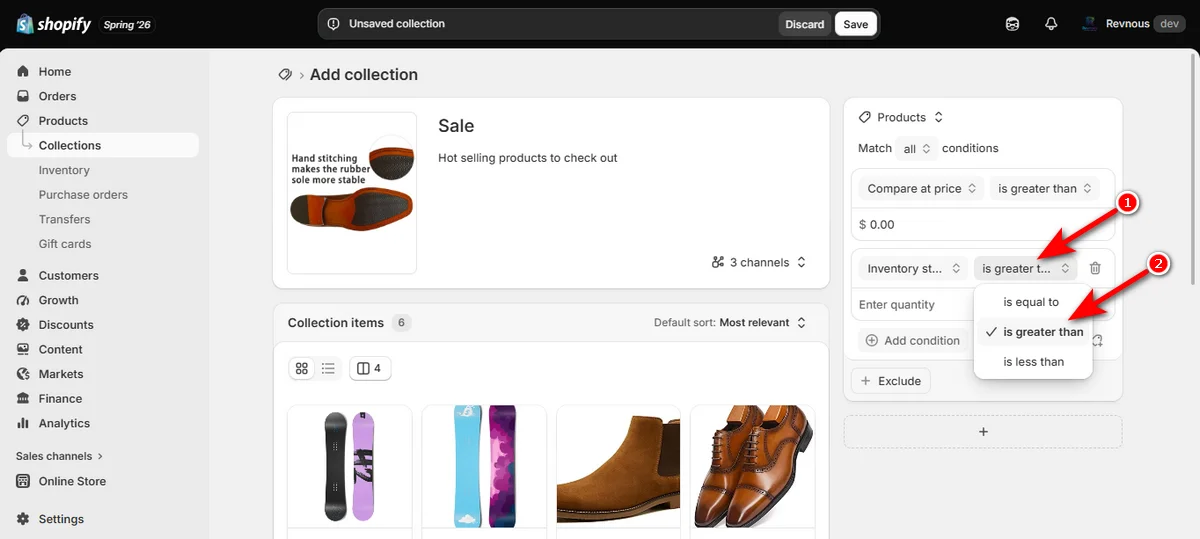
Click the operator menu next to “Inventory stock” and make sure “is greater than” remains selected.
-
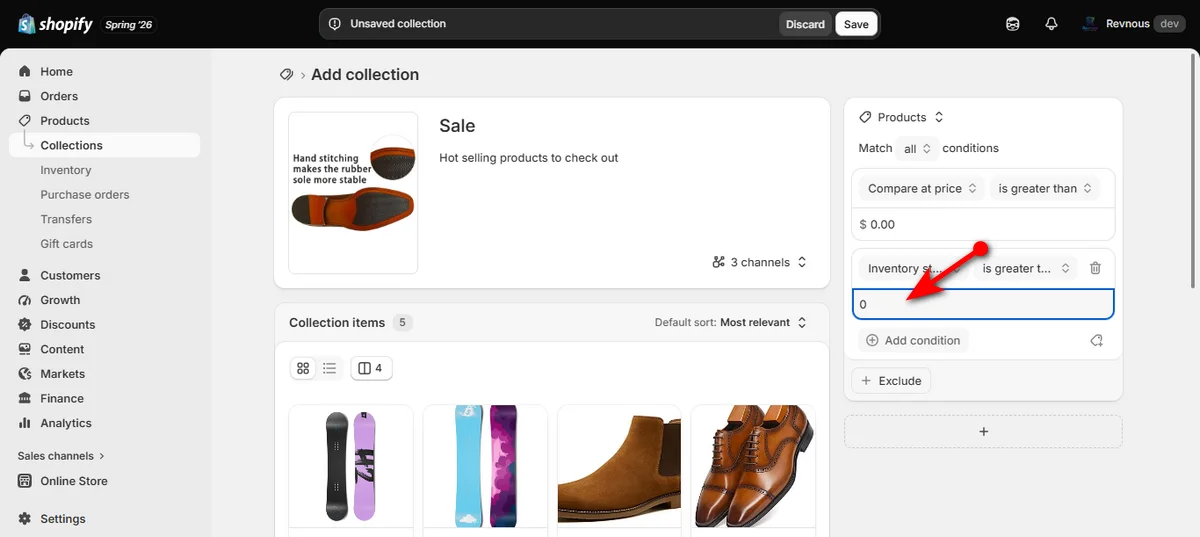
Click the quantity box and type 0.
Step 3: Turn on Your Sale Page and Save
Click the small channels button (it usually says something like 3 channels) under your collection details.
Turn on the switches for where you want to sell, like your “Online Store.”
Click ‘Save’ at the top right corner of your screen.
How the New Shopify Collection Sources Model Works
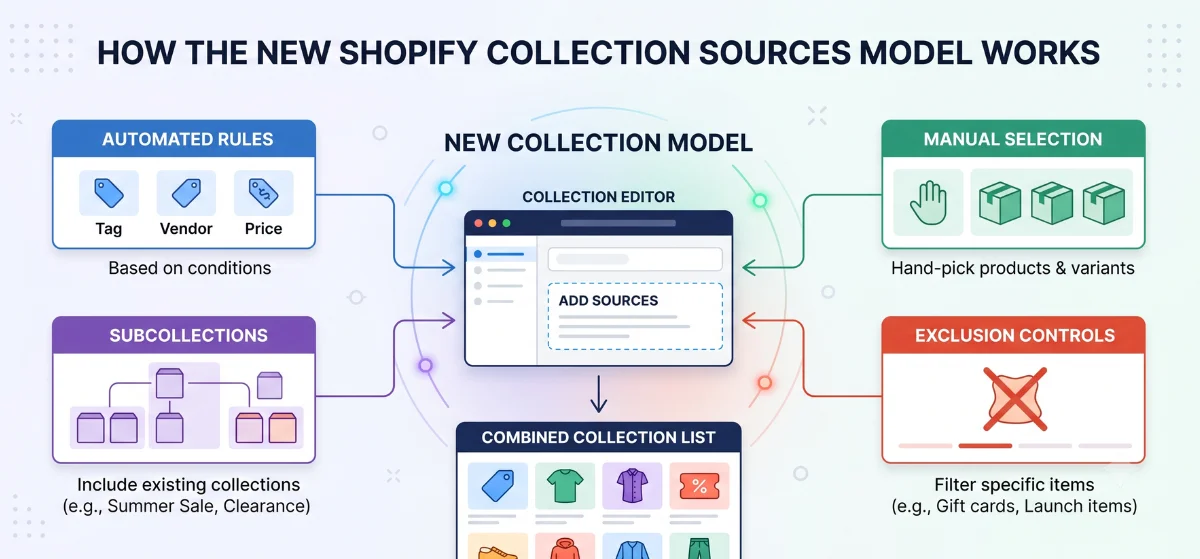
Shopify removed the strict separation between manual and automated collections. You no longer make a permanent choice at the start. Instead, you add one or more Sources inside the editor:
Automated Rules Source: Set conditions based on tags, vendors, product types, or Compare-at prices.
Manual Product Source: Search and hand-pick specific products or variants to add to the list.
Subcollection Source: Include other existing collections inside a parent collection. For example, you can add your "Summer Sale" and ‘Clearance’ collections into one master ‘Sale’ collection.
Exclusion Controls: Set rules to include discounted products while excluding specific items like gift cards or special launch items.
Prepare Your Products Before Creating the Sale
You must adjust pricing fields before building your sale collection. Shopify uses specific price fields to spot discounted goods.
How to Add Compare at Price Shopify
The “Compare-at price” field holds the original item price before a markdown. Shopify shows the original amount crossed out next to the active price when “Compare-at price” exceeds ‘Price.’
Regular Item: Price = $80 | Compare-at Price = Blank
Discounted Item: Price = $80 | Compare-at Price = $100
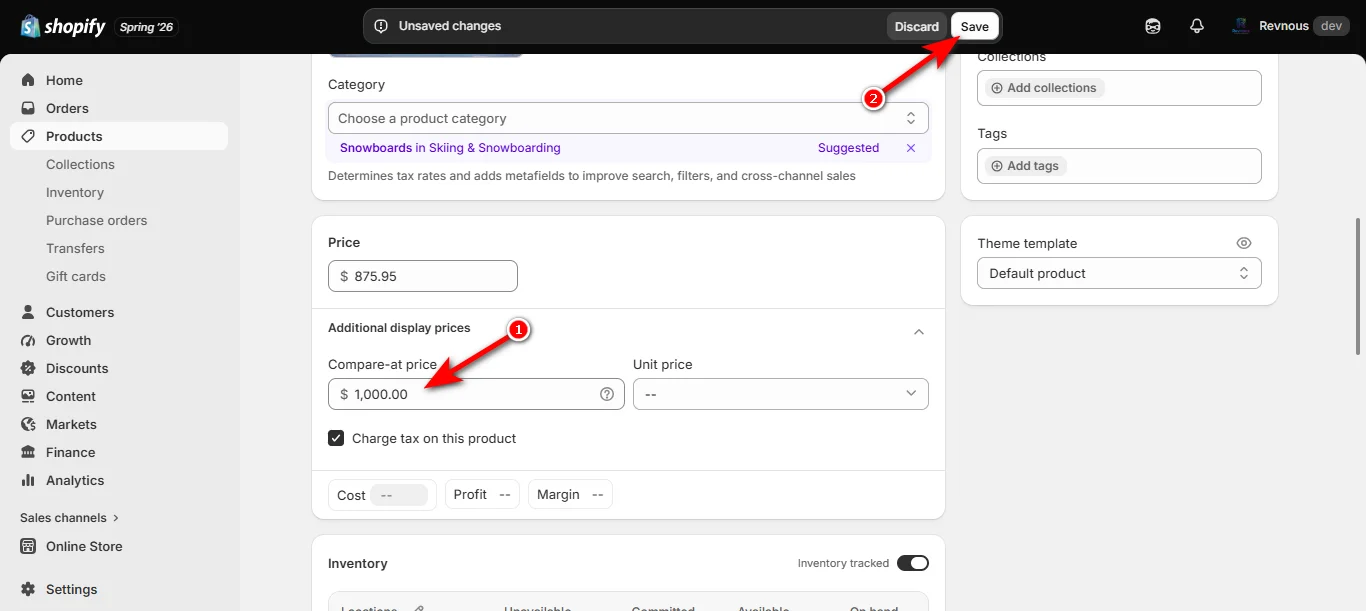
Steps for single items:
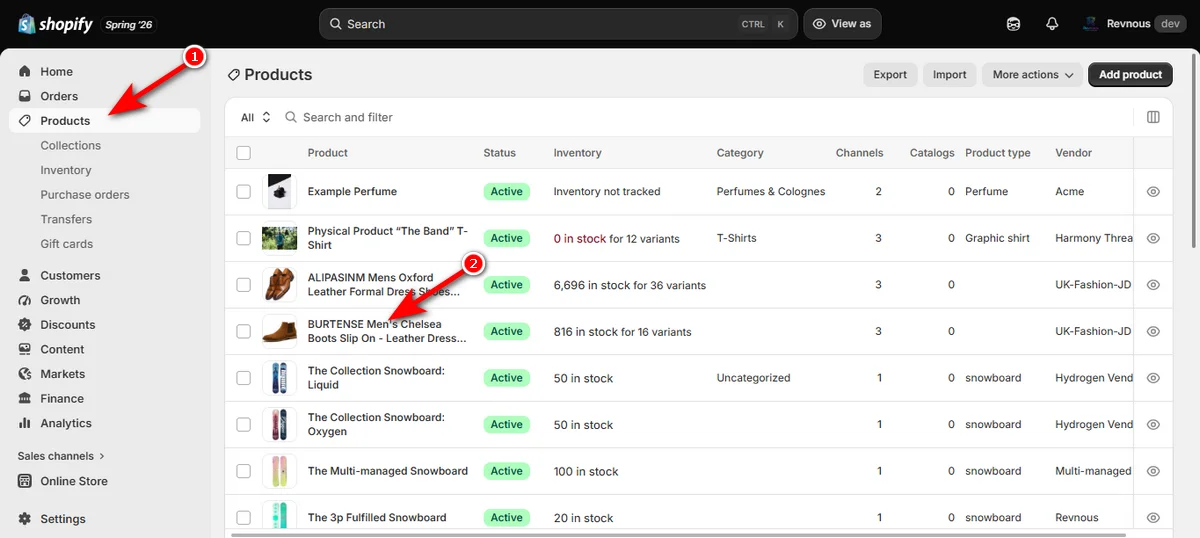
Open Shopify Admin. Go to ‘Products,’ select and open your product in the product editor.
-
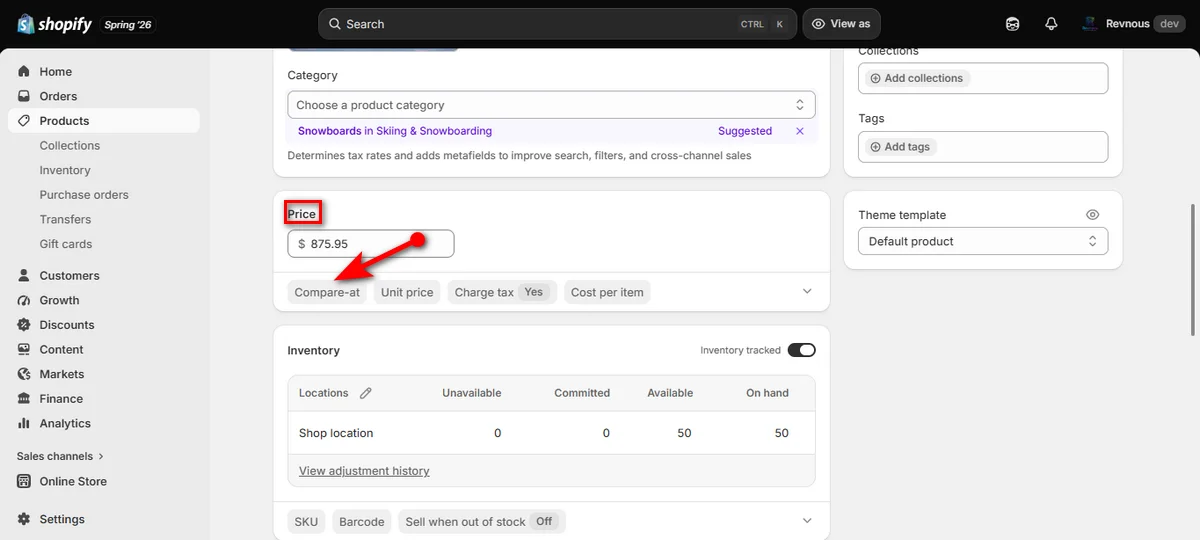
Scroll down to ‘Pricing’ and click “Compare-at.”
-
Type the original higher price inside the “Compare-at price” field. Then, click the ‘Save’ button.
How to Add Compare-at Prices in Bulk
It takes too much time when you edit items one by one on big catalogs. In such a scenario, use the native bulk editor:
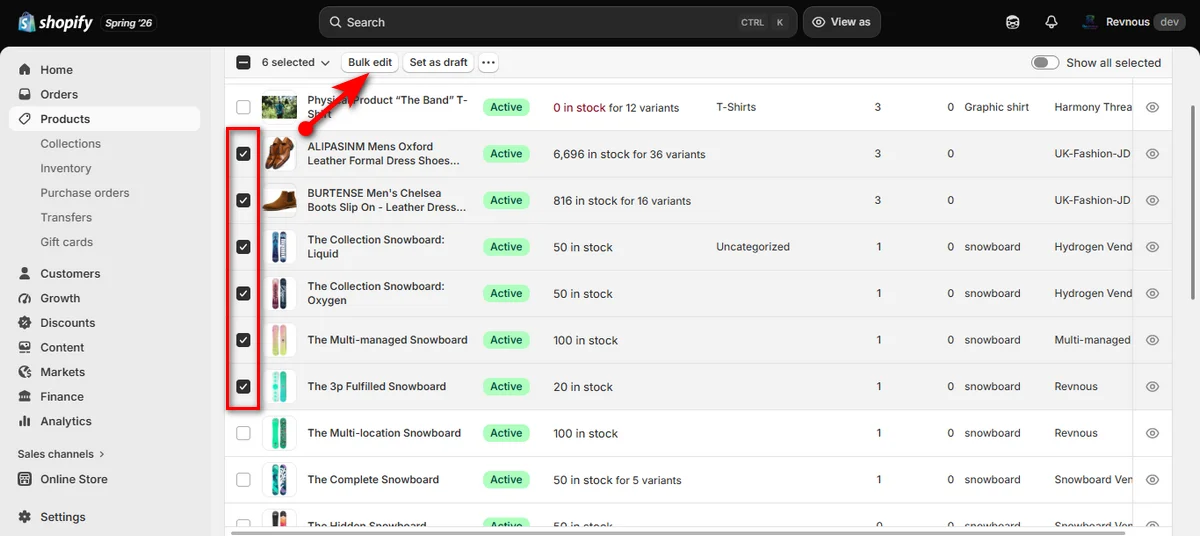
Go to ‘Products’ and select the checkbox next to every item on sale.
Now, click “Bulk edit” at the bottom of the screen.
-
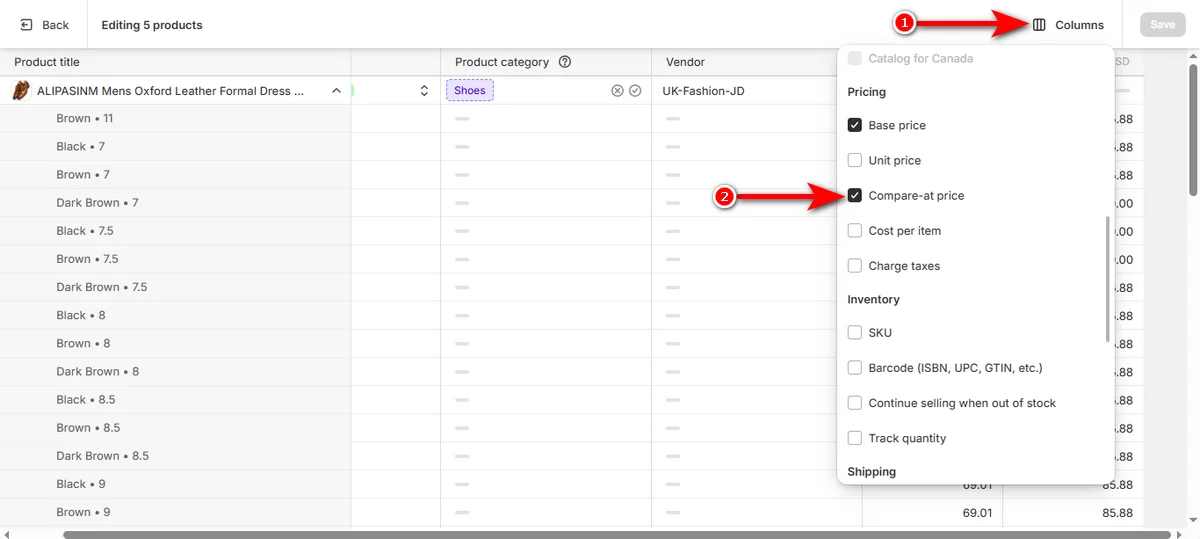
Add the “Compare-at price” column if it remains hidden. To do that, click on ‘Columns’ and find and check “Compare-at price.”
-
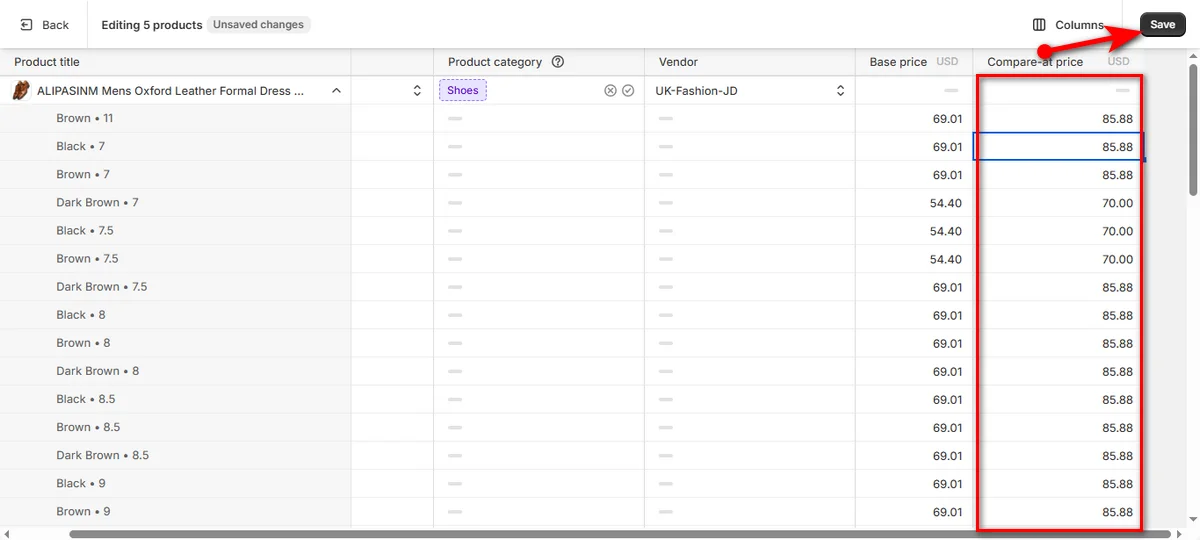
Enter your original prices down the column and click ‘Save.’
For large stores with thousands of items, export your product catalog as a CSV file.
Update the Variant Price and Variant Compare At Price columns in Excel or Google Sheets, then re-import the CSV file into Shopify.
As you can see, you need to spend a lot of time and perform several steps to add compare-at prices.
However, you can bulk edit all products or your selected collection products’ compare-at prices in minutes with Revnous Bulk Price Editor.
You may read this guide on How to Bulk Edit Price in Shopify to learn to use this app.
Compare-at Prices vs Shopify Discount Codes
Merchants often mix up compare-at prices and discount codes. Here’s what each means.
Compare-at Price: Shows crossed-out prices on product pages. Activates automated sale collection rules (“Compare-at price” is greater than 0). Requires no extra effort from shoppers at checkout.
Shopify Discount Code: Applies percentage reductions inside the cart or checkout screen. Cannot activate native automated collections on its own. Forces customers to enter code strings manually.
How to Add Your Sale Collection to Shopify Navigation
Promotions fail when visitors can’t spot your sale page. Place sale links in primary store locations.
Main Navigation Link
-
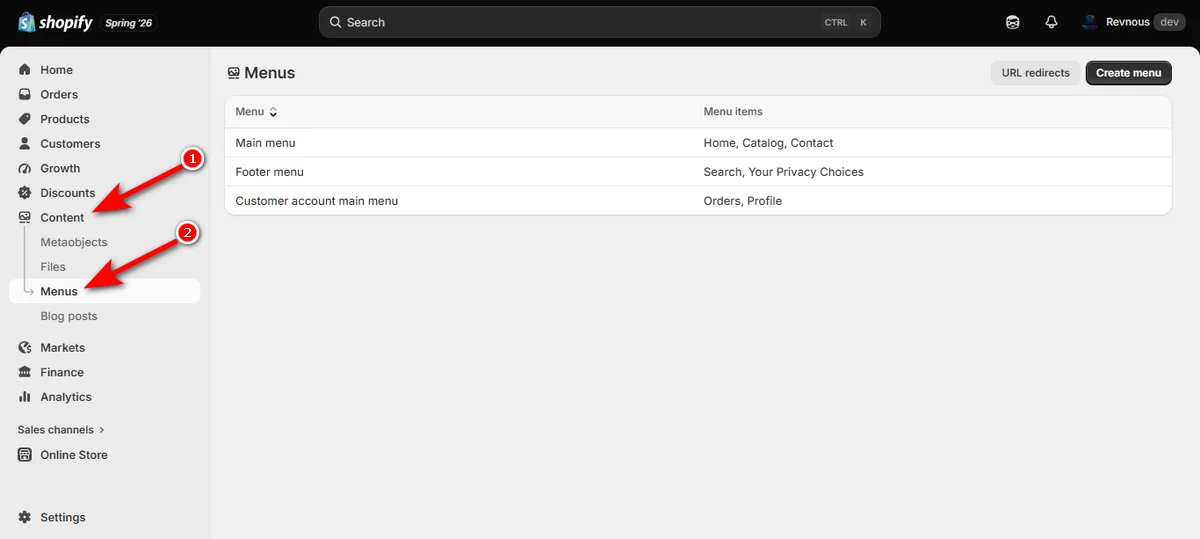
Go to Shopify Admin, click ‘Content,’ and then hit ‘Menus.’
-
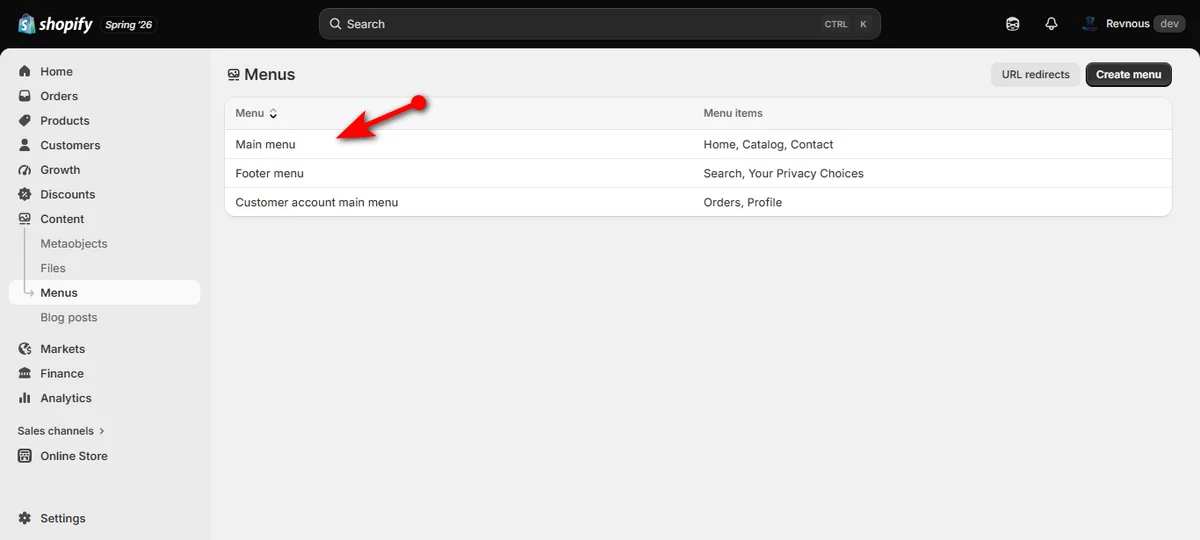
Hit the “Main menu.”
-
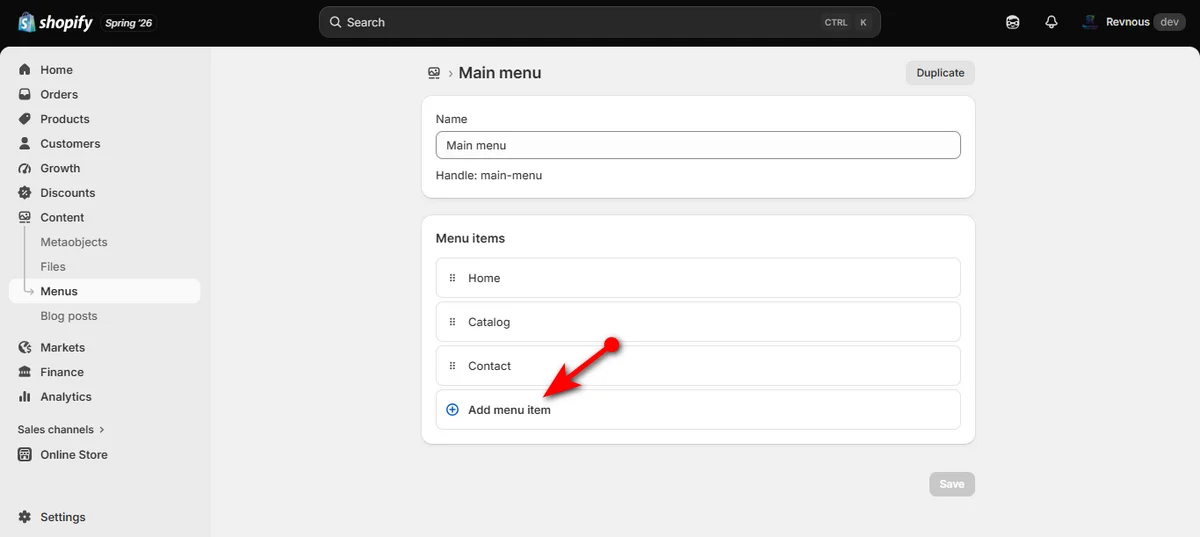
Click “Add menu item.”
-
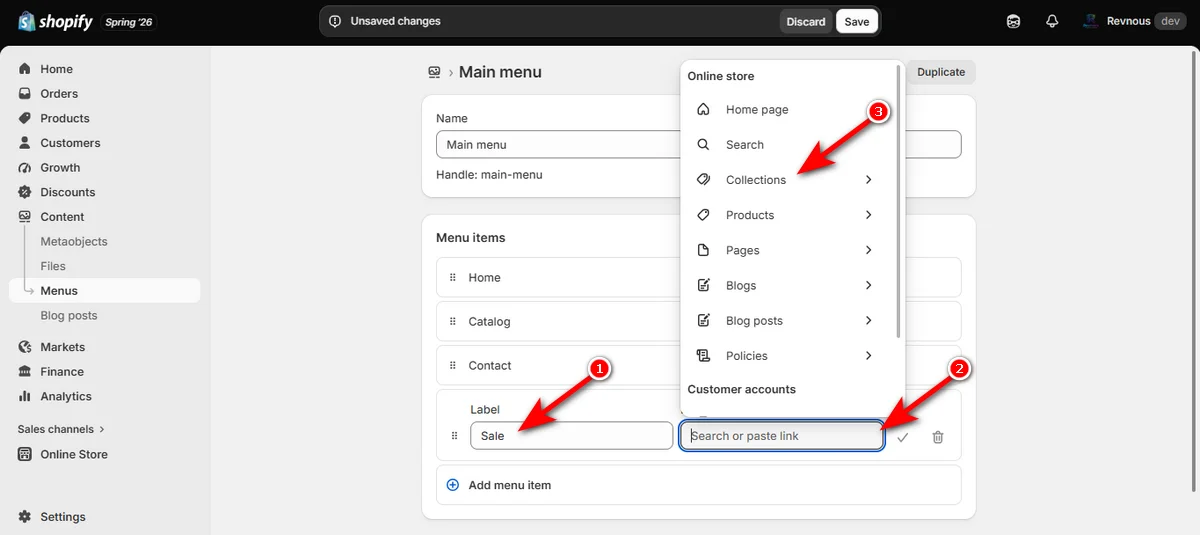
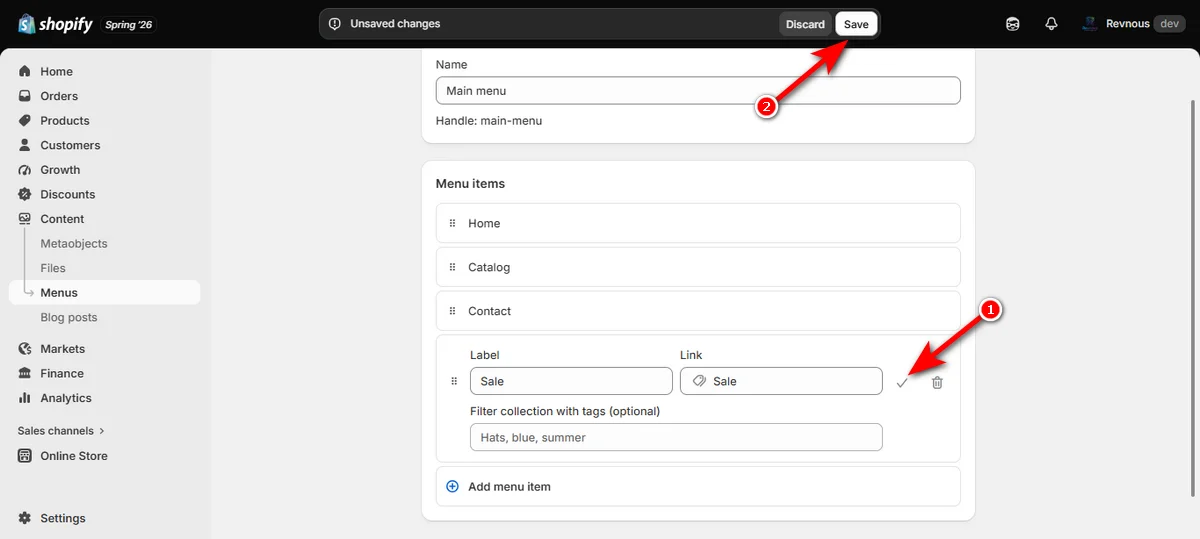
Type ‘Sale’ in the ‘Label’ field. Then, click ‘Link’ and hit ‘Collections.’
-
Now, select your sale collection.
-
Hit the tick mark icon and then click ‘Save’ button.
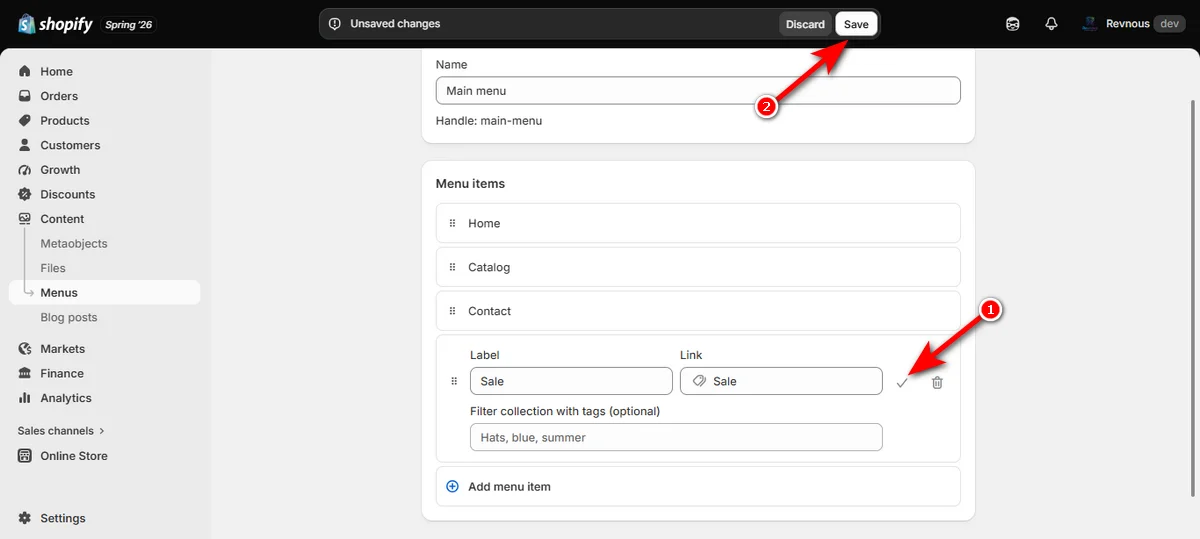
Visit your store and you’ll see a new collection menu.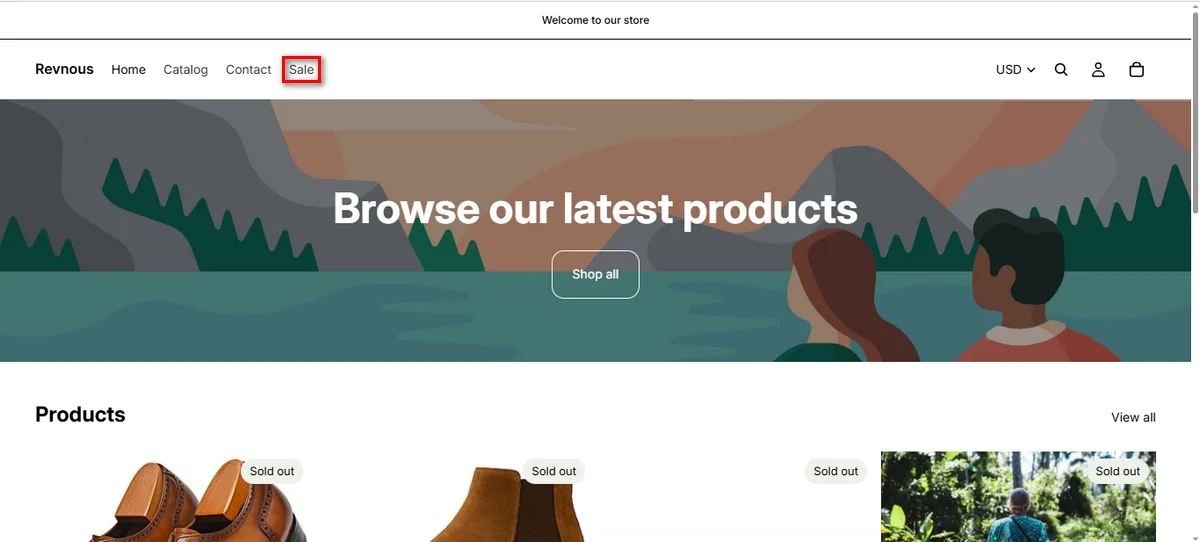
Homepage Placement
-
Go to “Online Store” and click the “Edit theme” button.
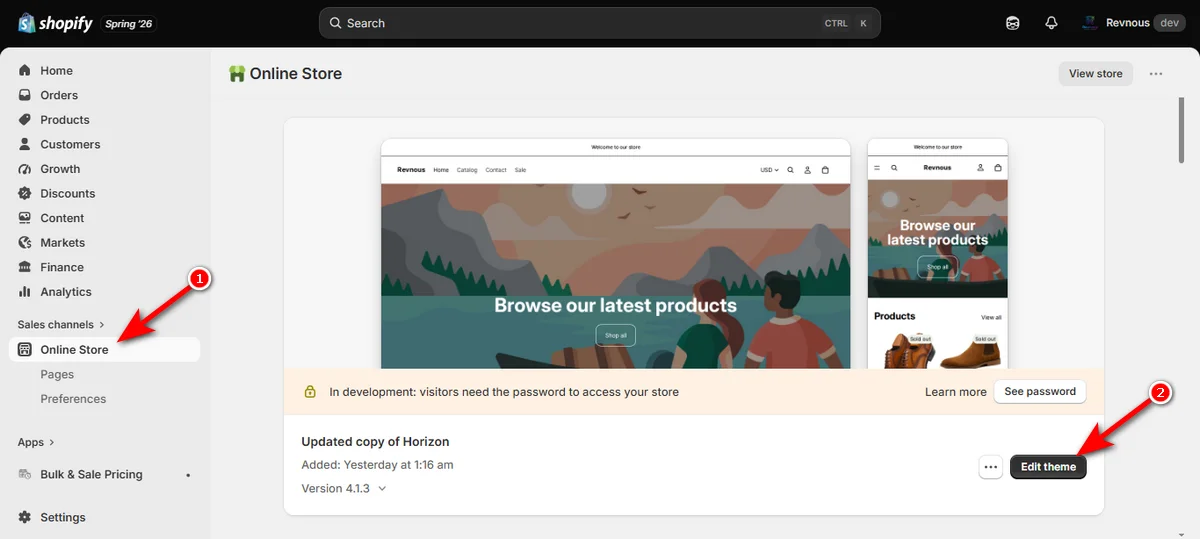
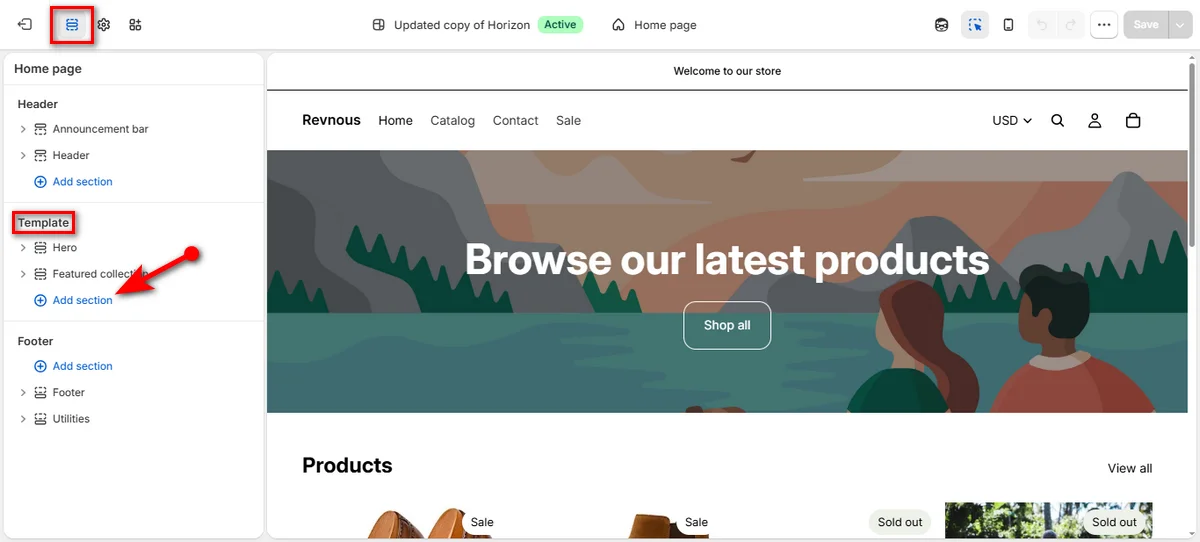
You’ll now enter the theme editor. Make sure the ‘Sections’ element is selected on the top left.
-
Head to the ‘Template’ area on the left toolbar and click “Add section.”
-
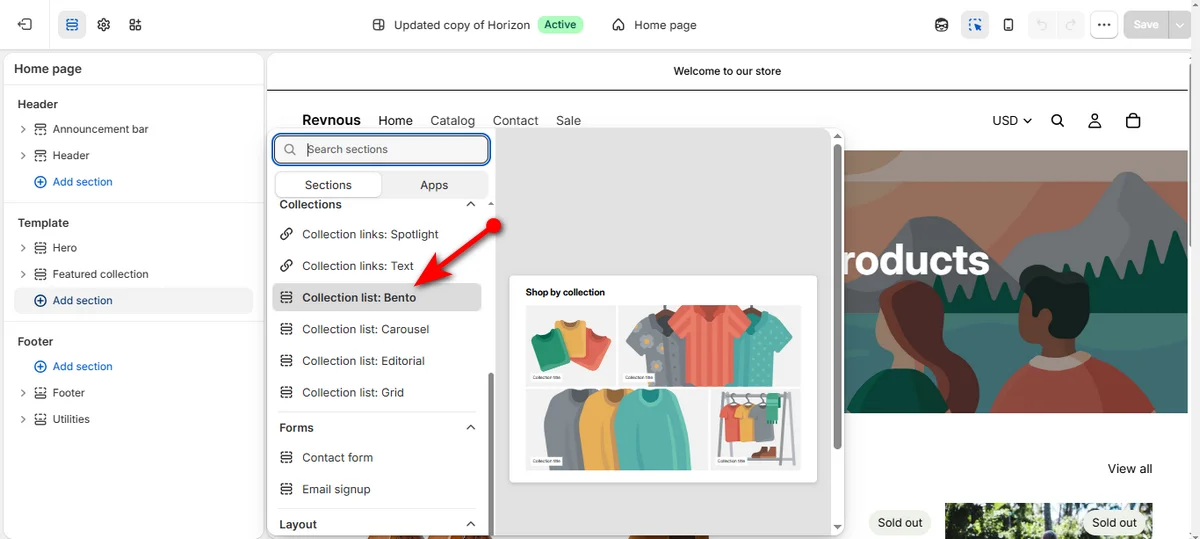
Now find ‘Collections’ and select your preferred collection style.
-
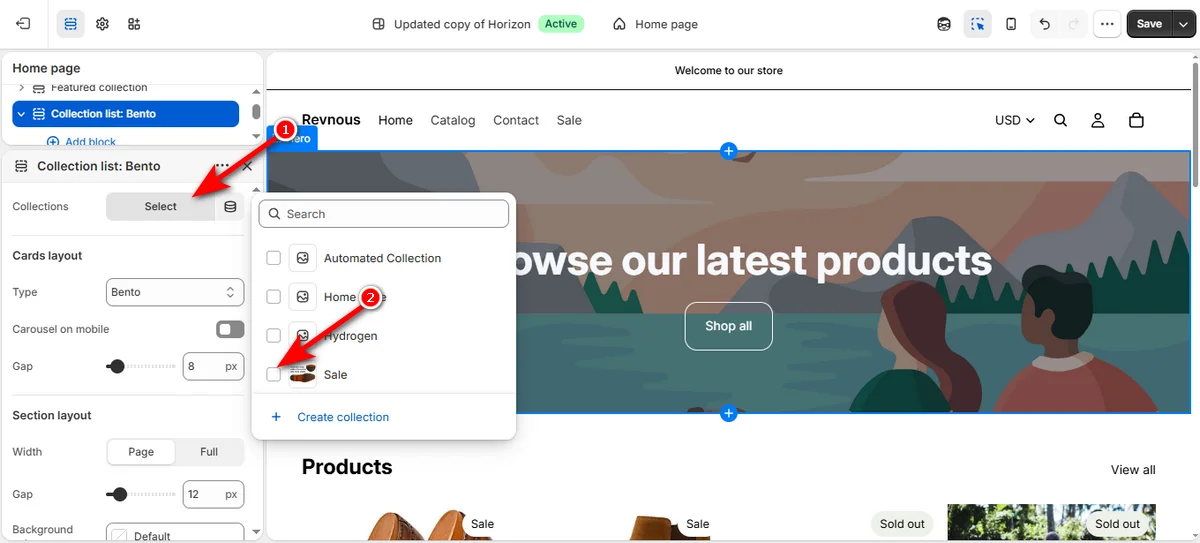
At this point, click the ‘Select’ button next to ‘Collections’ on the left sidebar, then check the box next to your ‘Sale’ collection from the list.
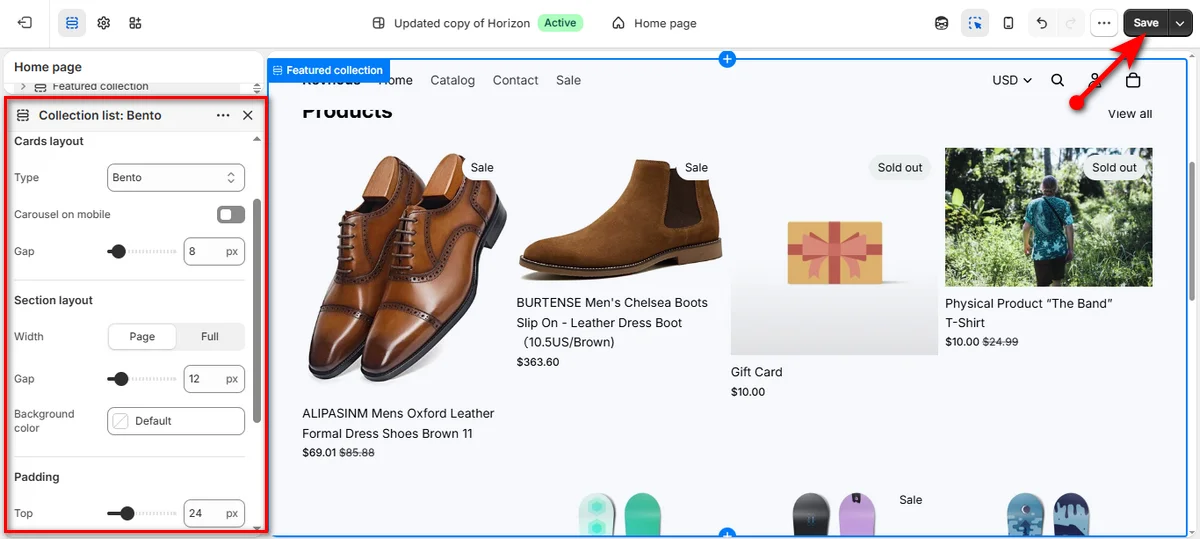
You can now customize the collection display using the left sidebar settings.
Adjust card types, mobile carousel options, and item gaps using “Cards layout."
The “Section layout” and ‘Padding’ let you set section width, background colors, and top or bottom spacing to match your design.
Once everything looks clean, click the ‘Save’ button at the top right corner.
Customize and Optimize Sale Collection Pages
A few quick tweaks to your collection page can drive more clicks and boost sales.
Write short descriptions: Add brief text to explain your sale event. Include main keywords naturally to build search visibility.
Display savings badges: Enable savings badges as they catch buyer attention instantly, highlight deal value on product grids, and boost store conversion rates.
Sort items strategically: Set the default collection sort order to “Best selling” or “Price: Low to High” to display top offers first.
Top Shopify Apps for Managing Sale Collections
You can use the following smart apps to easily update prices, manage collections, and run sales on autopilot.
Revnous Bulk Price Editor: Schedules bulk price updates, automates compare-at price changes across whole collections, and reverts prices when campaigns end.
Hextom Ultimate Sales Boost: Adds countdown timers, inventory counters, and promotional badges to product grids.
PageFly or GemPages: Builds custom sales pages with custom layout grids and promotional elements.
My Concluding Thoughts
You now know how to create a sale collection on Shopify to put all your best deals in one spot.
This simple work saves your buyers time because they do not have to search through your store for discounts.
Automatic rules update the list for you, while manual options give you total control over small promos. Put your new sale link in your main menu today and watch your sales grow.
Frequently Asked Questions
- What Are the Two Types of Collections You Can Create in Shopify?
- Historically, Shopify forced you to pick between manual collections and automated collections. Under Shopify's updated collections architecture, the strict two-type toggle switch is gone. Every collection is now a unified collection where you can combine automated rules, hand-picked items, subcollections, and exclusions in one place.
- What is the Difference Between Collections and Categories in Shopify?
- Collections represent custom store groups created by merchants for navigation and sales campaigns. Categories represent standardized product taxonomy values assigned by Shopify for tax calculation, meta-field setup, and sales channel integration.
- How to Create a Best Sellers Collection in Shopify?
- Create a new collection. Add a 'Products' block condition with a broad rule like “Price” “is greater than” 0. Save the collection, then change the ‘Sort’ dropdown setting to “Best selling.” Shopify orders products based on historical sales volume.
- How Many Collections Can I Create in Shopify?
- Shopify allows merchants to build up to 5,000 collections per store. This limit covers all your active collections across all source types.



Ready to Boost Your Revenue?
Join 66,000+ brands already using Revnous to drive sustainable growth