
How to Add Sale Badge in Shopify - A Step-by-Step Guide
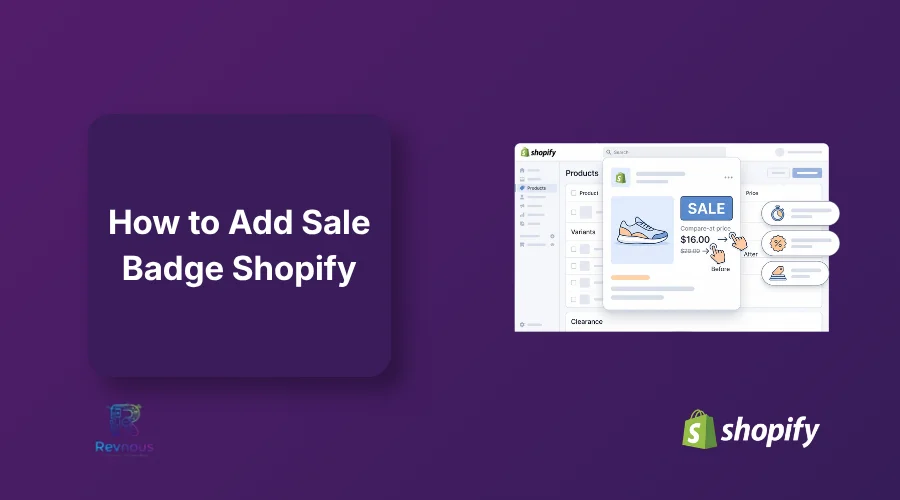
To learn how to add sale badge Shopify displays, open any product in Admin. Type your old higher price into the "Compare-at price" field. Save your changes. Shopify automatically shows the badge on your live store.
Store owners can capture buyer attention fast when they know how to add sale badge Shopify offers default. Online shoppers browse quickly and miss great deals on your site.
Without clear visual cues, shoppers walk away without buying. They fail to realize your prices dropped. Competitors with bold labels pull those customers away while your product pages look bland and inactive.
You can fix this problem in minutes. This guide shows simple steps to edit prices, change badge colors, adjust text, and pick smart store placements for your discounts.
How to Add a Sale Badge in Shopify
Here are three quick ways to add a sale badge:
Method 1: Set a Compare-at Price (Easiest & default)
Method 2: Edit theme code
Method 3: Install a Shopify app
Since method 1 works on almost every Shopify theme, I’ll talk about this one in this article. Then, I’ll introduce a third-party app and use it to add sales badges in bulk.
Here is how to add sale badge Shopify free in step by step.
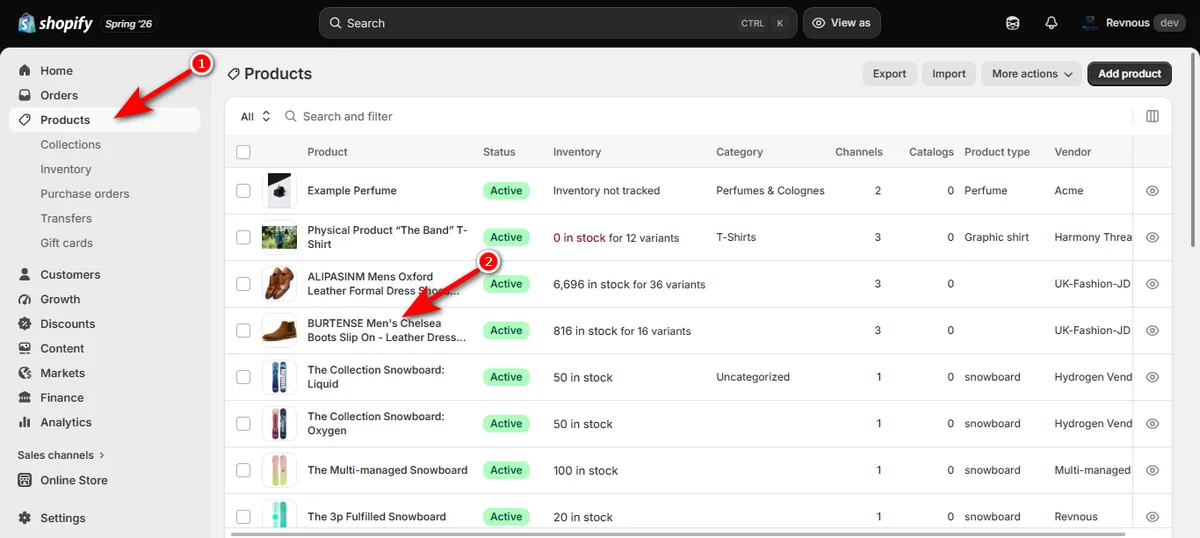
Log in to Shopify Admin. Click ‘Products’ on the left menu. Pick the item that needs a sale badge.
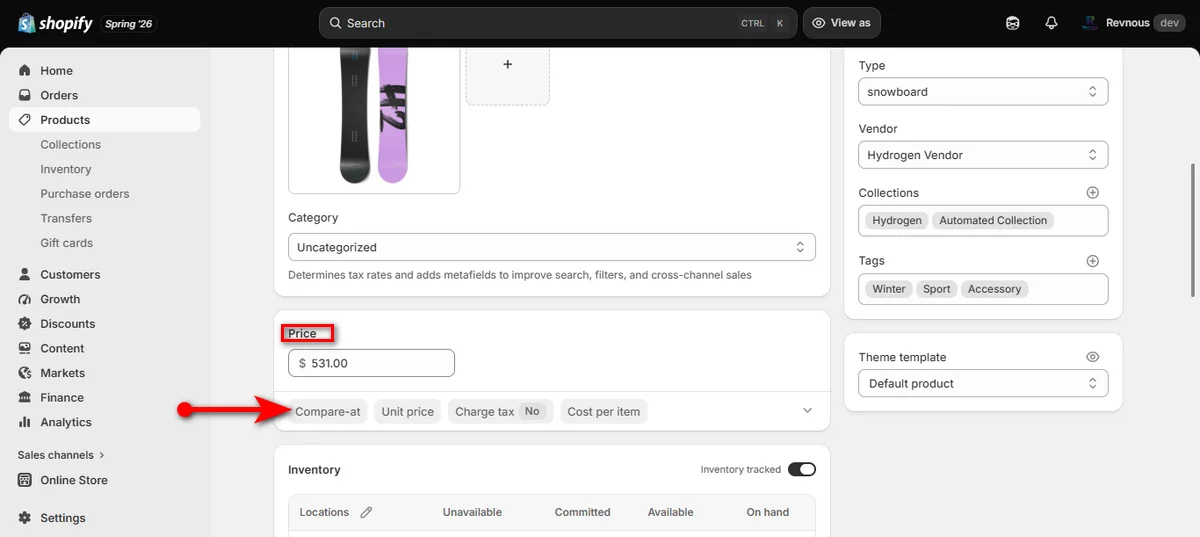
Scroll down to the price area and click the “Compare-at” option.
Note: Click on the product variant (a variant of a product that needs a sale badge) and then hit the “Compare-at” price if your product has variants.
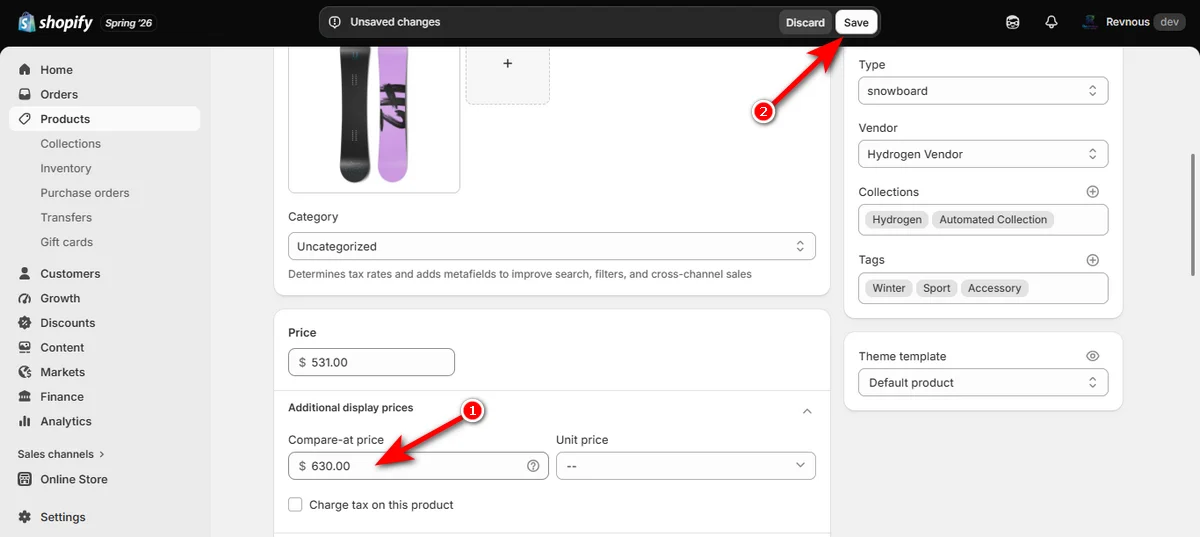
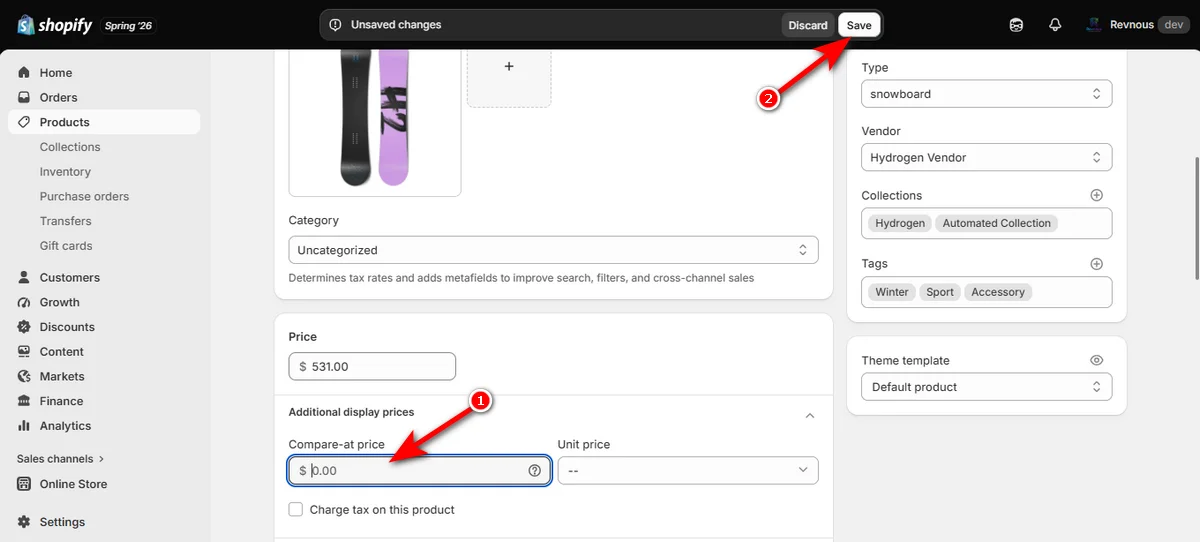
Now, type the old, higher price into the “Compare-at price” field and tap the ‘Save’ button on the top right.
If you wonder, “How to change the price of Shopify" or “How to add a discount badge on Shopify," there you have your answer.
Visit the product page, and you’ll notice a sale badge.
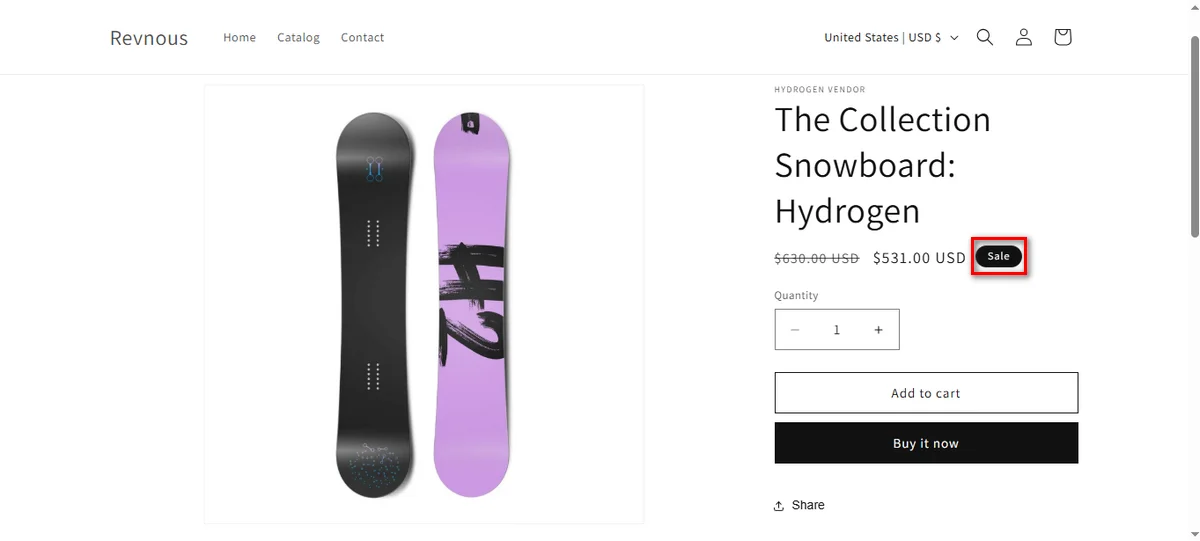
Note: Badge design varies based on your active theme.
How to Handle Shopify Remove Sale Badge
It’s incredibly simple. You just need to remove the “Compare-at price” from your product. Hence, select a product featuring a compare-at price.
Then, open it in the product editor and head to the “Compare-at price” field. After that, delete the price value and hit the ‘Save’ button.
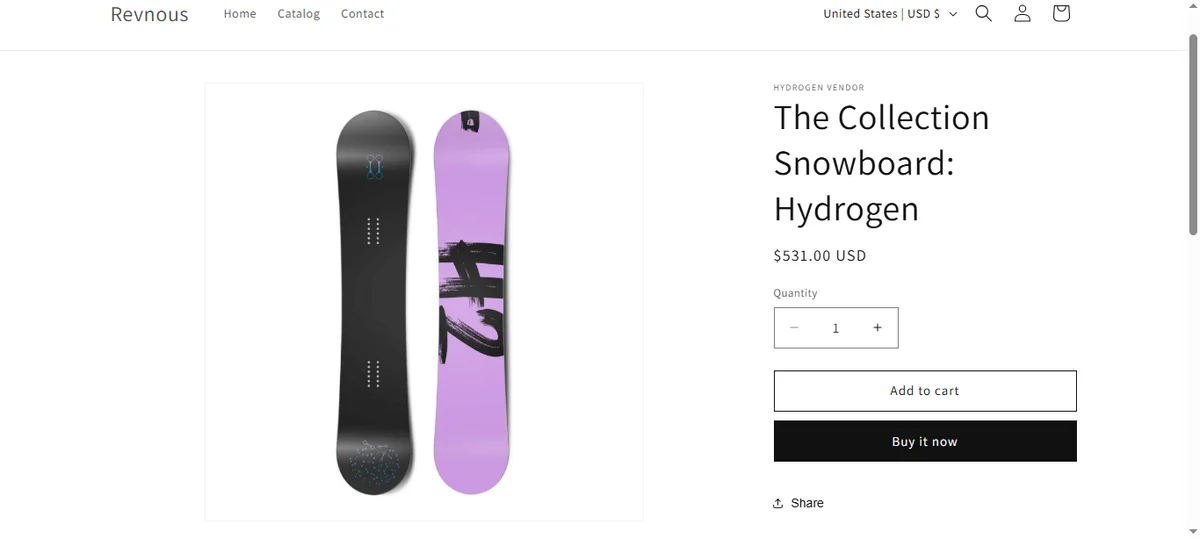
Lastly, check the live product page, and you’ll no longer see the sale badge.
How to Add Sale Badges in Bulk with Revnous Bulk Price Editor
First, search for the “Revnous Bulk Price Editor” on the Shopify app store. Then, install it and open the app in your Shopify admin.
From there, follow the steps below.
Step 1: Launch a New Campaign
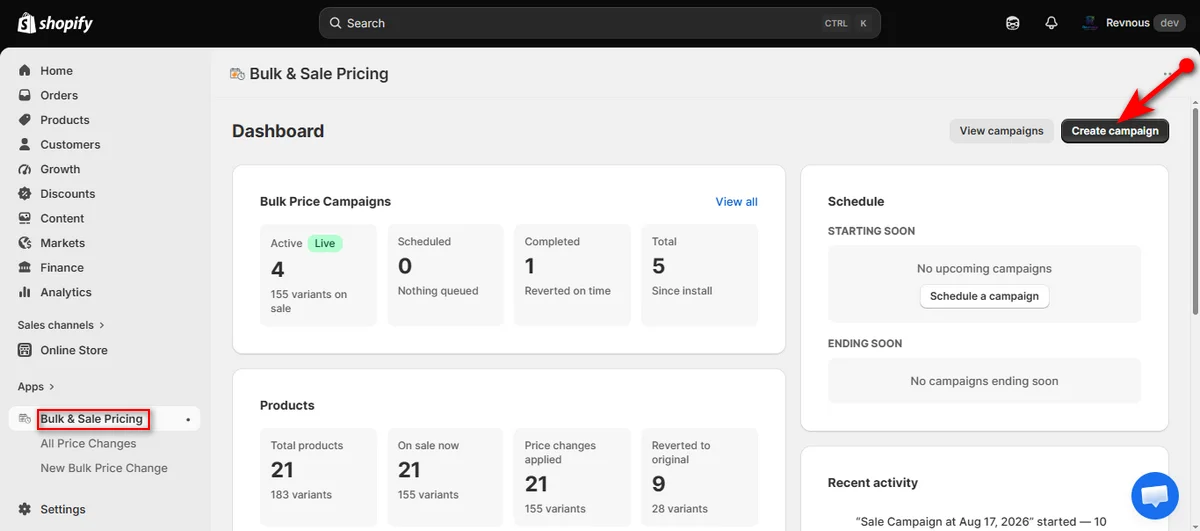
Open the app dashboard and click the black “Create campaign” button in the top right corner.
Step 2: Target Your Sale Products
Choose which items need discount tags:
All products in my store: Best for storewide events like Black Friday or Cyber Monday.
A specific collection: Ideal for seasonal clearance or category-level deals (e.g., Summer Gear).
Advanced filters: Use this to target items by tag, product type, vendor, or price range.
Select your preferred option.
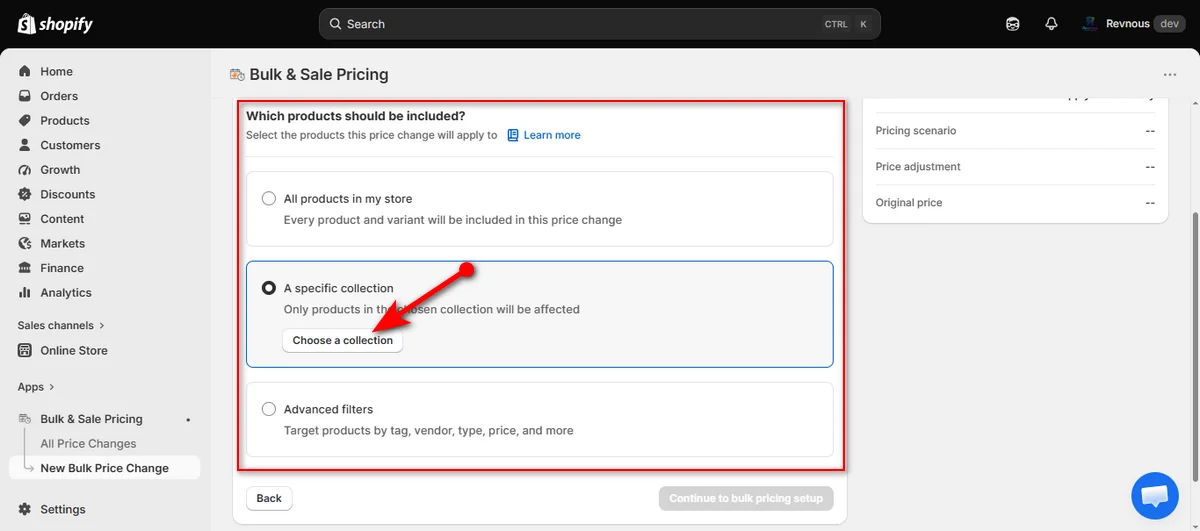
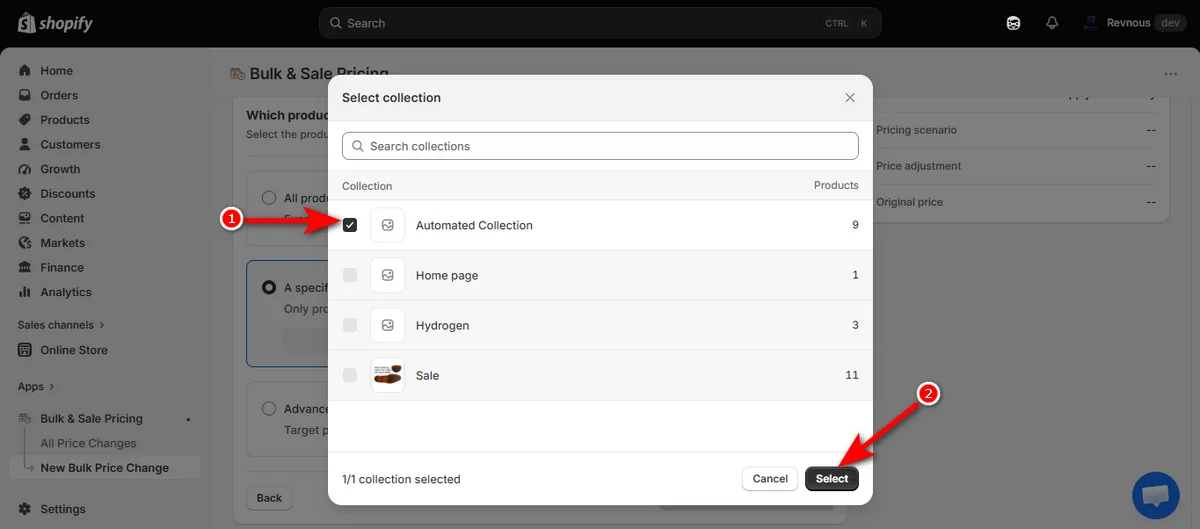
If you pick “A specific collection,” mark the checkbox next to your target collection and click ‘Select.’
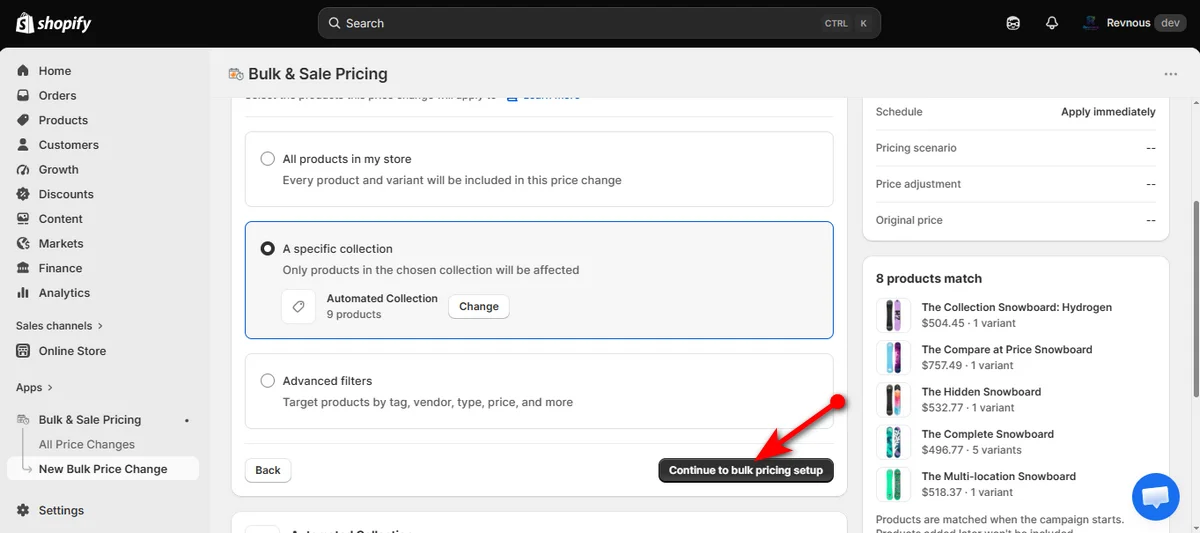
Hit “Continue to bulk pricing setup” to move forward.
Step 3: Pick the Right Pricing Scenario
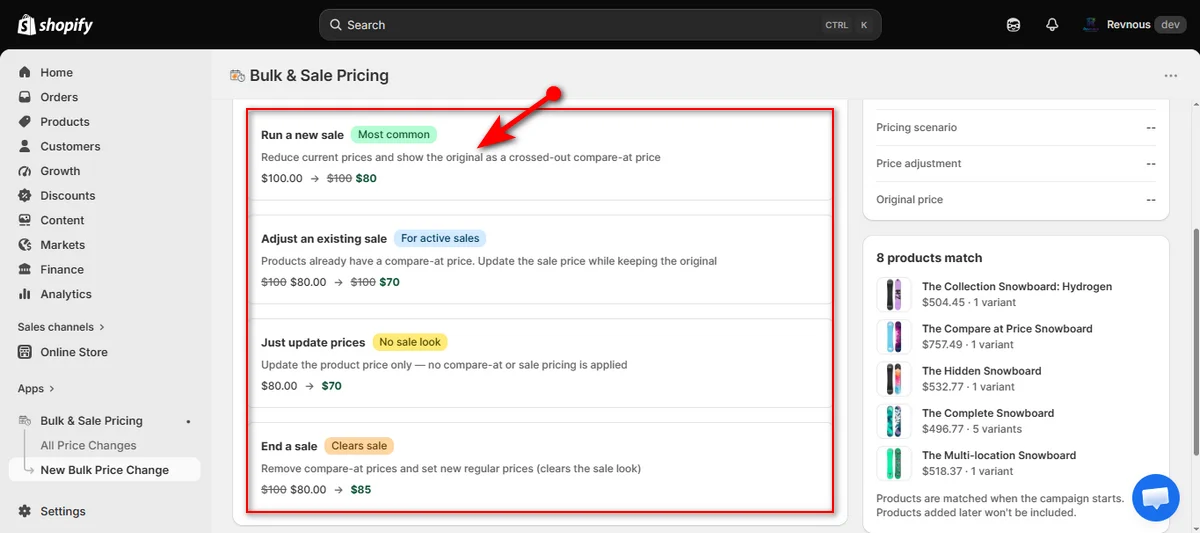
Select the workflow that matches your campaign goals:
Run a new sale: Turns current prices into crossed-out compare-at values and drops prices. Best for standard discounts.
Adjust an existing sale: Updates sale prices for items already on discount without altering original reference prices.
Just update prices: Changes base prices directly without generating a sale badge.
End a sale: Removes compare-at prices to return items to regular pricing.
For a fresh promo, pick “Run a new sale.”
Step 4: Set the Discount Rule
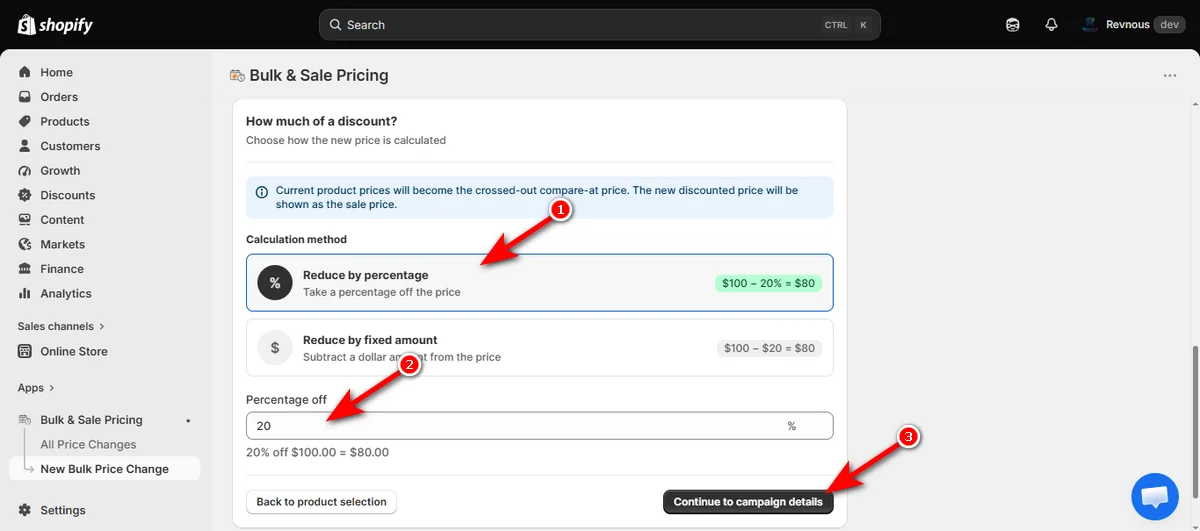
Scroll down and choose how the app calculates your sale prices:
Reduce by percentage: Cuts prices by a set percent (e.g., 20% off). Use this when pricing varies across products in the same collection, keeping profit margins equal.
Reduce by fixed amount: Knocks a flat amount off (e.g., $10 off). Works best for uniform price tiers or high-ticket items where absolute price savings drive quick conversions.
Enter your value and click “Continue to campaign details.”
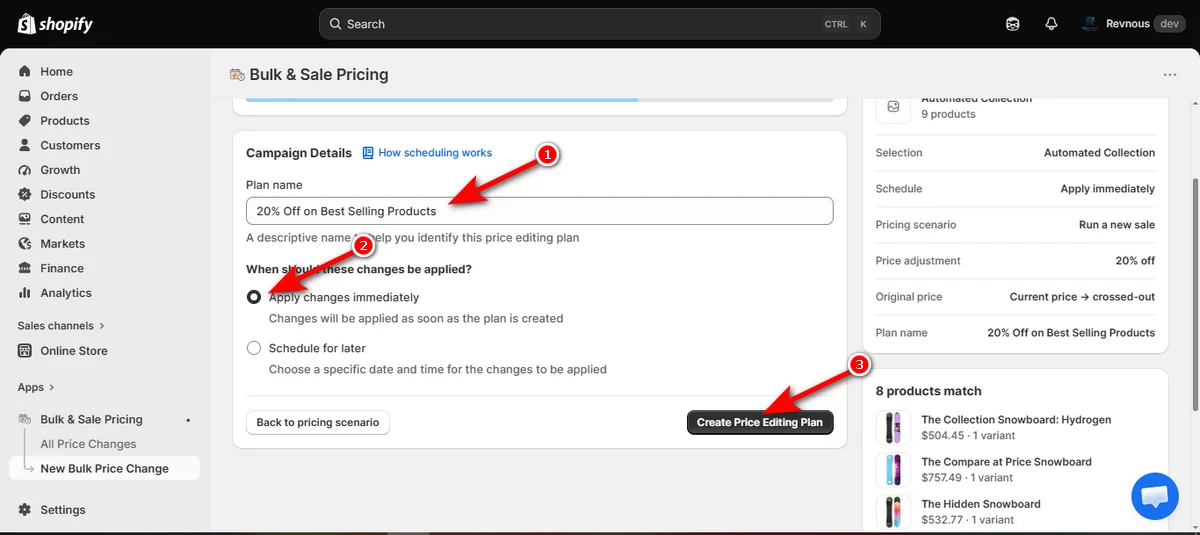
Step 5: Name and Launch Your Plan
Type a clear title in the “Plan name” field (e.g., 20% Off on Best Selling Products).
Under timing options:
Apply changes immediately: Fires off compare-at updates across selected products right away.
Schedule for later: Picks a specific launch date and time for automated campaign rollouts.
Click “Create Price Editing Plan.”
Step 6: Control and Monitor Active Sales
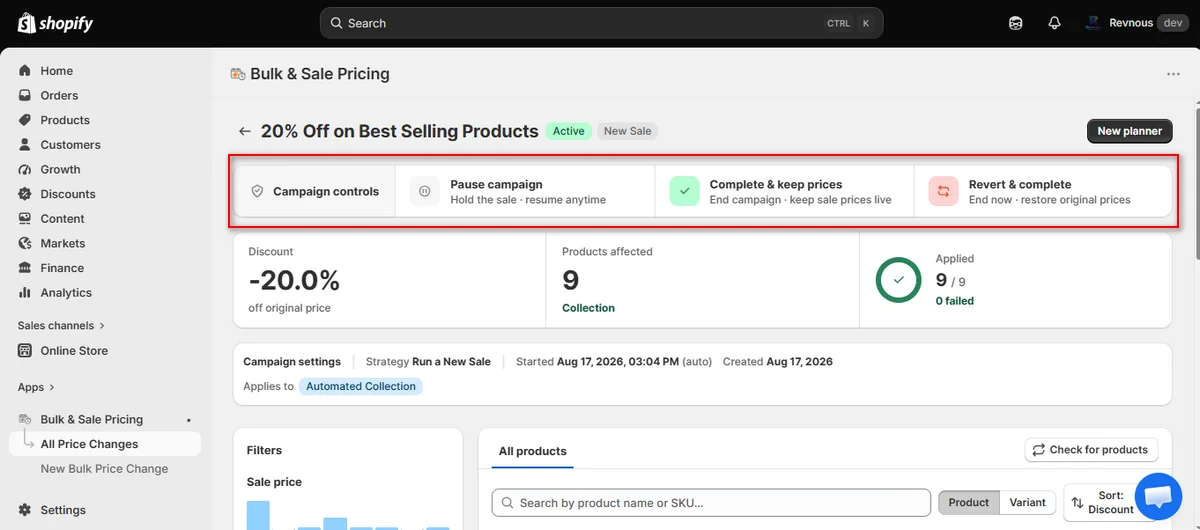
Wait a while, and you’ll visit the campaign dashboard, which gives full control over live promotions.
You can pause, keep prices permanent, or instantly revert to original costs with one click:
Pause campaign: Temporarily holds the sale and lets you resume anytime.
Complete & keep prices: Ends the campaign while keeping discount prices permanent.
Revert & complete: Cancels the sale and instantly restores all original pre-sale prices.
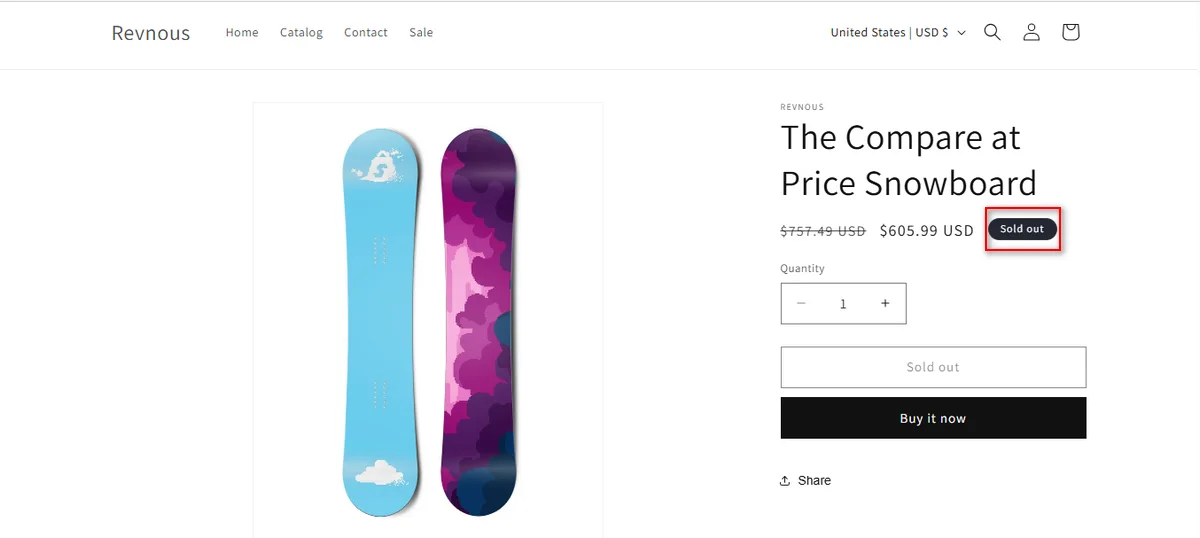
Now, visit your selected product pages one by one to see the changes.
Bonus: How to Customize Shopify Sale Badges
This section will show you how to change a sale badge’s text, color, and position. Let’s get started.
Change Sale Badge Text
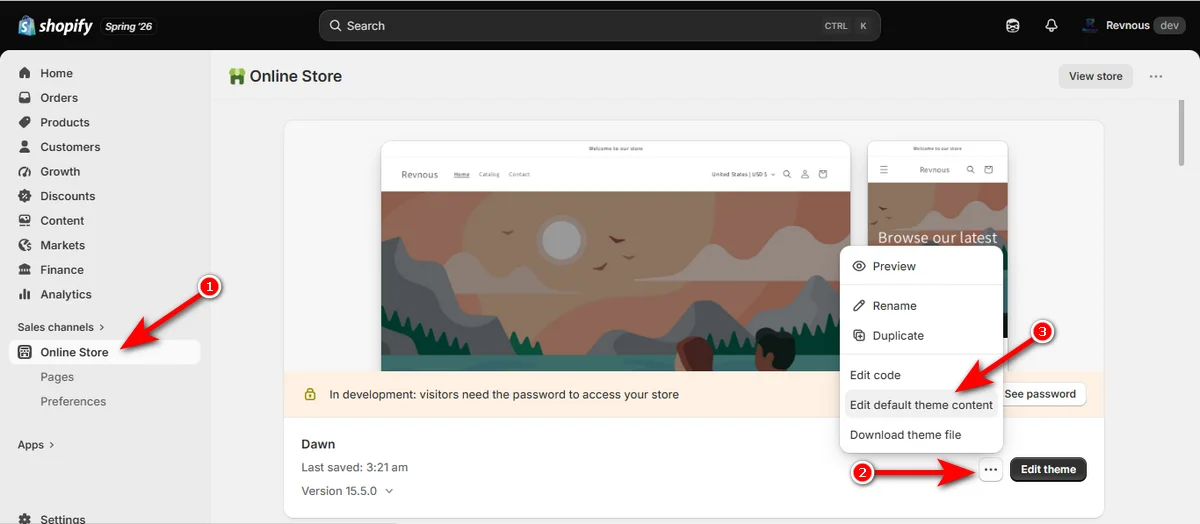
First, click “Online Store” under “Sales channels” on your left side.
Then, hit the “three dots (...)” button next to the “Edit theme" button and select “Edit default theme content.”
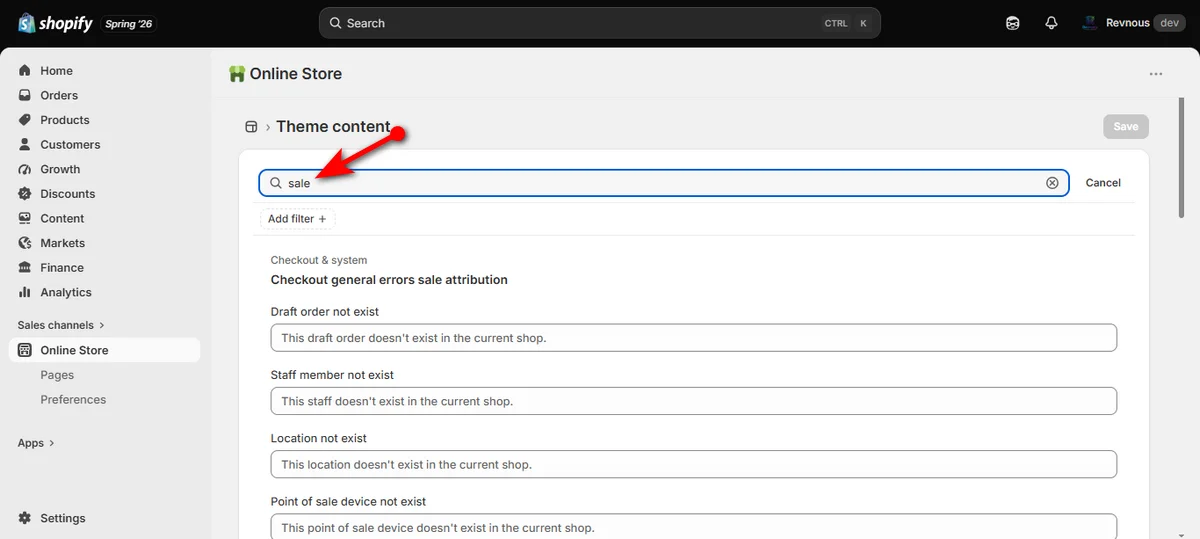
Now, type ‘Sale’ into the top search bar.
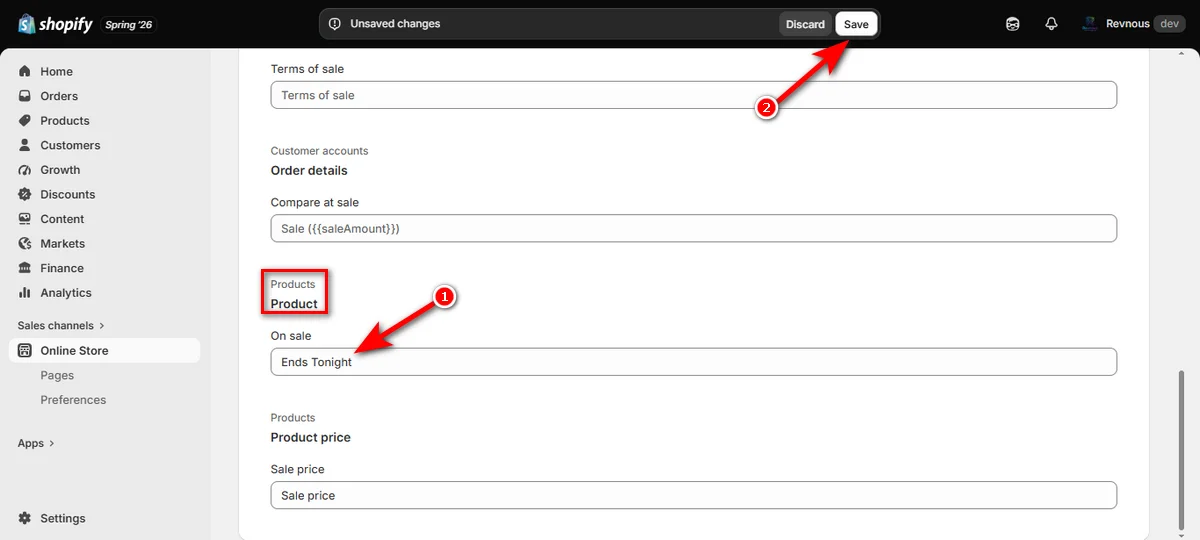
Scroll down to the “Products / Product” section and locate the “On sale” box.
Replace the default text with your own callout. Pick wording that fits your goal:
Urgency: Use "Ends Tonight" or "Limited Time" to push quick buys.
Clear Savings: Use "Save 20%" or "Hot Deal" to highlight value.
Clearance: Use "Final Sale" or "Closeout" for old inventory.
Finally, hit ‘Save’ in the top right corner.
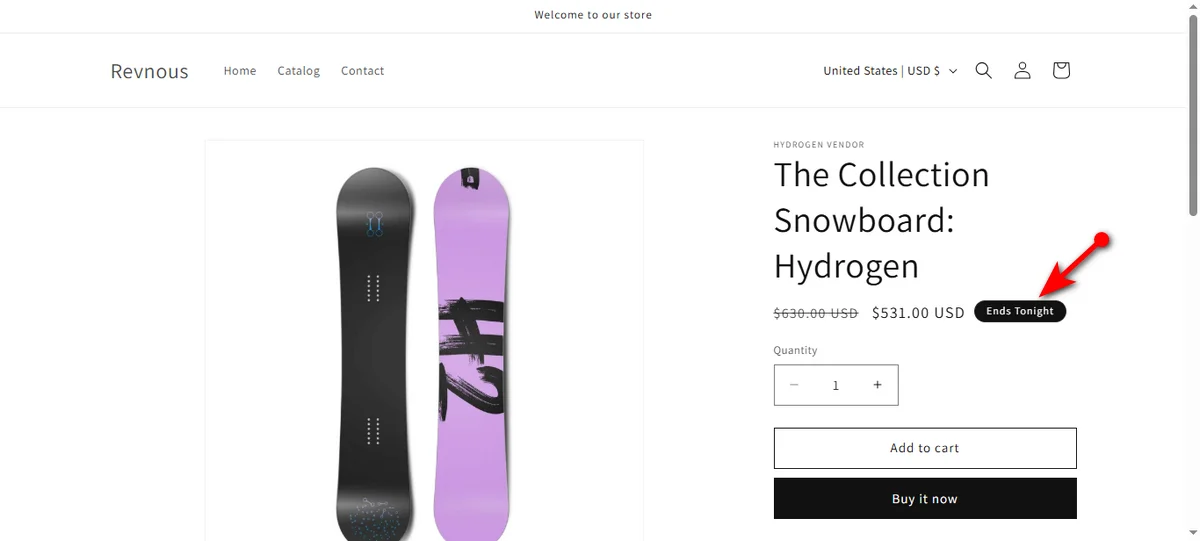
Now, visit a product page with a sale badge and you’ll see the custom sale badge label.
Change Badge Color and Position (Standard Themes)
Go to "Online Store," find your active theme, and click the "Edit theme" button.
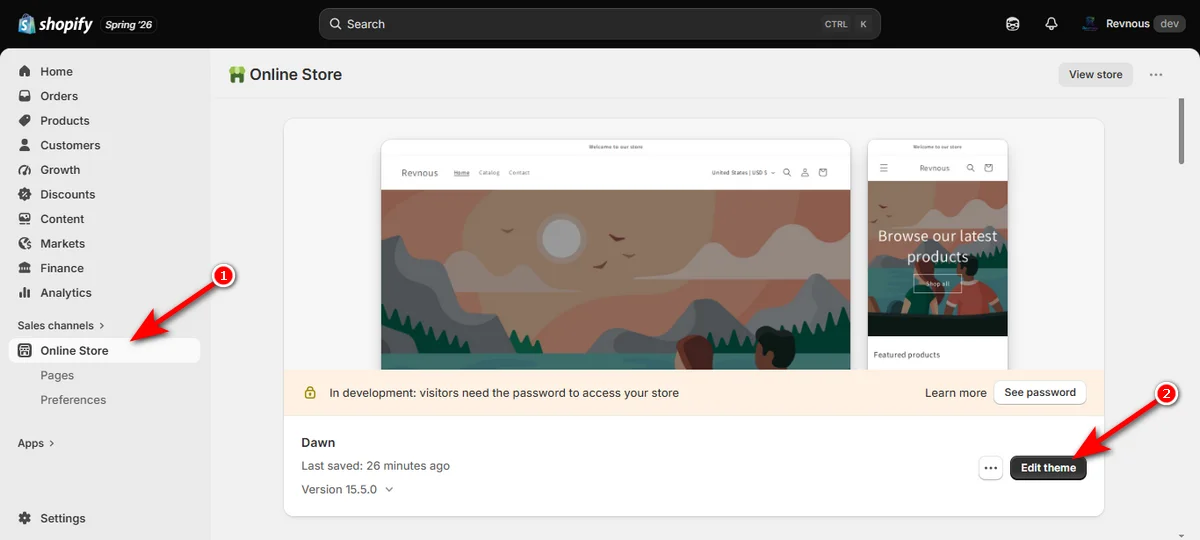
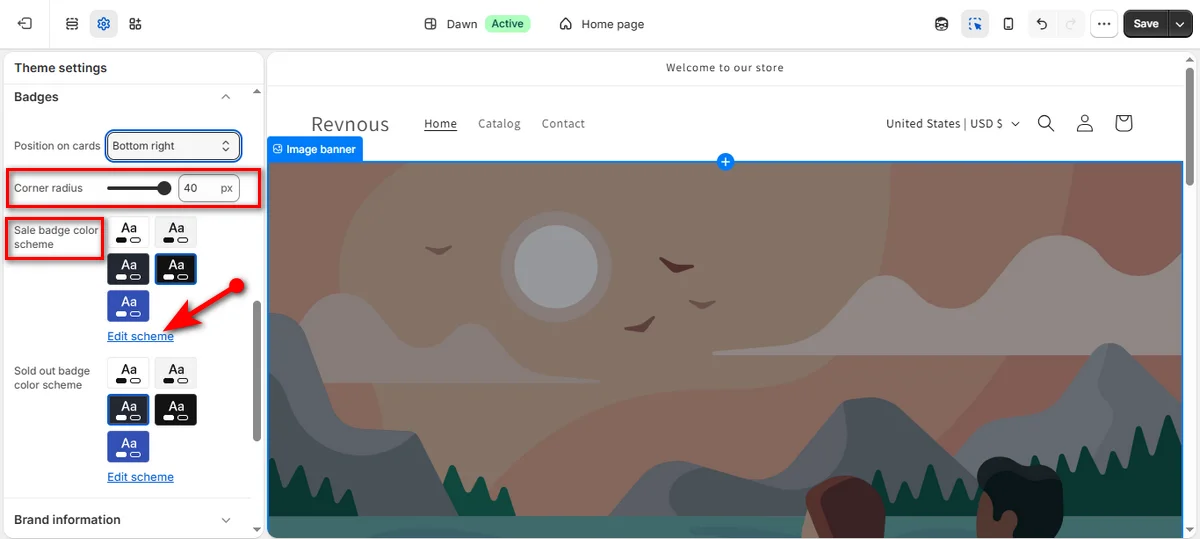
Look at the left sidebar menu, and click the gear icon (Theme settings) near the top left corner.
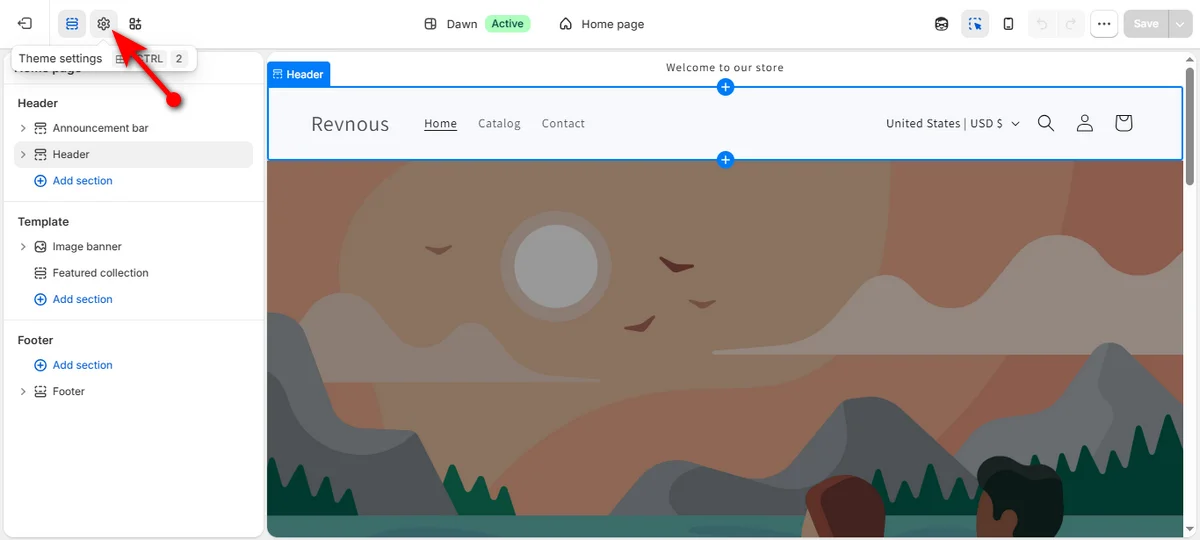
Scroll down the left menu and click 'Badges.'
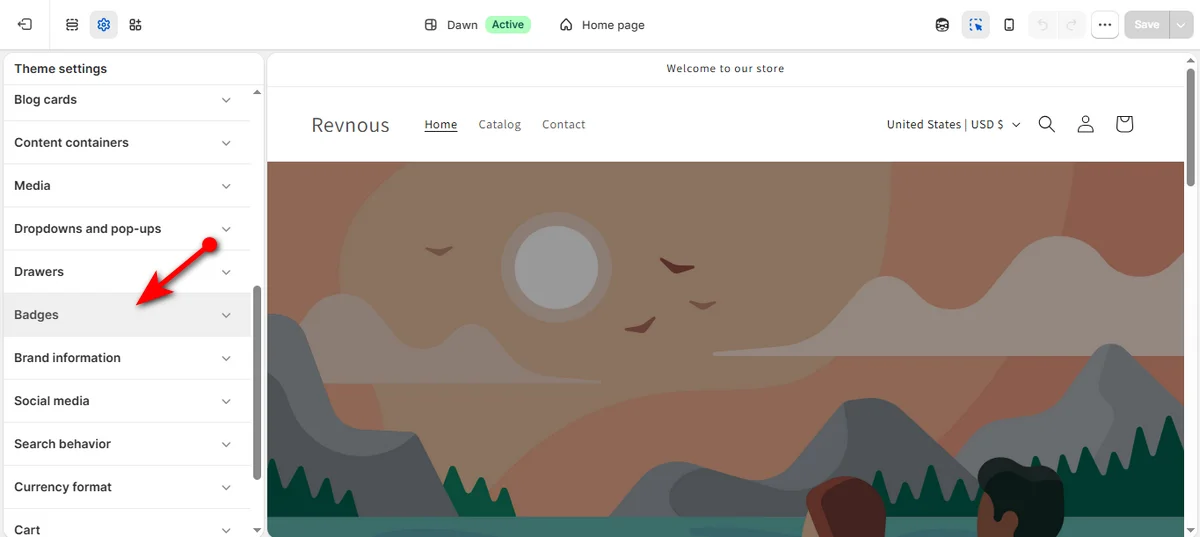
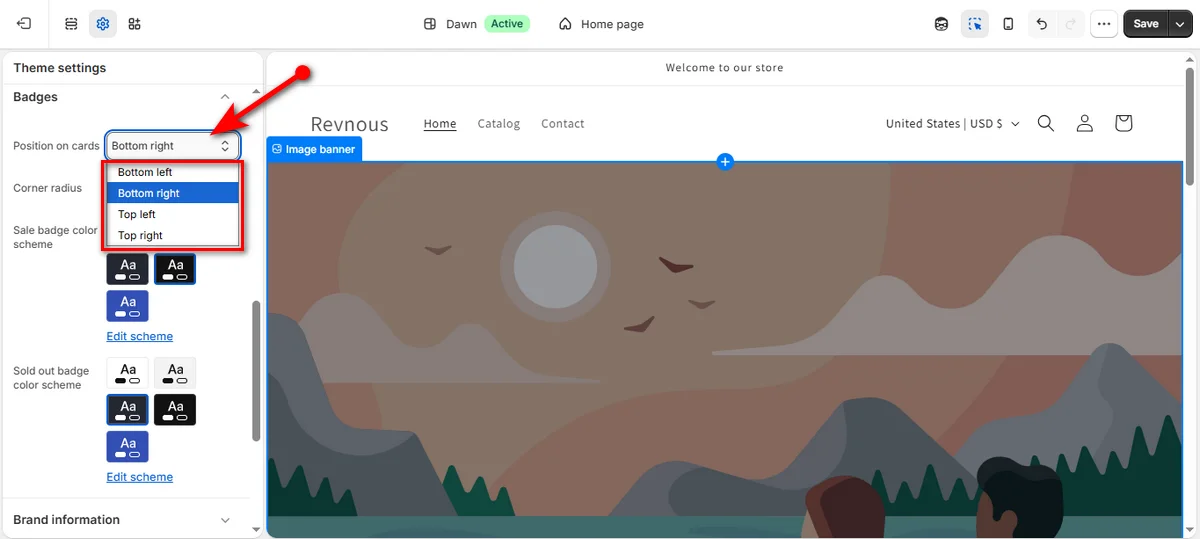
Click the "Position on cards" dropdown menu to change the sale badge position: “Bottom left,” “Bottom right,” “Top left,” or “Top right.”
Drag the "Corner radius" slider to change edge sharpness. It’s optional, though.
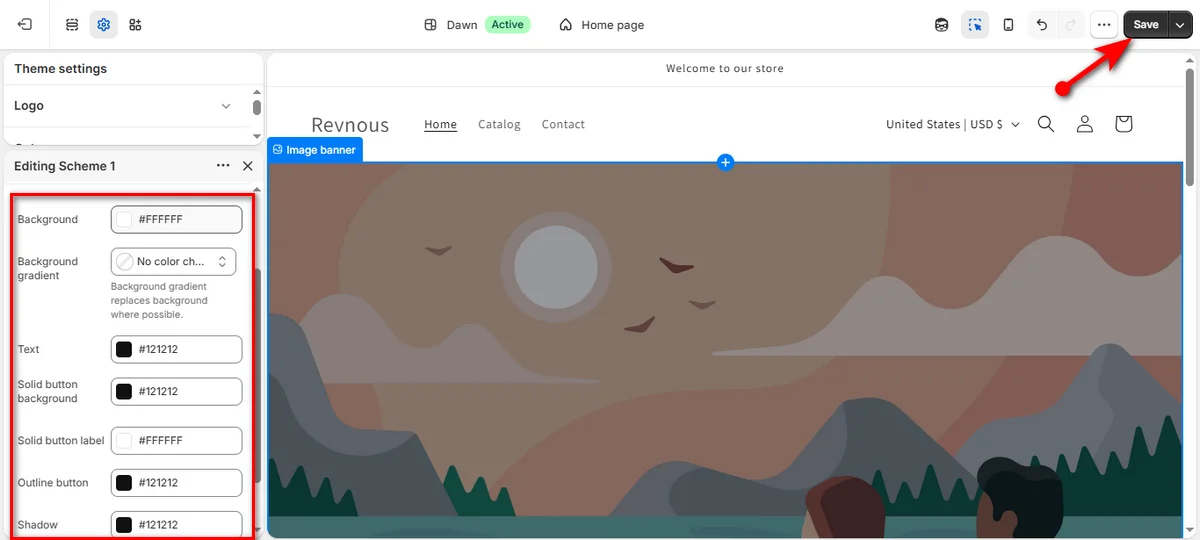
Find "Sale badge color scheme" and select a color block, or click the “Edit scheme” link below the presets.
Adjust colors for 'Background' and 'Text' inside the panel. And hit 'Save' at the top right corner.
That’s how you change the text, position, and color of a sale badge in Shopify.
Types of Shopify Sale Badges
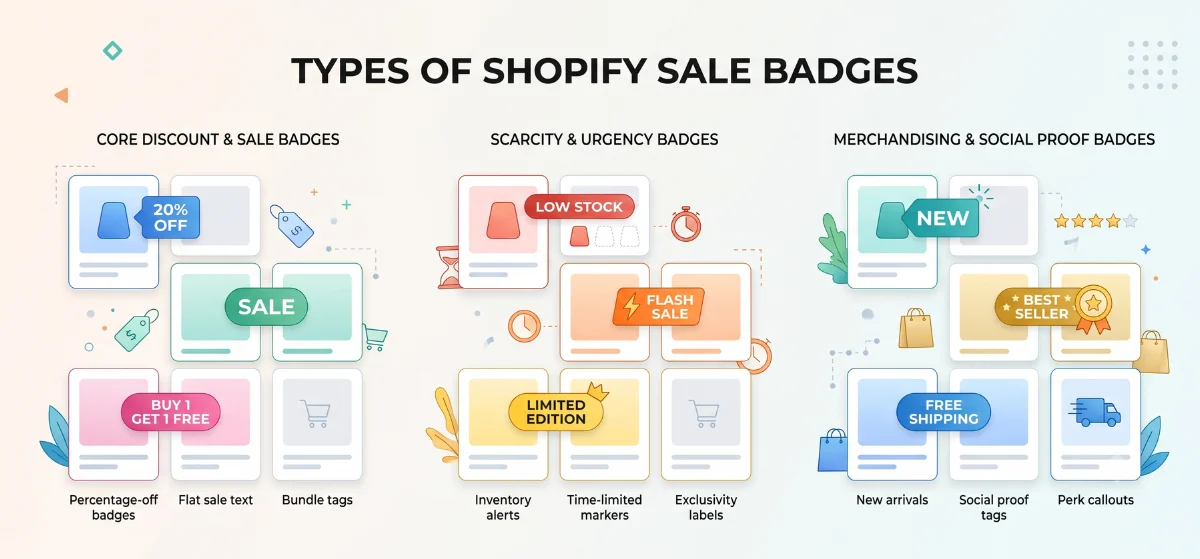
Shopify store owners use percentage labels, urgency tags, and custom text badges on product pages. These small visual markers catch eyes fast and speed up purchase decisions.
Core Discount & Sale Badges
Percentage-off badges: Show exact savings like "20% OFF" based on price differences.
Flat sale text: Display simple callouts like "Sale" or "On Sale" using default theme settings.
Bundle tags: Highlight special volume deals such as "Buy 1 Get 1 Free" or "Save on Sets."
Scarcity and Urgency Badges
Inventory alerts: Push fast action with texts like "Low Stock" or "Only 3 Left."
Time-limited markers: Signal short discount windows using "Flash Sale" or "Ends Tonight."
Exclusivity labels: Flag rare products with "Limited Edition" or "Vault Item."
Merchandising & Social Proof Badges
New arrivals: Highlight fresh stock using simple tags like ‘New.’
Social proof tags: Mark crowd favorites with "Best Seller" or "Top Rated."
Perk callouts: Spotlight store incentives using "Free Shipping" tags.
Where Sale Badges Appear in Shopify
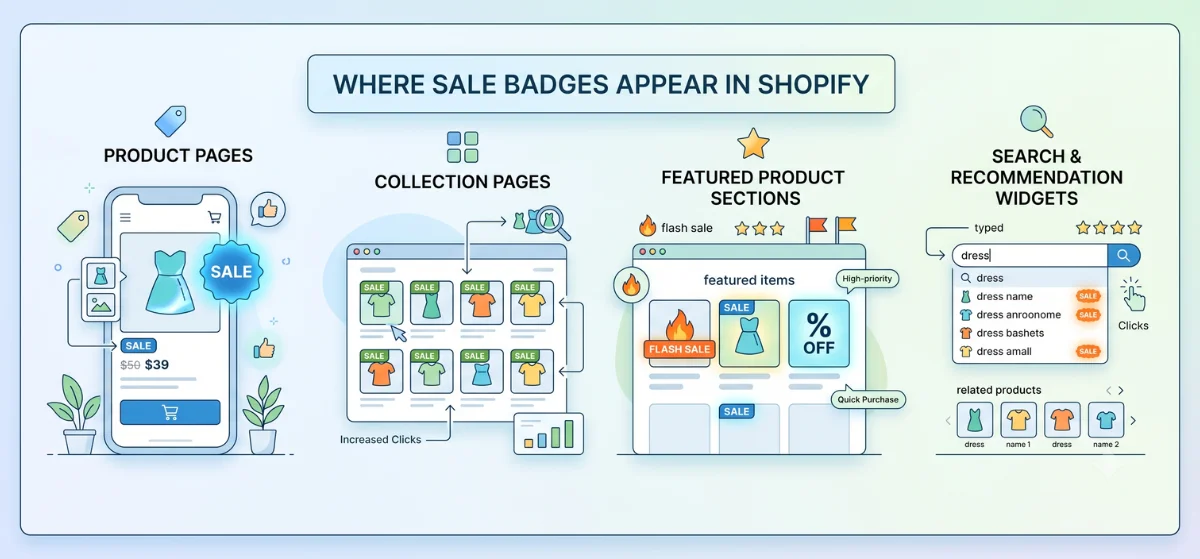
Sale badges can appear in several locations across a Shopify store.
Product Pages
Product pages are the most common location for Shopify sale badges. Here, the badge reinforces the discount next to the price and encourages purchase decisions.
Many stores place badges near the product title, price, or image gallery to make discounts visible immediately.
Collection Pages
Collection pages are one of the most important areas for sale badges because customers compare multiple products at once.
A visible badge on collection pages helps discounted products stand out before customers even open the product page.
This is especially useful during seasonal campaigns where shoppers browse quickly.
Featured Product Sections
Featured product sections often appear on homepages and landing pages. Adding sale badges here increases visibility for high-priority promotions.
Stores often use this placement to highlight:
Best-selling discounts
Flash sale items
Seasonal collections
Search and Recommendation Widgets
Search results and recommendation widgets also benefit from sale badges.
Customers often interact with related products or predictive search suggestions. Sale labels in these areas improve click-through rates by highlighting discounted items instantly.
Best Practices for Shopify Sale Badges
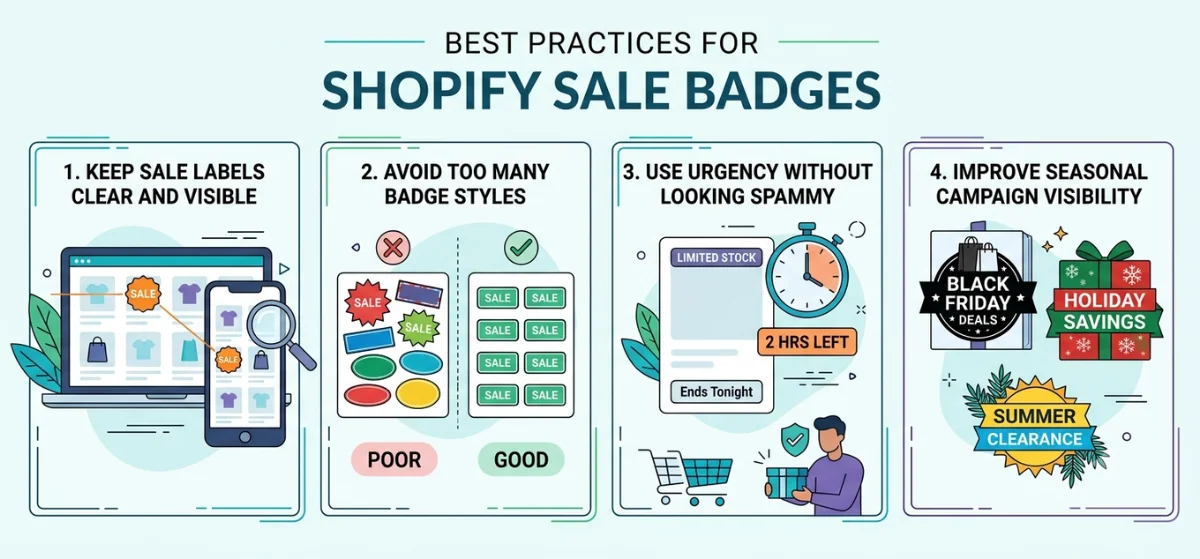
Strong sales badge design improves visibility without overwhelming customers.
Keep Sale Labels Clear and Visible
A sale badge should be easy to notice within seconds.
Small or hidden labels reduce effectiveness, especially on mobile collection pages.
Avoid Too Many Badge Styles
Too many colors and badge designs create visual clutter. Consistency improves trust and keeps the storefront professional.
Use Urgency Without Looking Spammy
Urgency works best when it feels realistic.
Labels like “Ends Tonight” or “Limited Stock” should reflect actual campaign conditions.
Fake urgency damages trust.
Improve Seasonal Campaign Visibility
Seasonal sale badges perform best when they match campaign themes.
Examples include:
Black Friday Deals
Summer Clearance
This improves campaign recognition across the store.
Wrapping Up
You now know how to add sale badge Shopify store owners use to highlight discounts. These badges draw fast attention to your best deals.
You can change text, pick colors, or remove labels anytime. Test different styles in your store today. Watch your store sales grow!
Frequently Asked Questions
- What is the Compare-at Price in Shopify?
- The "compare-at price" is your product's original or higher reference price. Shopify crosses it out next to the lower sale price. This shows shoppers exact discount savings instantly.
- Can I Customize the Sale Badge Text in Shopify?
- Yes, you can easily change badge text. Use Shopify's built-in theme language settings, edit theme code, or install third-party apps for total control.
- How Do I Add a Percentage-Off Badge in Shopify?
- Check your theme settings first. Some themes offer built-in options. Otherwise, edit theme code with a quick math snippet or install a third-party app.
- Why is My Shopify Sale Badge Not Showing?
- Your sale badge stays hidden if you don’t set the Compare-at price. Automatic discounts, code promotions, or disabled theme settings can also block the badge from displaying.


Ready to Boost Your Revenue?
Join 66,000+ brands already using Revnous to drive sustainable growth